Shortcuts Tips: Uploading Images to a CDN for Blogging
Last night I went on a journey into Shortcuts and API requests while trying to solve a problem I have in managing images for this blog. One of the limitations of Squarespace, my website host, is that it’s very reliant on its online editor, including for adding arbitrary images to blog posts. Adding images to posts that use Markdown blocks, as mine do, is particularly clunky.
I wanted an image solution that was Markdown-native, so that I could keep everything in the text file and adjust while in the writing flow. Shortcuts was the obvious place to turn, as it has Markdown actions, and I do many posts from an iPad. Furthermore, Shortcuts will be fully cross-platform when it comes to the Mac this fall. A few months ago, I found a shortcut by Matt VanOrmer on Peer Reviewed that seemed to solve the problem. Matt’s shortcut takes an image and uploads it to Imgur using the Imgur action included in Shortcuts. It returns the appropriate HTML for pasting into a text editor.
This solution was good for a while, but I always felt a nag in the back of my mind that I didn’t have any control over what Imgur did with the image files. The hotlinks could suddenly stop working, seeing as using Imgur as a Content Delivery Network (CDN) wasn’t kosher with their Terms of Service. I needed a solution that I could control and rely on before getting too far down the road. I knew I needed to find a traditional CDN.
After some research, I found ImageKit.io which promises fast delivery, has a generous free plan, and an API. I’d heard about using APIs with Shortcuts, but never delved into using them myself. I quickly created an account and located my private API key; it was time to put the rubber to the road.
Below, I give you the full saga so that if you, too, are just starting to make more advanced shortcuts, you can learn from my mistakes. If you’d rather skip right to the goodies, here are the Upload to ImageKit and Upload Image to Text shortcuts that I created.
UPDATE: These two shortcuts have since been streamlined into one standalone shortcut.
Using the Get Contents of URL Action
I knew that the key to making API calls in Shortcuts laid within the Get Contents of URL action, so I started there.
Luckily ImageKit’s documentation for a server-side upload was clear about that first endpoint URL: https://upload.imagekit.io/api/v1/files/upload. That’s where I needed the file to end up.
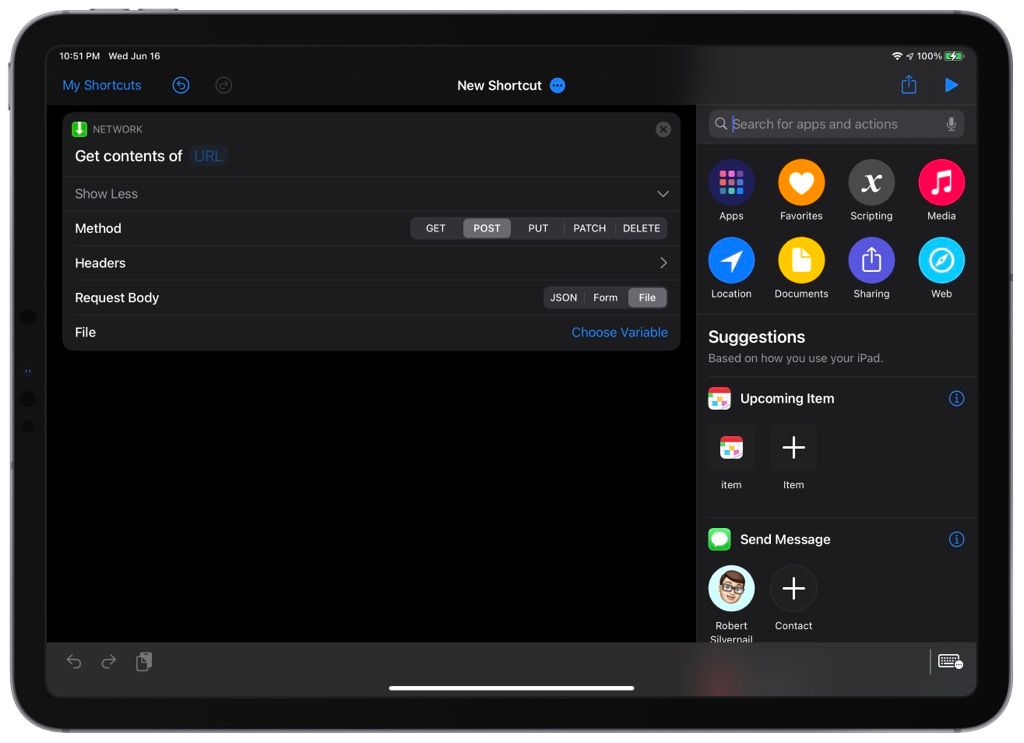
I wanted to post a file to CDN, so I chose POST as the Method, and File as the Request Body. I immediately ran into a wall: I couldn’t figure out how ImageKit’s parameters fit into the Headers and Request Body. I scoured the internet for screenshots or explainers for making a similar API request. Surely someone else had used ImageKit for this or showed how they upload images to a CDN via Shortcuts. I couldn’t find anything in all the usual places, but this YouTube video did come close.
Many trials of guess-and-check later, I was still banging my head against the wall. The shortcut was reaching ImageKit, but always returned an error about missing the fileName parameter or incorrect authorization. I had to be missing something simple.
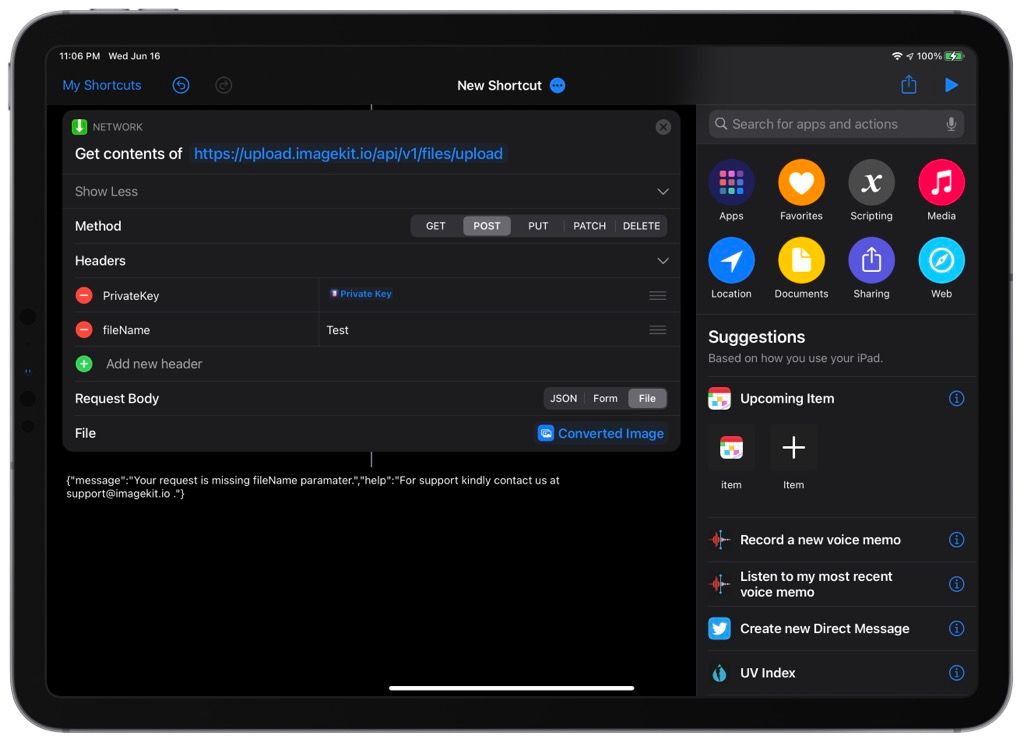
I was. It turns out that Headers are primarily for authorization, and require specific formatting. The Request Body is where other parameters should go.
Parsing ImageKit’s documentation with my non-technical eyes (what the heck is a cURL?), I realized that I needed to use Authorization as the key, and Basic username:password as the value for that key. Username is the private API key, and there is no password. I also needed to Base64 encode that user:password string, which, luckily, is trivial in Shortcuts using the Base64 Encode action.
By using Form (not File as I originally guessed) for my Request Body, I was able to add file and fileName for my required parameters, and used variables generated by the shortcut for their values. More on those variables below.

Finally, I had success. Shortcuts didn’t error out, and I was able to see my test image in my ImageKit library. Huzzah!
Click here for a screenshot of the full shortcut.
Building Out the Rest of the Shortcut
File Variable - I’m a proponent of building many individual shortcuts as building blocks so that they can be called by multiple other ones. That’s how I typically use this shortcut; I call it as a Run Shortcut action in an adapted version of that Imgur Uploader shortcut that I got from Peer Reviewed. That shortcut does some heavy lifting by getting the image, preparing it for the web by converting it to JPEG, resizing, and then passing it to the Upload to ImageKit shortcut as its input variable. That shortcut also takes the URL returned by this one and gives me a few options for formatting it (plain URL, HTML image, or Markdown image).
Auth (Base64) Variable - I’m using the app Data Jar to store my private key. That way, I can reference it across multiple shortcuts and have only one place to change it if needed. Plus, I can freely share this Shortcut without revealing the key. However, you could just paste your private key directly into the first Text action and remove the Data Jar action altogether. Just don’t forget the colon (:) at the end of your private key to satisfy the user:password format that the API expects.
File Name Variable - ImageKit needs a name for each file uploaded to the library. I enter one in an Ask For Input action, but with the default text set to the file’s existing name. That speeds things up if the file is already named on my device.
Output - A shortcut is only as good as the output, so when Get Contents of URL returns some JSON, you need to do something with it. I used the Get Dictionary Value action to specify that I wanted to get the value for the url key out of the JSON. This is the direct link to the item just uploaded, which is ultimately what I need so that it can be formatted into a Markdown image link.
Checking for Errors - Since I’m running this shortcut from the Share Sheet most often, I need some indication if something goes wrong. The final action returns an alert if I don’t get a URL back from ImageKit.
I hope you enjoyed going on this journey with me. Despite some initial frustration, I enjoyed learning more about making web requests, and how these actions work together. I plan to share more Shortcuts tips as I learn!
Get the Upload to ImageKit shortcut (Original Version) →
Get the Upload Image to Text shortcut (Original Version) →
UPDATE: I have since streamlined these two shortcuts into one. The latest version can be found on RoutineHub.
I’m new at this, so please forgive me if I used some technical language incorrectly here.