How to Automatically Cross-Post from Instagram to Micro.blog with Make.com
This blog post is adapted from a post I made to Micro.blog’s Help Center. It’s posted here for posterity.
I’ve been kicking the tires on Micro.blog lately. I’ll have more to say on the subject soon, but the gist of my interest is that owning each of my homes on the internet — including social media — is very appealing. But I’m not yet ready to abandon the friends and relationships I’ve made on Twitter and Instagram. Micro.blog has a handy guide for importing old Instagram posts, but not new stuff. So I’ve been looking for a way to get new posts from Instagram to Micro.blog automatically. The two established ways were non-starters for me. Zapier requires a costly premium subscription to use the necessary Webhook action. And it sounds like OwnYourGram is being hamstrung by Instagram and won’t work for new users, if at all.
So I created a solution myself!
Enter Make.com
After recreating the Zapier recipe using this post as a guide, I found it would cost $19.99 per month to use the premium actions. So I looked for a more cost-effective solution, remembering something called Integromat was an up-and-coming Zapier/IFTTT competitor.
Integromat is now Make.com and has a much more generous free tier than Zapier. After five modules and lots of trial-and-error, I got a working scenario (as Make calls them) that works as a (relatively) simple and free way to cross-post from Instagram to Micro.blog and retain control over that aspect of your social posting.
See the results for yourself: Here’s an Instagram original and the same post on my microblog posted automatically using this scenario.
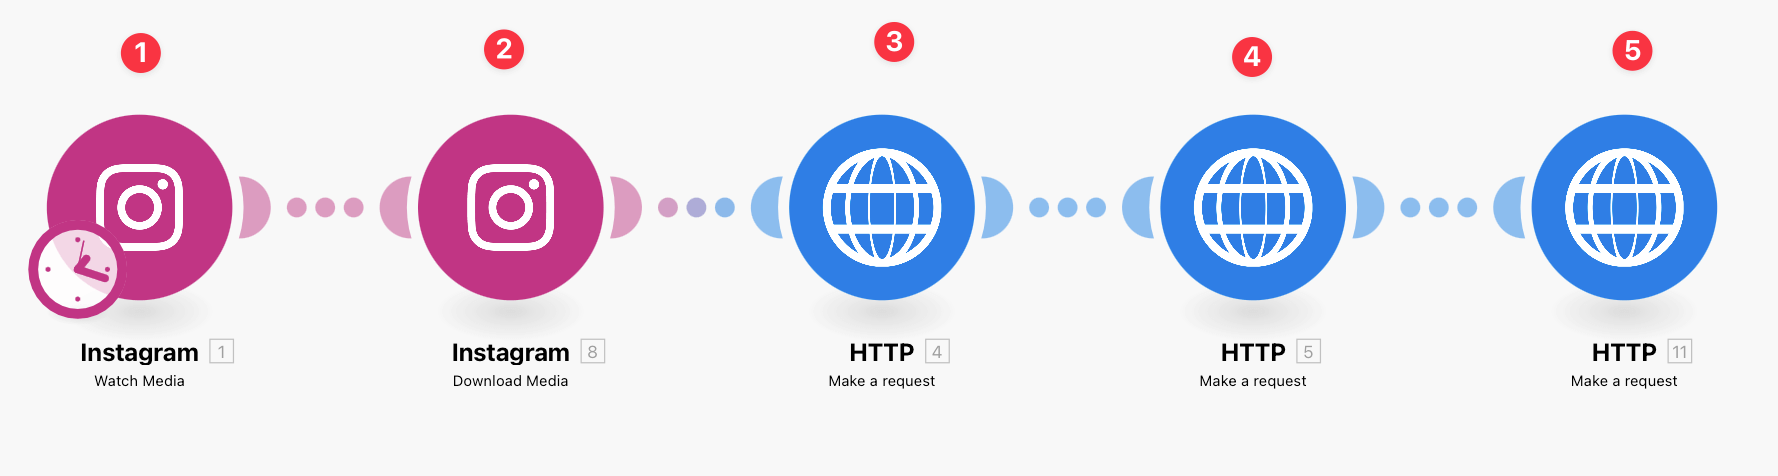
How It’s Made
Note that you may need to run each module individually as you build it to make the necessary fields available to map in later modules. This was the trickiest part for me since it didn’t want to pass the latest Instagram post along more than once.
(Step 1) Watch Media from Instagram
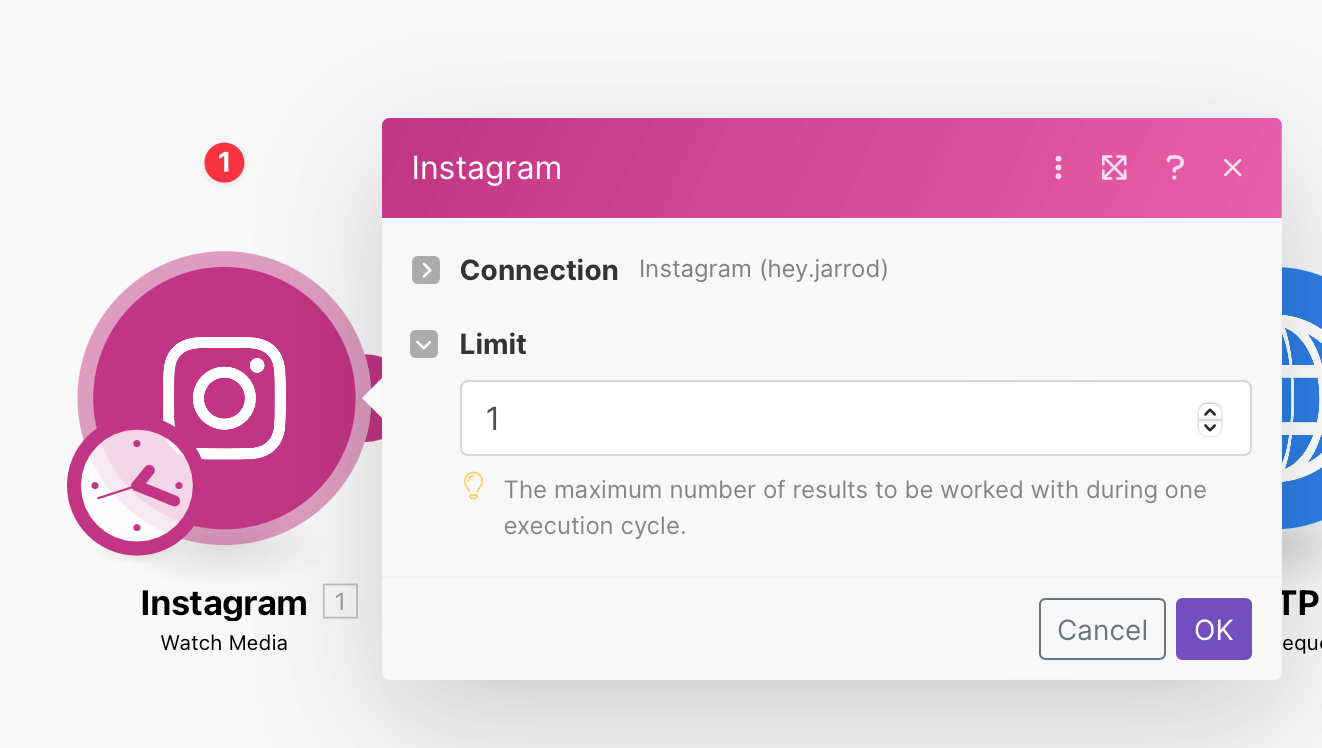
This first module connects to your Instagram account and watches for new posts. It collects information about the post when it runs.
(Step 2) Download Media from Instagram

Next, map the Media ID from Step 1 so it can hold onto the image for later modules.
(Step 3) Make an HTTP GET request
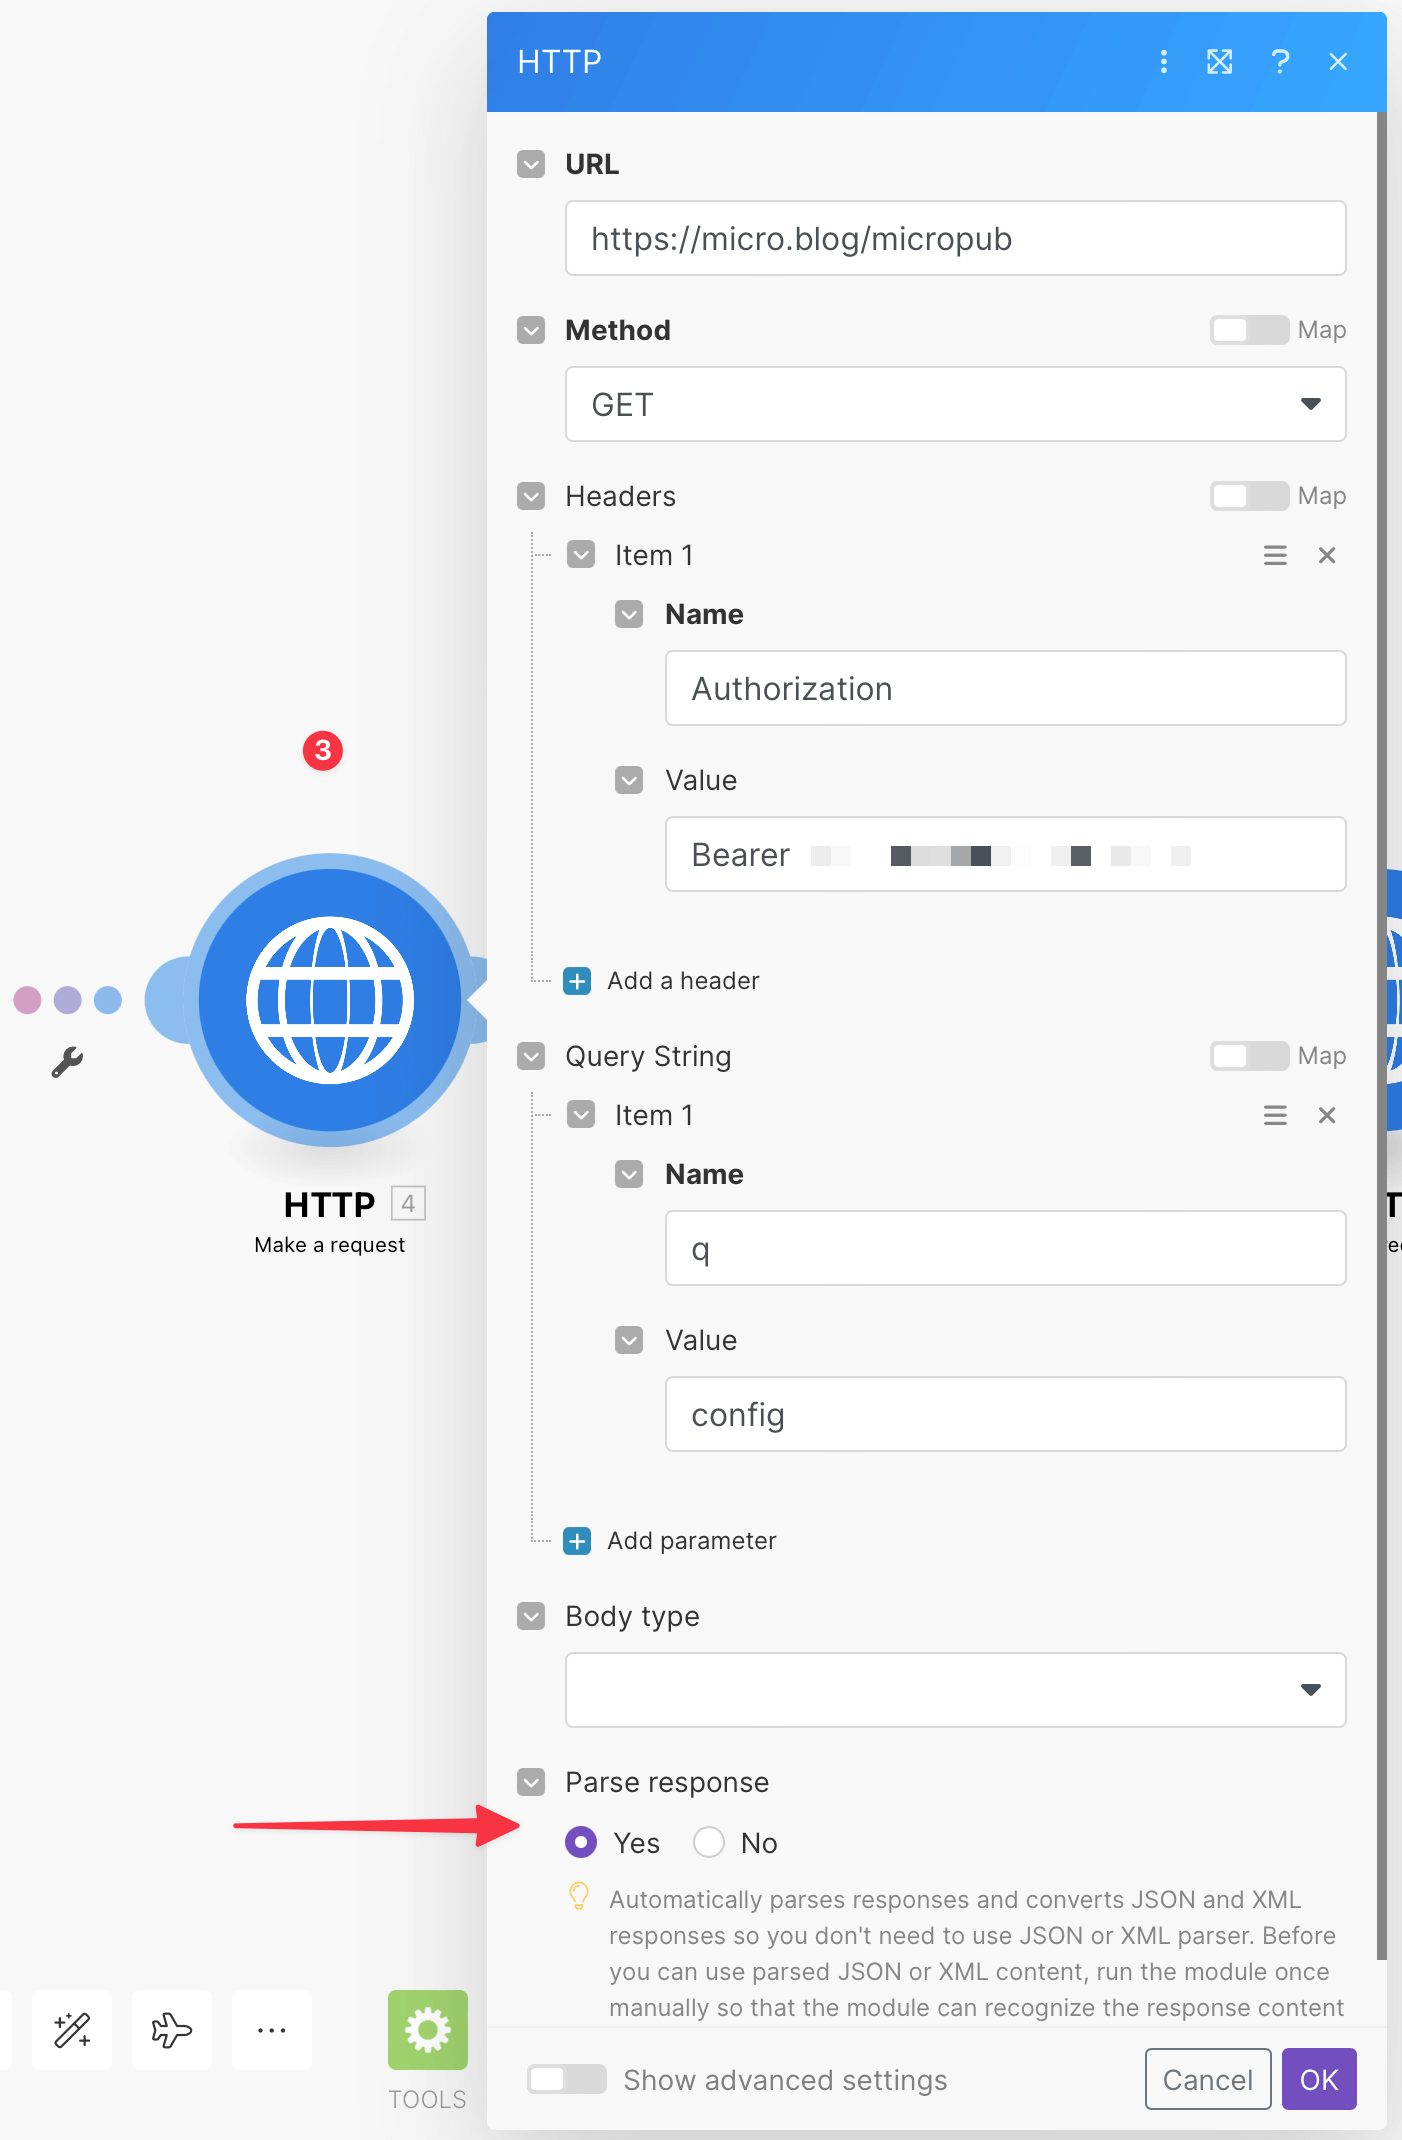
Use the https://micro.blog/micropub URL, GET Method, and for Headers, make sure you leave just one space between “Bearer” and your Access Token generated from your Micro.blog account settings. The Query String name and value are q and config And don’t forget to switch ‘Parse response’ to Yes so you can get the granular bit you need for the next module.
I’m actually not convinced this step is necessary since we know the media-endpoint URL will be https://micro.blog/micropub/media, but the their API documentation recommends it.
(Step 4) Make an HTTP POST request
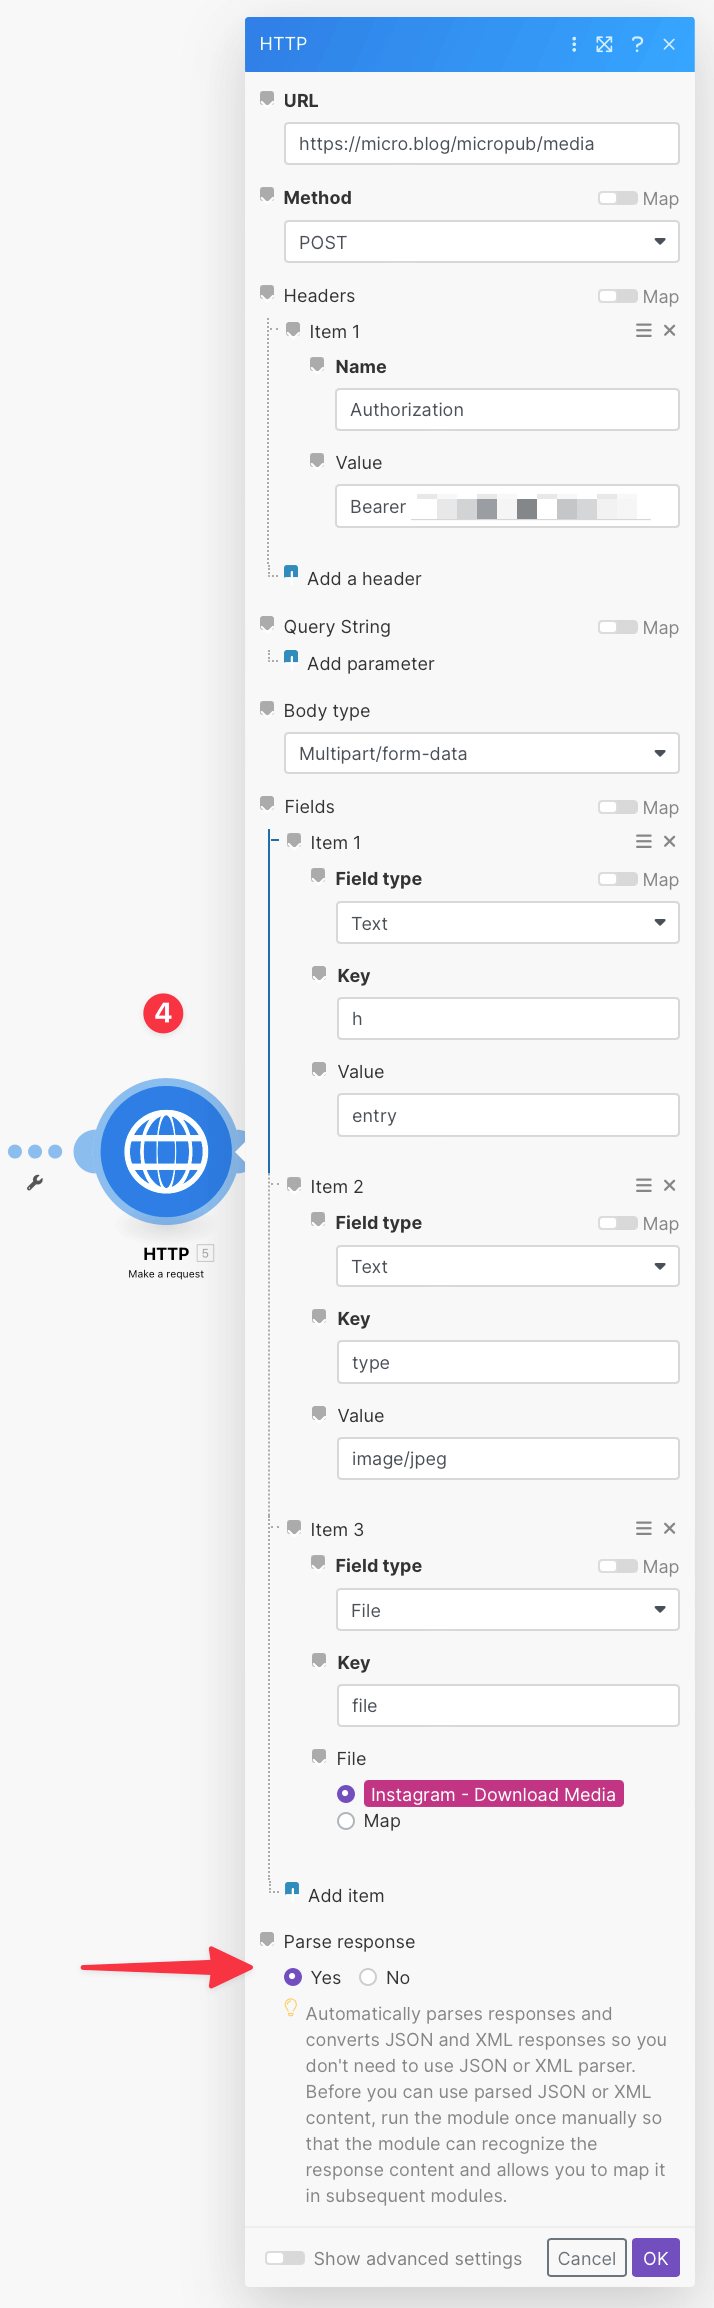
Here’s where it’s a little complicated. For the top URL field, https://micro.blog/micropub/media will do, or map it from the previous module. Use the POST method. Headers are the same as in Step 4. You’ll select ‘Multipart/form-data’ for the body type and add three fields. The first two are Text fields, with keys / values of h / entry and type / image/jpeg. The third field item is ‘File’ with the key of file. For the value, you’ll select the Download Media we got in Step 2. Again, select Yes for ‘Parse Response’.
In the screenshot, you’ll notice that I didn’t use the data parsed from Step 4 for the URL, as noted above. You can select the data: media-endpoint ingredient from the previous HTTP request module to ensure you’re always getting the correct endpoint URL.
(Step 5) Make an HTTP POST request
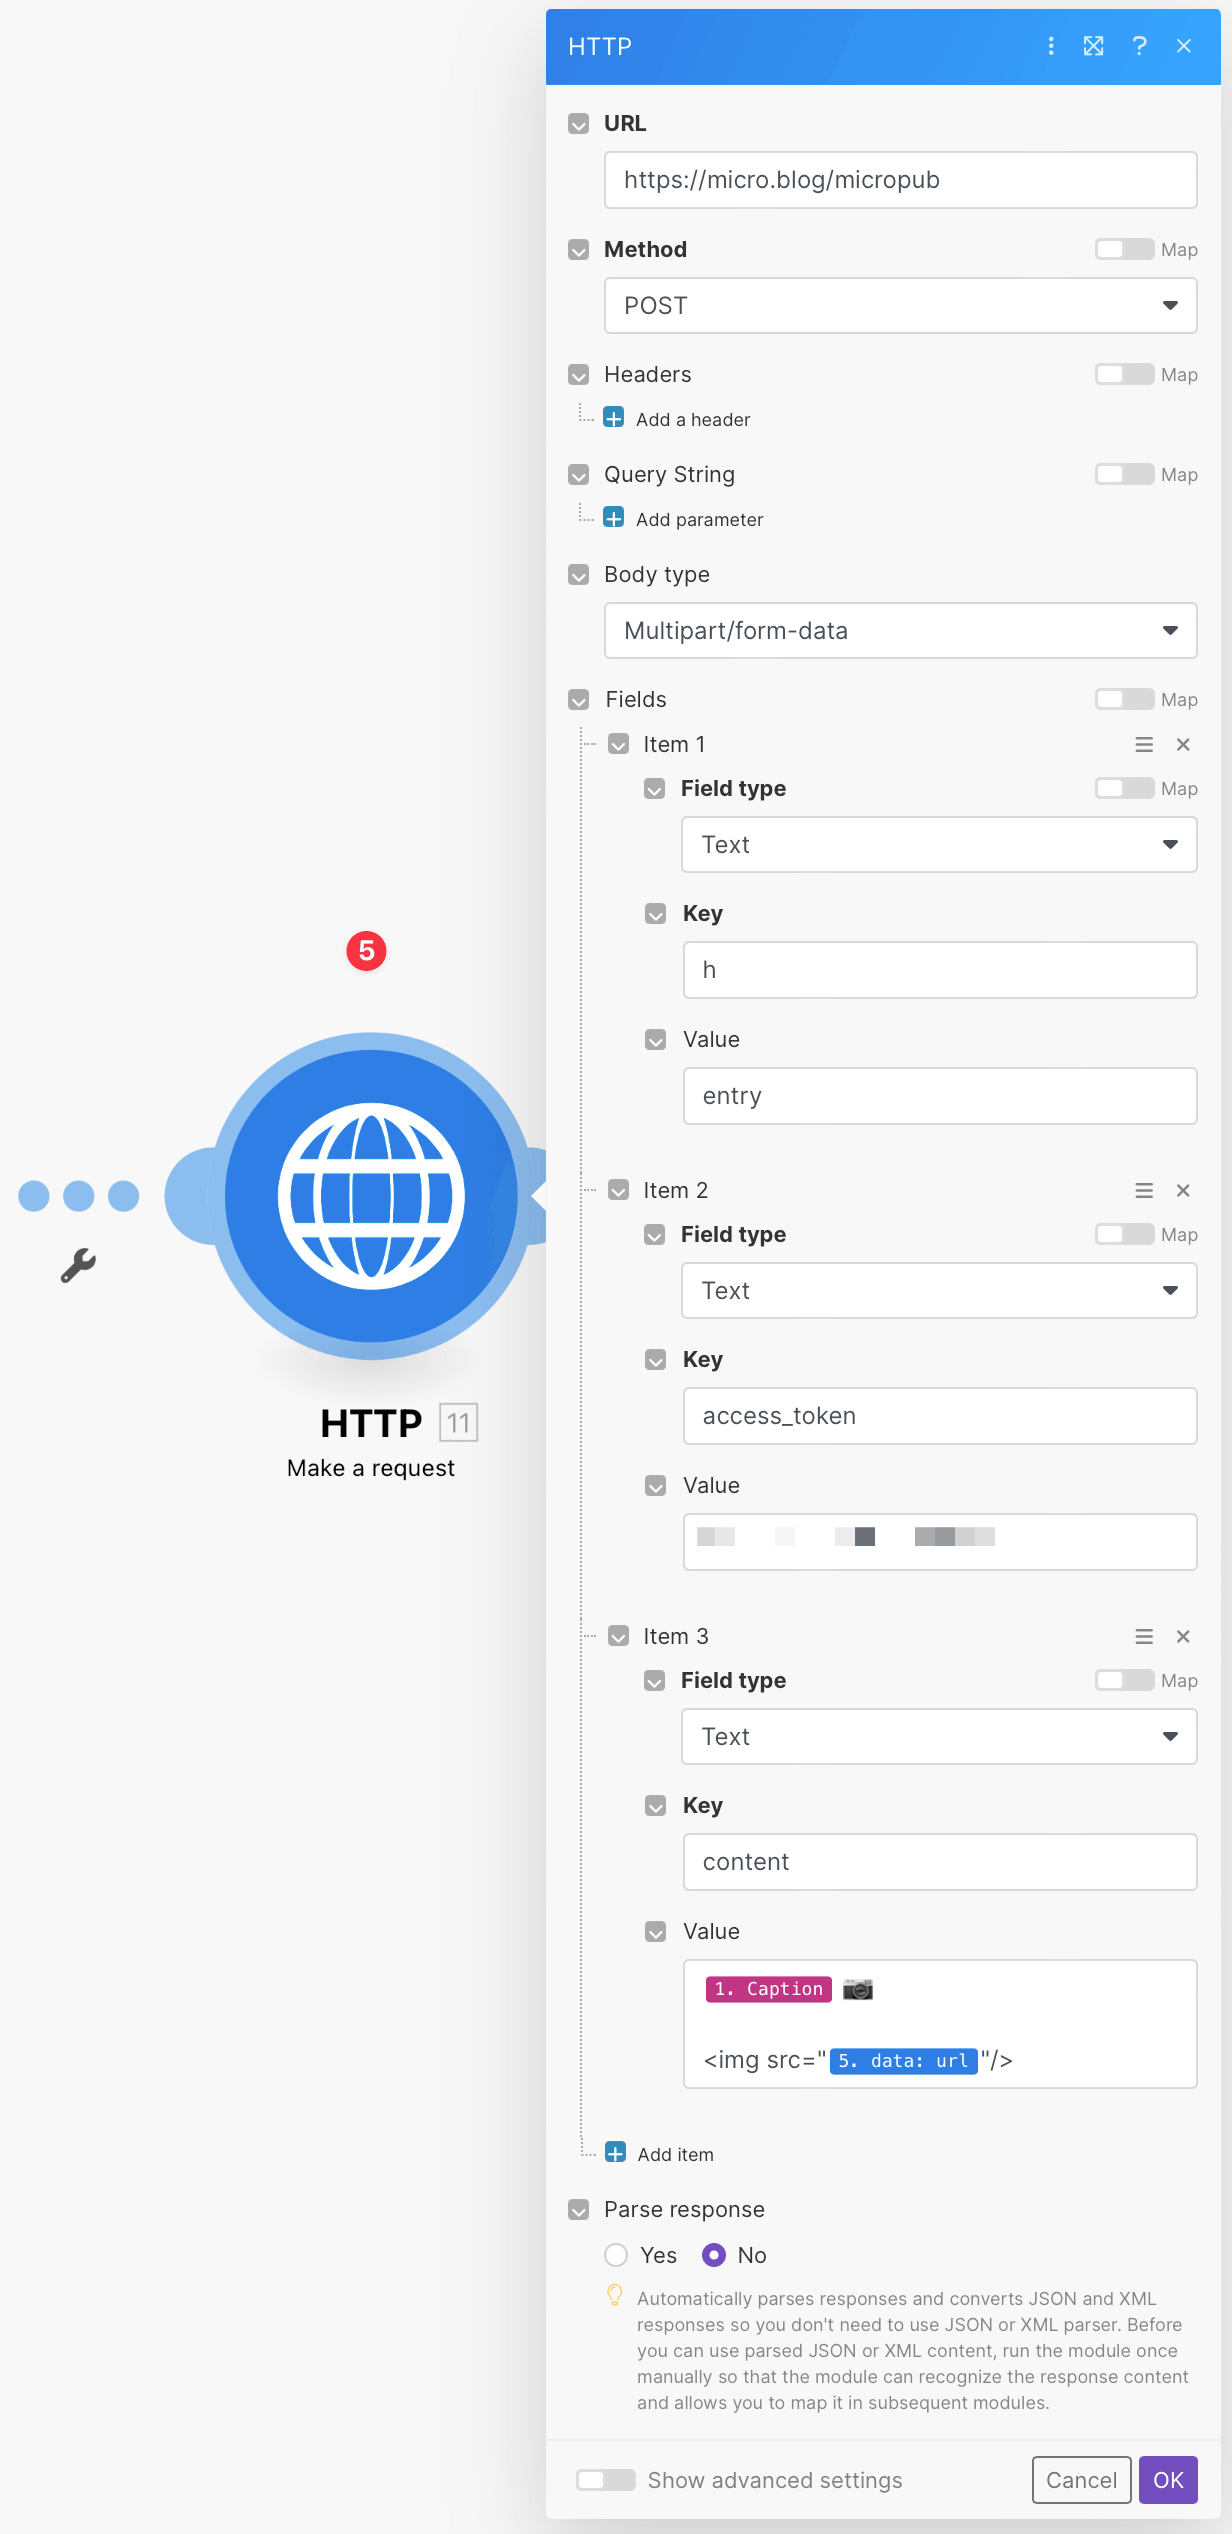
We make another POST request and reuse the https://micro.blog/micropub URL. No Headers or Query Strings are necessary this time. Body type is ‘Multipart/form-data’, and we’ll make three field items again. They’re all ‘Text’ fields this time, with keys / values of h / entry and access_token / YOURACCESSTOKEN. The third ‘Text’ item is what we’ve been aiming toward: the Micro.blog post. The key is content; for the value, you’ll type out what you want the post to look like and include the image’s new URL on Micro.blog as mapped from the result of Step 4. That’s the 5. data: url bit you see in the screenshot. You can customize this value to your heart’s delight, but I styled it with the Caption item mapped from Step 1 first, followed by the 📷 emoji, so it gets grouped by Micro.blog’s emoji tags. I left a blank line and then an
<img src="UPLOADED-IMAGE'S-NEW-MICRO.BLOG-URL.jpg"/>. This style aligns with the default formatting of image posts when uploaded directly to Micro.blog.
And that’s it! Post something new to Instagram, and then run the whole scenario as a test before turning on the scheduling feature. After scheduling is turned on, it’ll take care of posting any photos to your Micro.blog automatically. You could then use cross-posting in your Micro.blog settings to get that photo elsewhere, too.
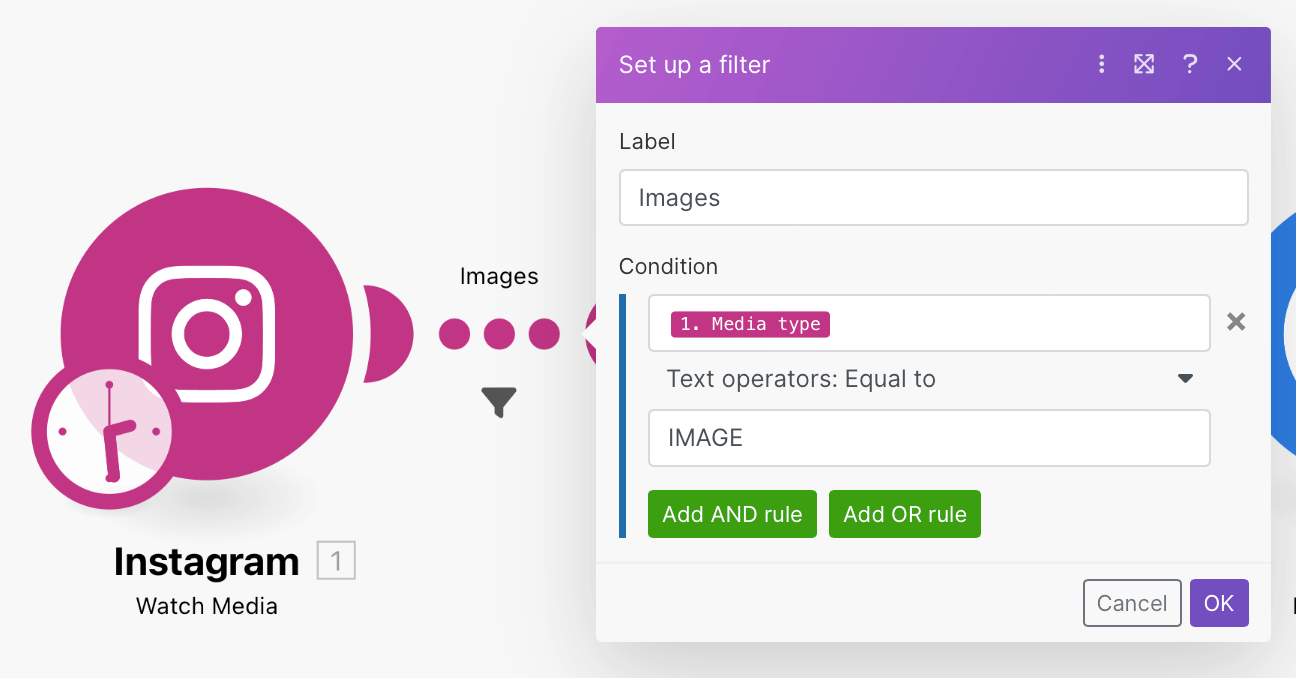
Limitation: The method described above is limited to single photo posts or just the first photo from multi-photo posts. If you want to exclude multi-photo posts and videos, add a filter after the first module that matches the ‘Media Type’ to ‘IMAGE’. Multi-photo posts (CAROUSEL_ALBUM) and videos (VIDEO) will get stopped from moving on to the next steps.
Or follow along below to split the scenario to create either a single-image post or a video post based on the Instagram media retrieved.
Going Further to Support Video Posts
Unable to leave well enough alone, I wanted to ensure that if I posted a video to Instagram, the scenario wouldn’t break. It turns out that adapting it to also fully support posting videos was pretty easy. You can add a Router module and branch off to different outcomes using filters.
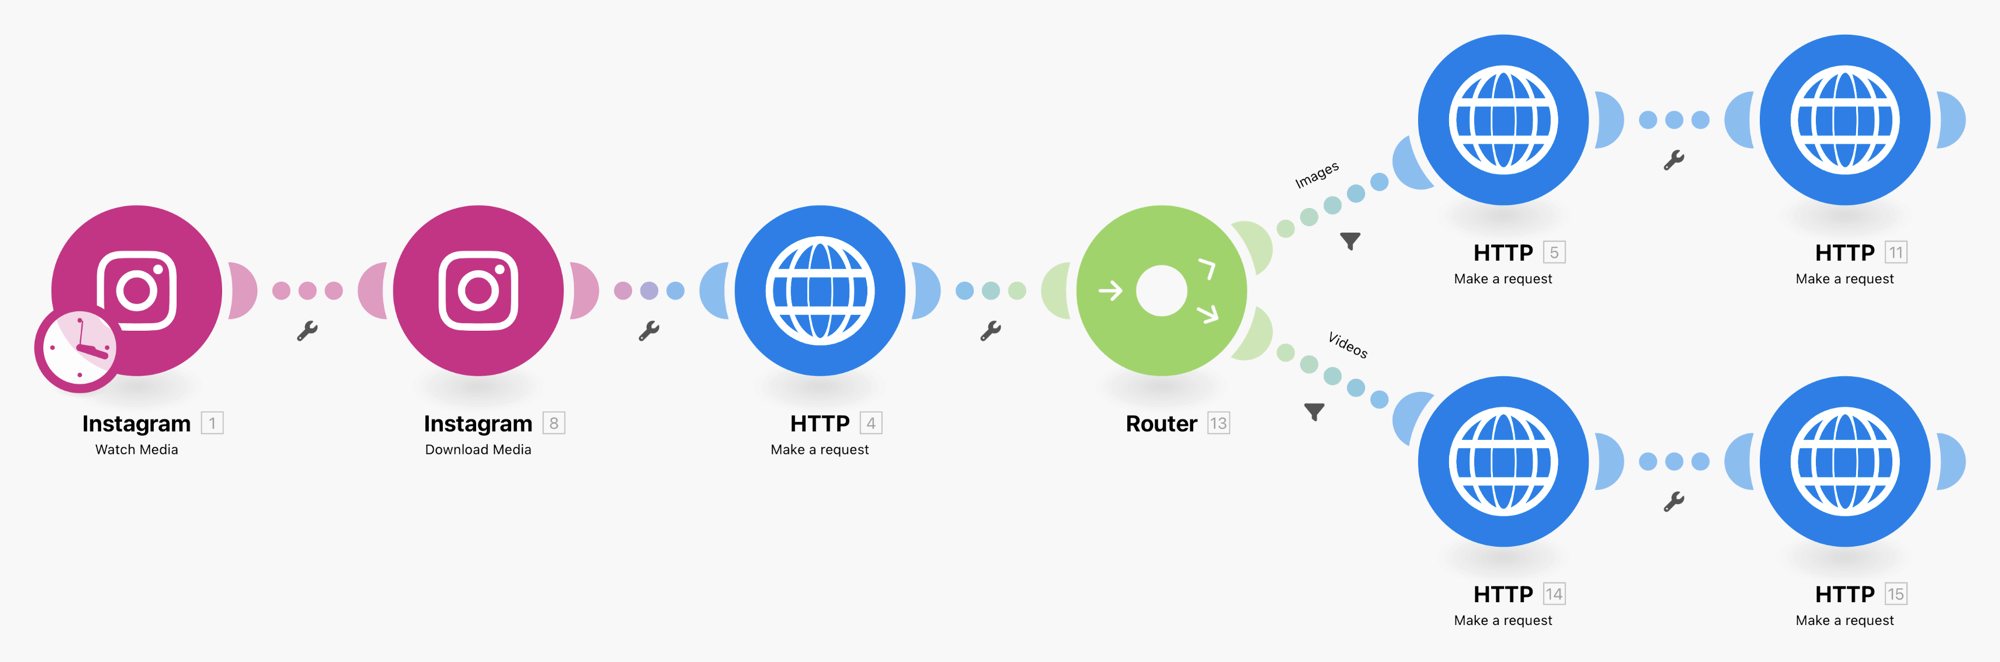
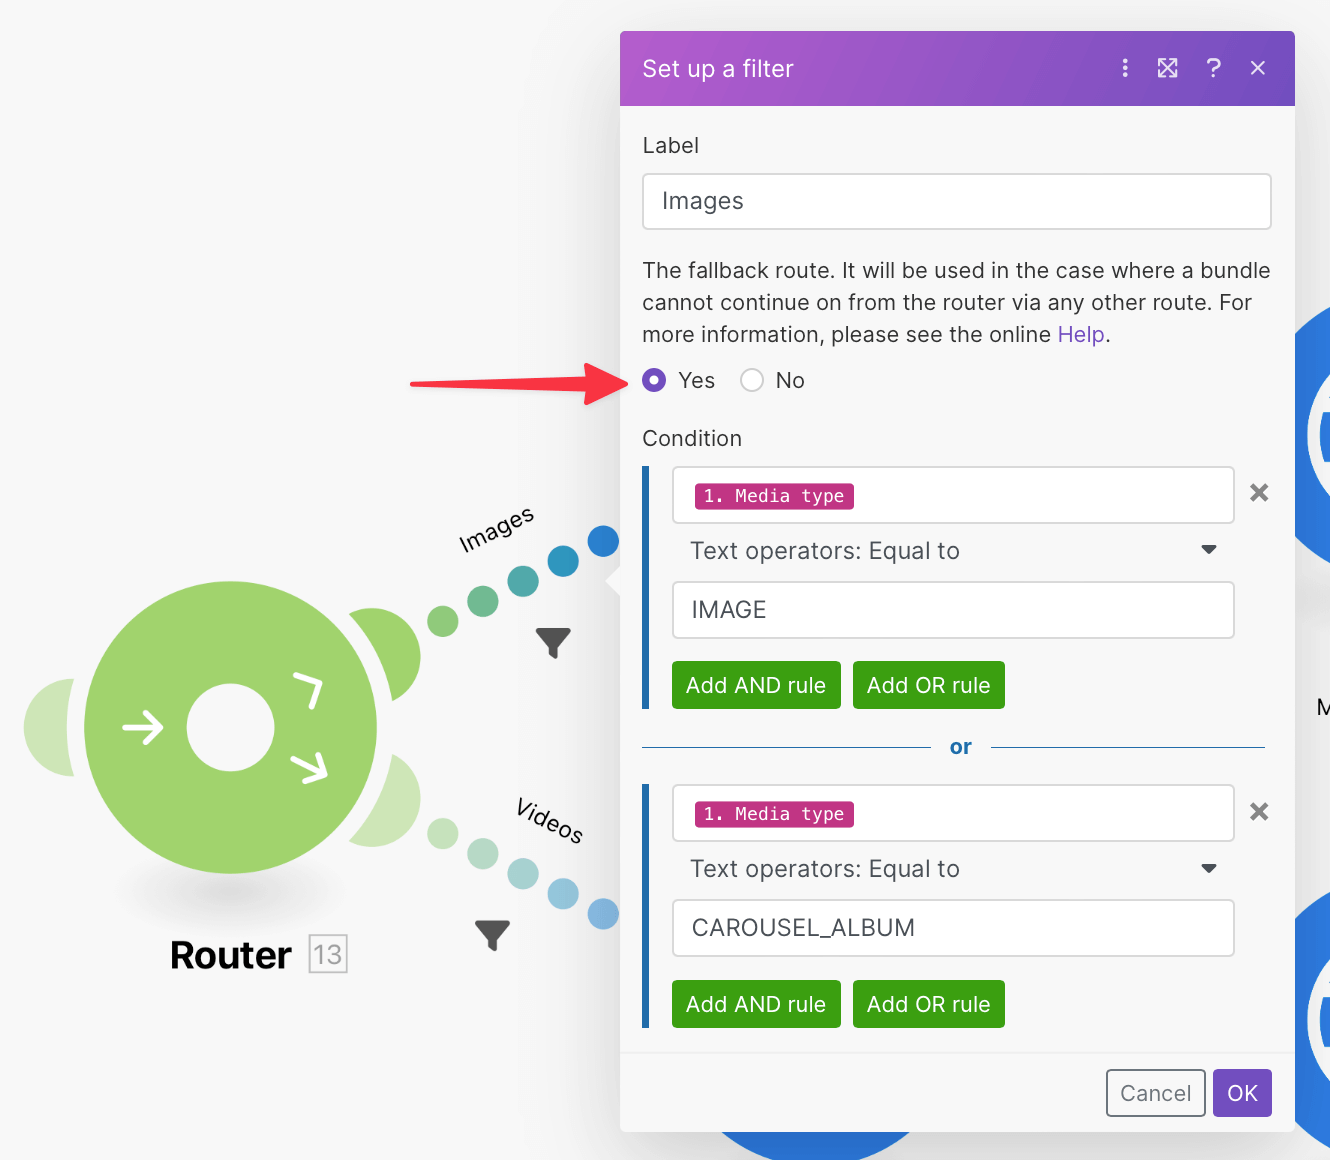
In the top route for images, I used a Filter that checks for the ‘Media type’ of either IMAGE or CAROUSEL_ALBUM and designated it as the fallback route. This ensures that at least one image will get uploaded from whatever is pulled from Instagram.
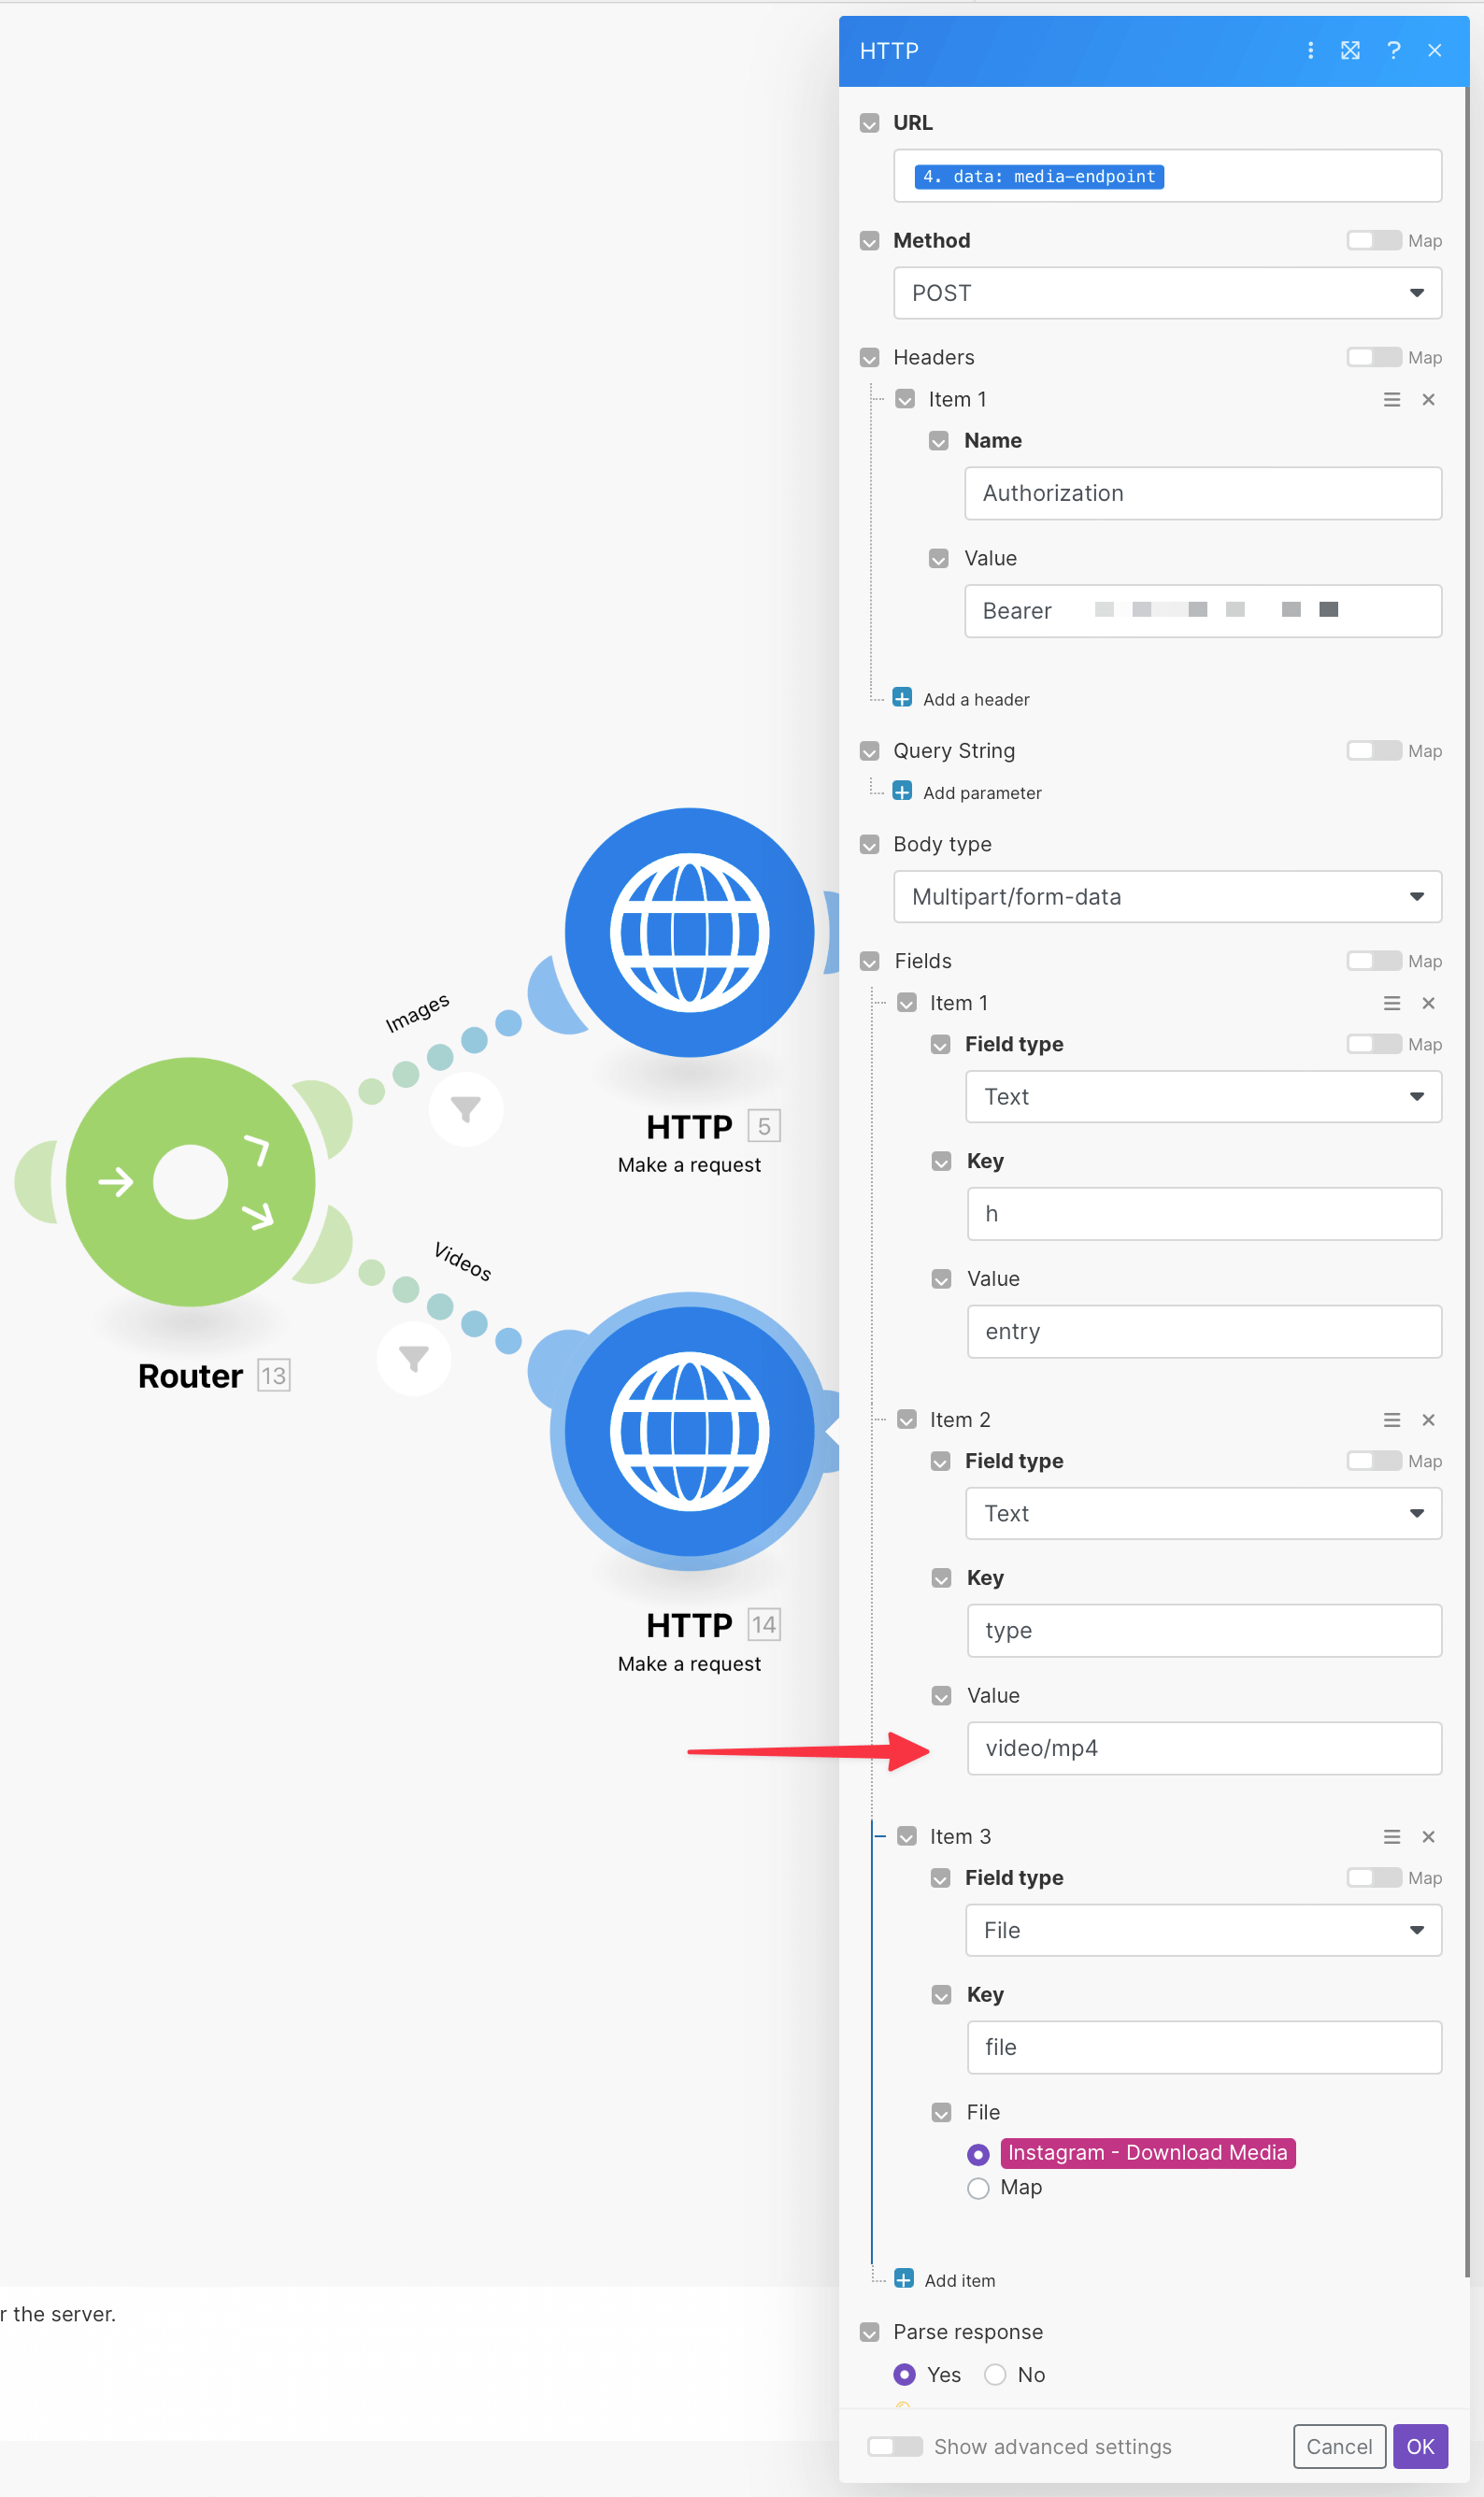
For the bottom route for videos, I added a separate filter looking for the VIDEO media type. Then I copied and pasted the HTTP requests to hook them up.

Finally, I just had to edit two fields to work with videos rather than images.
For the first POST request, video/mp4 is the new value for the type key:
Likewise, using a <video> tag, instead of the image syntax, for the content value is all you need to change:
<video>
    <source src="MICRO.BLOG_VIDEO_URL_FROM_PREVIOUS_STEP.mp4" type="video/mp4">
</video>
And that’s it! Here’s my example post and the Instagram original.
Make.com has some powerful modules and might become my new go-to tool rather than IFTTT or Zapier. Perhaps grabbing multiple photos from a CAROUSEL_ALBUM and putting them all into one Micro.blog post will also be possible, but that’s an endeavor for another time.
A big thanks to Khürt Williams, who showed the way with Zapier, and to Greg Morris for creating this shortcut, which I used to debug my GET/POST requests.

UPDATE 2024-01-03: I significantly improved this workflow and added automatic image description (alt text) generation to boot. Detailed here on the Make.com community forum.