‘Speak Screen’ was the final piece to my ideal read-it-later setup
I recently wrote about my discovery of the ‘Speak Selection’ feature in Accessibility settings. The ability to select the text of an article in Reeder, or anywhere else in the system, and have it read out loud to me while dynamically highlighting the sentence and word as they’re spoken was groundbreaking. It was the final dot to be connected to allow me to build an ideal reading workflow. I could use my preferred RSS sync service (Feedly) and reader app (Reeder), save items for later using my preferred service (Pocket1), read those saved items anywhere (Reeder on Apple devices, the Pocket website on Windows machines, my Kobo e-reader when disconnected or focused), and listen to the articles with a passable voice engine.
There was just one major point of friction. Selecting an entire article in Reeder isn’t particularly easy. It’s a two-handed affair to scroll to the bottom of the page, select the final paragraph, and then tap the top of the screen to scroll back up while still holding the text selection. Then tap ‘Speak’ in the context menu. Oh, and then I also couldn’t switch away from Reeder or turn off the screen because the narration would stop.
Tonight, I solved all those problems with a very clever workaround. And by clever workaround, I mean I happened to try the very obvious toggle beneath the ‘Speak Selection’ option in Settings: the one called ‘Speak Screen’. 🤦♂️

The Deets
Speak Screen is absolutely great. I guess I overlooked this option before because I incorrectly assumed it would start speaking out everything onscreen, such as button labels and other UI elements like it does for VoiceOver. But no, those are separate features for a reason. Speak Screen does (almost) exactly what I want it to do. With one gesture (a two-finger swipe down from the top of the screen), the system starts reading the primary content displayed.
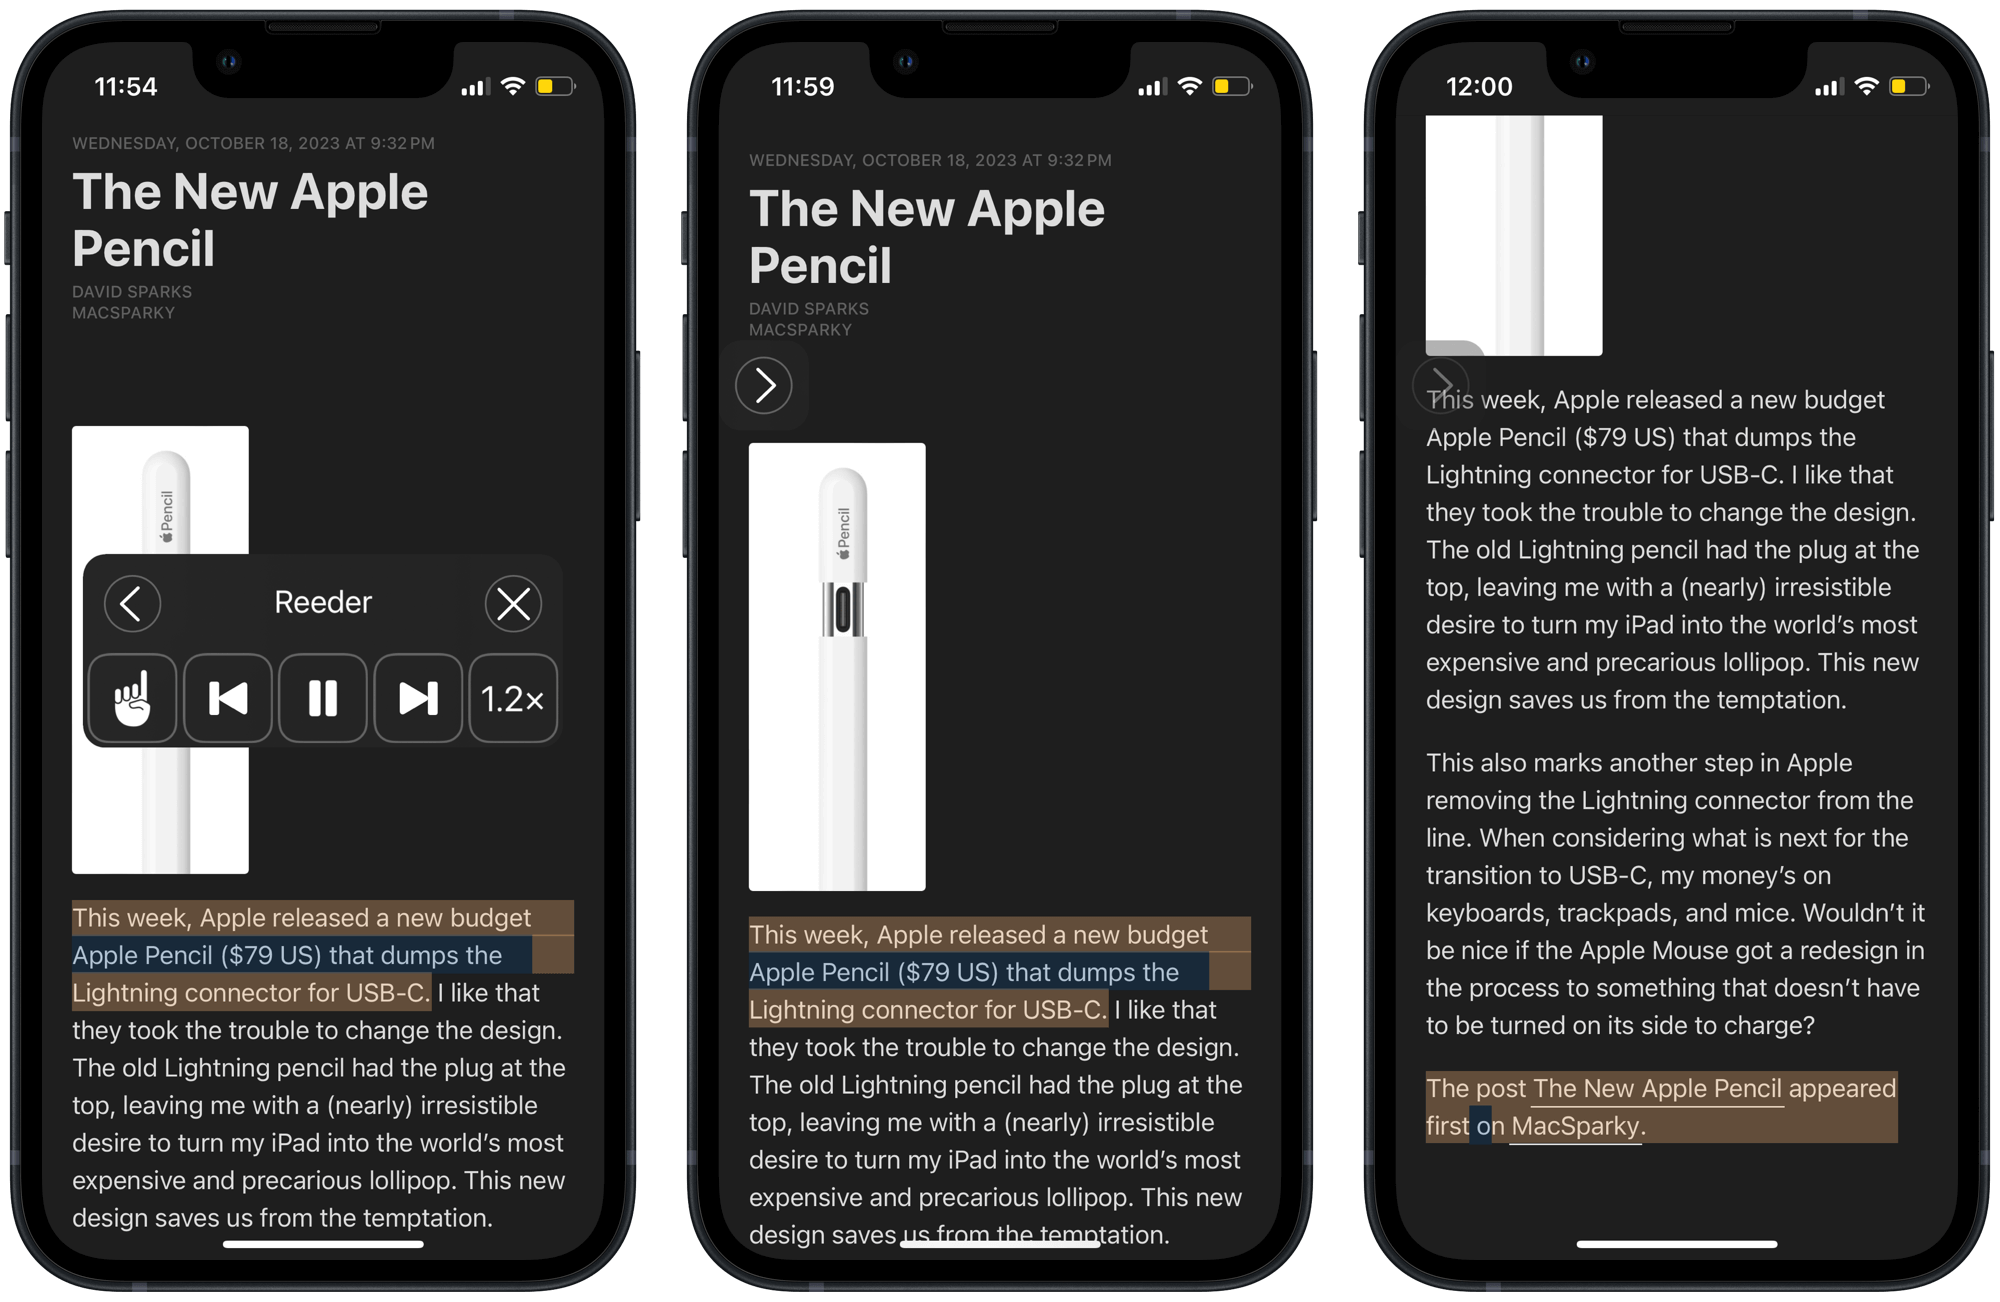
In Reeder, where I use it primarily, it starts reading and highlighting the article, just as if I had selected it all manually. The voice is fairly smooth and conversational. I’ve chosen one of the Siri voices because I think they’ve had the most work put into them. Here’s an example:
It also pops up the ‘Speech Controller’ overlay which contains controls for play/pause, playback speed (I like 1.2-1.3x), and skipping sections. Crucially, the speech continues to play even if I switch away from the being-spoken content, the app, or even if I turn off the screen.
Almost…
I hedged above saying it does “almost” exactly what I want because there are still a few quirks. For instance, the auto-scrolling screen sometimes jumps around or prevents scrolling the text manually. List items will inexplicably sometime be read out at 1x despite the speed being set to something faster. Also, in Drafts on my iPad, after reading out the current onscreen text draft, the system does continue to read the draft list and other UI stuff. But for 90% of my text-to-speech needs — RSS, webpages, email, and articles saved to Pocket — Speak Screen is pretty much perfect.
The landscape for human-like voice replication is changing rapidly with advances in AI/machine learning. I expect that Apple’s voice options, although already good when set to one of the modern Siri voices, will likewise improve in short order. Maybe — crosses fingers — it could even get as good as Omnivore’s Ultra Realistic Voices. Hell, with Personal Voice I could even have everything read back to me in my own voice!
Between the swipe gesture and being available system-wide, Speak Screen actually gets pretty close to matching Android’s ‘Reading Mode’ app, which I previously admired. But Reading Mode still has the upper hand with a more fully-featured and functional interface, including a scrub bar, a clean reading view, and showing the estimated reading time.
(Triple) Click Button to Read
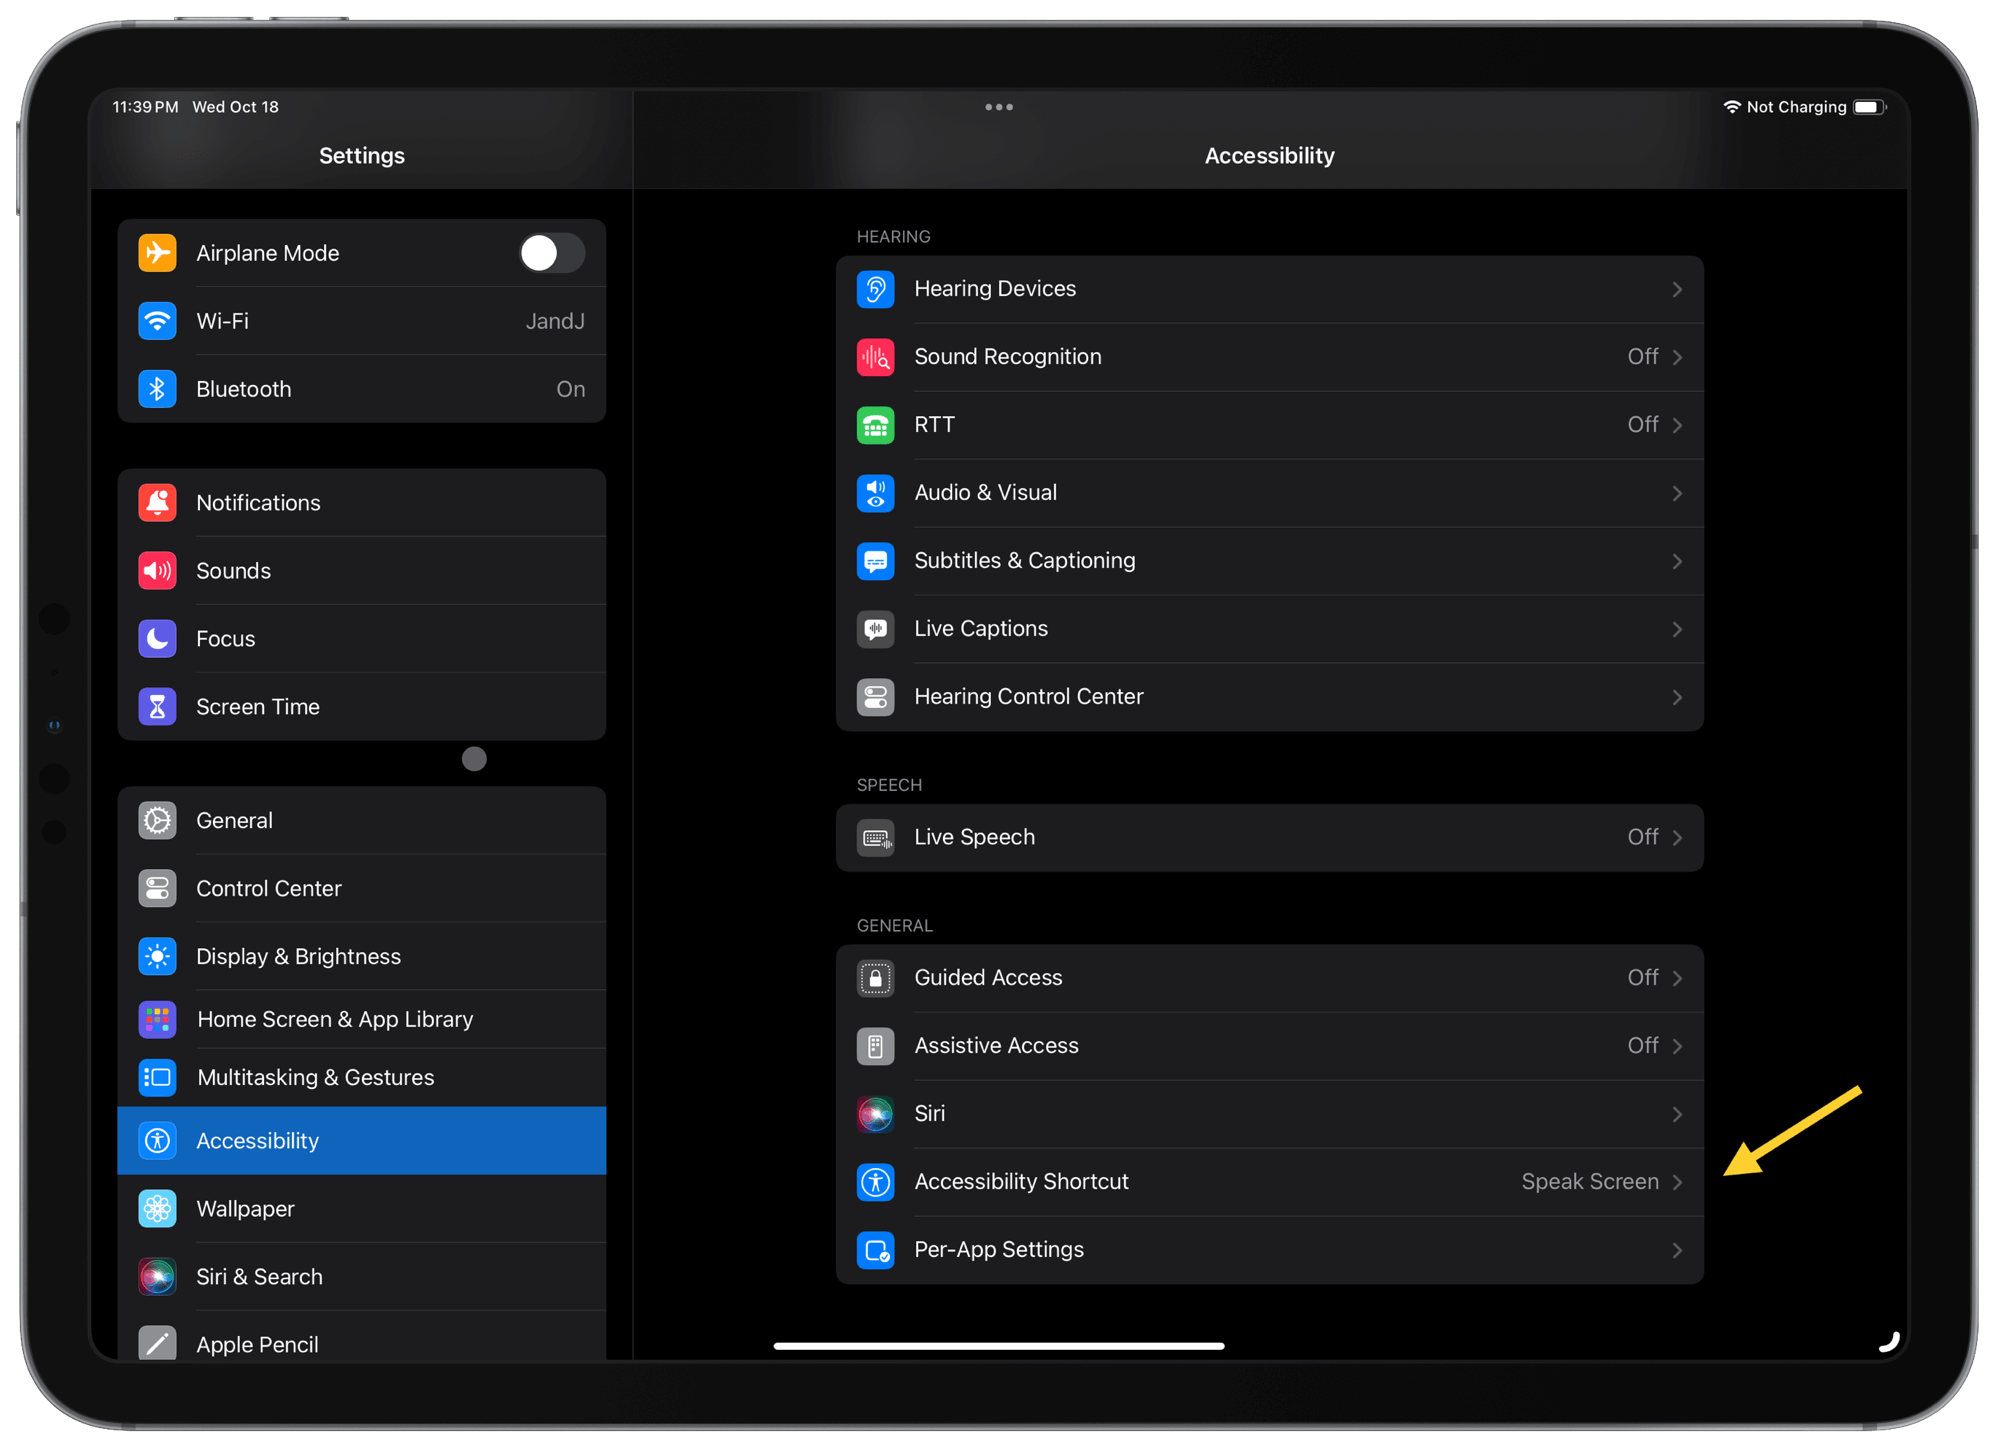
Here’s a little peek behind the curtain here at HeyDingus HQ. I wrote this whole piece a couple of weeks ago. But I wanted to have some real time with the feature to make sure that it stuck and worked as well as I thought it would. I’m so glad that I waited because now I can share with you an extra improvement to this setup that has changed the game for me. You can kick off Speak Screen with a press of a physical button on your devices! Nope, this is not the Action Button that’s all the rage these days. It’s actually, like a lot of the coolest things I’m discovering these days, another accessibility feature called ‘Accessibility Shortcut’.
At the bottom of the Accessibility pane in the Settings app, the second-to-last item is the one we want. Tapping into this setting reveals this description:
Configure and then triple-click the Side Button to toggle accessibility features on or off.
Below that you’ll find a list of the common accessibility features that you might want to toggle on and off throughout the day.2 And what’s on that list but our newly beloved Speak Screen.3 Select that as the Accessibility Shortcut and you’re off the races.4
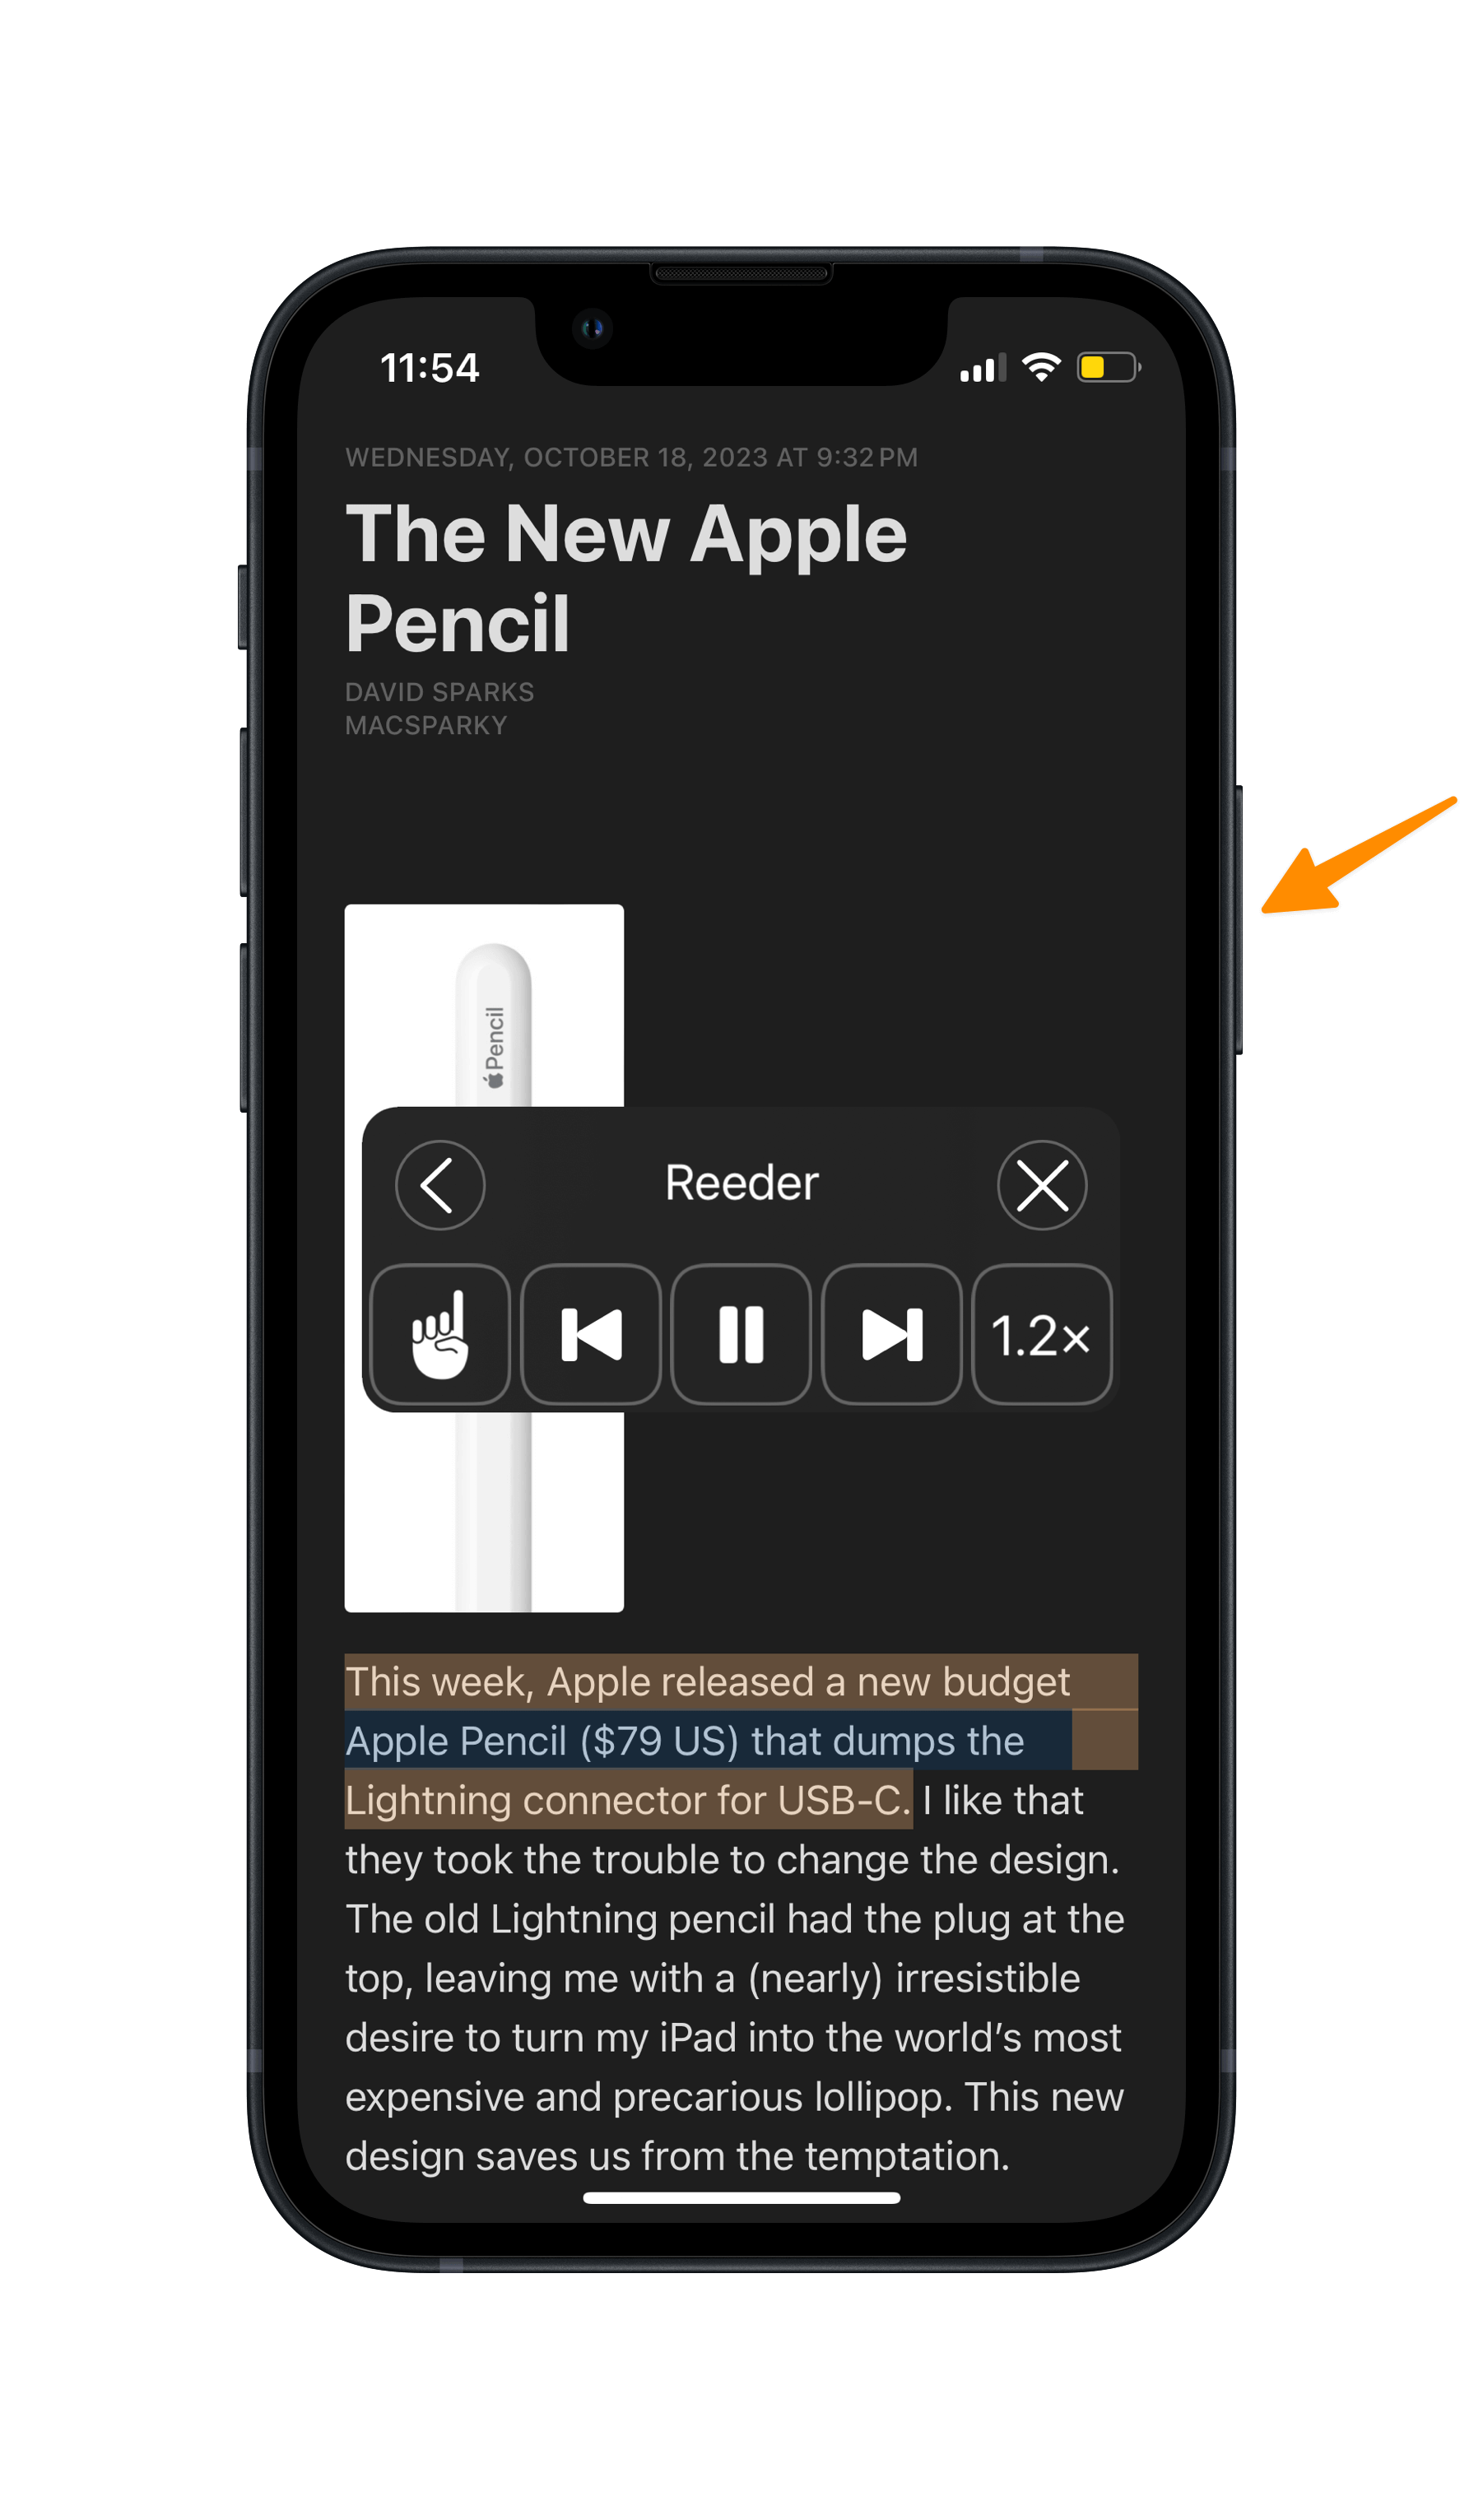
With that enabled, at any time I can triple-click the Side Button of my iPhone (or Top Button of my iPad) and it’ll start reading out whatever’s on screen using the settings I’ve set in Speak Screen. It does the same thing as that two-finger swipe down gesture, but it’s way easier to initiate! Rather than pulling down the Notification Center half the time when I’m trying to start a reading session, I can very easily hammer on the Side Button a few times and move on.
It’s so much better than using the two-finger swipe. I can do it one-handed! I’ve found this to be particularly handy when reading late into the night. In Reeder, I can reach over to my phone on the nightstand and make an imprecise swipe to the next article, triple-click the Side Button, and start listening. I can do it with my eyes closed.
That’s a Wrap…For Now
I’m happy to have pieced together a reading system that lets me use the devices and apps that I love, without leaving behind any major features. I can save anything from RSS with a single swipe in Reeder, or elsewhere with the Pocket extension. I can flit between reading in Reeder, Pocket, the web, or my Kobo with all of them staying in sync. I can listen to my beloved auto-scrolling, highlighted, and versatile text-to-speech with the (triple) click of a button. Finally, my reading flow is feeling settled.
At least until the next app or challenge (👀) comes along. 😉
Yeah…that Instapaper experiment didn’t last very long. I valued having the option to read things on my Kobo too much to give up that integration with Pocket. But by using Pocket as the syncing service with Reeder as the frontend reading experience 99% of the time, I meet almost all of my ideal read-later service criteria. So now I’m still catching up on things that I saved in Readwise Reader and Instapaper, while all the current stuff goes into Pocket. It’s a whole thing.↩︎
Funnily enough, I actually used to use Accessibility Shortcut back in the day. Before system-wide dark mode was a thing, it was somewhat popular to use the ‘Invert Colors’ (now called ‘Classic Invert’) to flip the colors of the screen at night so that they’d be less blinding in dark environments. A quick triple-click flipped the colors so you wouldn’t have to go diving into the stark white Settings app to enable it.↩︎
One option missing from this list: good ol’ Shortcuts. If I could set a custom shortcut from the Shortcuts app as an Accessibility Shortcut (yes, I know how ridiculous this sentence sounds), I could create my very own pseudo-Action Button and keep my physical Mute Switch.↩︎
If you want, you can turn on multiple Accessibility features for the Accessibility Shortcut. When you have more than one enabled, the triple-click presents a menu for you to choose from.↩︎