After what felt like an eternity with Twitter sitting on its laurels, they’re now churning out new features at an impressive pace. The latest initiative appears to be an upcoming expansion into the blogging space. Like, actual long-form blogs, not just threads or newsletters.
The feature was first discovered by app researcher Jane Wong, who showed a hidden menu on the social network’s website dedicated to the new Articles feature. While there are no details about how Twitter Articles will work, it will presumably let users write full articles on the social network without the 280-character limit.
…
A Twitter spokesperson confirmed to CNET that the company will share more details about Twitter Articles soon.
and
If Twitter does indeed let users write longer texts on the social network, this could be seen as an attempt to compete directly with other blogging platforms like Medium. We also don’t know if the social network will monetize articles in any way, but it wouldn’t be a surprise if longer texts are exclusive to Super Followers or Twitter Blue subscribers.
If true, I’d consider this the most interesting entry into the blogging sphere since HEY World. And, honestly, if I didn’t already have my own site, I’d give it serious consideration seeing as Twitter is where all my followers are already. Best to keep a close eye on this one!
I was driving along one recent night with podcasts going, per usual, when a familiar name came out of my speakers. My Alma Mater! Give a listen to this four-minute episode:
When I attended Central Michigan University, I was a member of their Honors Program. I didn’t receive the prestigious Centralis Award, but a couple of my friends did. I can’t imagine the joy and relief of getting a full-ride scholarship and then having it taken away. I’m so glad that CMU did the right thing here and honored the scholarship, even if it was a mistake. Congratulations to the students!
As a side note, I listen to The Good News Podcast every week and have done so for years. It’s only a few minutes long and brings a smile to my face to start my day.
“In the months ahead, we’ll continue to deliver a diverse range of exceptional shows from the world’s most inventive and creative minds,” said Matt Cherniss, head of domestic programming, Apple TV+. “We can’t wait for audiences all over the world to connect with these incredible, heartwarming and powerful stories just as much as we have.”
I saw these announcements during the TCA Winter Press Tour pop up throughout that day. I gotta say, all of these shows sound great. It’s already hard to keep up with everything coming out on Apple TV+, and the release schedule continues to crank ever faster.
If I had to choose my most anticipated from the list, I’d go with Severance and The Last Days of Ptolemy Grey. They both deal with memory, but in unique ways.
As Dan points out, another problem with the queues argument is that they will play music in the order you add to them, whereas with tabs, you’d have the ability to choose what you’d want to listen to when you’re ready.
Tabs are ideal for listening to that new album when you have time to later on
What tabs would be particularly useful for is new music discovery, like an album you’ve been wanting to get around to hearing but haven’t yet had the time.
I end up saving albums and songs to a ‘Listen Later’ playlist. But it’s far from ideal. I’d be down for browser tabs in the Music app.
For some, “clean” is distilling climbing down to a contest between the climber and the rock, the greatest challenges met by eliminating the unknown rather than embracing it. Exploration has been left by the wayside and with it the preeminence of the environments that define it. True adventures are not efficient.
Clean climbing, as in leaving no gear behind, is all I’ve ever known. But I do sometimes struggle with the fact that, even though I didn’t put them in, the bolts I use when sport climbing are permanent fixtures. This was a poignant read.
Apple has a long track record of trying out new features in iMessage the app, but has seldom re-evaluated how the text of messages themselves could be improved on. That’s where Markdown comes in — the ubiquitous plain-text markup language that let’s you quickly bold, italicize, strikethrough, or add a link in-line as you type your message.
Yes, please! Markdown everywhere! Put me down for this.
Will it help me accomplish something or solve a problem?
Will it matter in a year? Five? Ten?
Is there something I’d rather be doing?
Have I had enough?
Might it be better to set it down now and pick it up again later?
What’s the worst thing that would happen if I give up?
These questions help pressure-test the idea of continuing to follow my current trajectory. And sometimes their answers reveal that I should have pulled off the highway a few exits ago. But no matter how close to the end I am, it’s never too late to stop.
As I queue up more and more things to read, watch, and do, I think these questions will help me pare back down to stuff that will enrich my life and not just keep me in a rut. One of my themes for 2022 is ‘The Year of Curation’. Matthew’s blog post couldn’t have come at a better time.
This was a great run-through. I’ve been more interested in previous versions of Android. I’m not a big fan of the funky widget shapes or control center design in Android 12, but I can’t deny that there’s good stuff in here. I like the interactive widgets, the visual clipboard, and easy access to grab things while in the app switcher.
It sounds like 2022 will finally be the year that we’ll get a peek at what Apple’s been cooking up for the AR/VR space. In addition to all the amazing features that we’ll be eager to dissect, it’s also the first time in a while that we’ve gotten to speculate on the name for not only the hardware of a new Apple product but also the software it runs.
I’m going to toss these ideas into the ring, from most likely to least likely.
realityOS - Surprisingly, no one else has this yet. Communicates well what it’s for, and could be used for multiple devices (unlike iPadOS). Best contender.
rOS - Similar to iOS in that it can cover multiple devices, but not as clear as realityOS. I think it might confuse customers.
eyeOS - 😏 I would love this just for the pun. If they didn’t already have iOS, then I think it would be a stronger pick.
appleOS - I’ll just put out there again that, ultimately, these products are all running on the same underlying system. iOS stemmed from OS X, which has now forked into all their other OSes. It kind of seems inevitable that they consolidate under one operating system that just manifests interfaces based on the device it’s running on. Could the AR/VR headset be the first? Maybe, but I doubt it.
Wow, it’s been a big month. As planned, my wife and I moved from Ohio, our home of five years, to the middle of the Adirondack Park. It was difficult to say goodbye to the places that had become so familiar and even harder to say goodbye to the friends we made there. But, our new home is cozy after some much-needed nesting, the area is gorgeous, and the neighborhood is friendly and welcoming.
We were also lucky enough to get ahead of the worst of Omicron when we celebrated Christmas with our families earlier in December. With vaccinations all around, it was wonderful to not worry so much about the pandemic and enjoy our time together sans masks. Same with our goodbye party with friends around the New Year. Boosters made us all more comfortable, and it felt like old times hanging out and playing games together.
Packing, traveling and then unpacking meant that my computing setup was simplified down to just my iPhone and iPad for a week or so. Honestly, it wasn’t so bad. The Magic Keyboard makes the iPad into a worthwhile laptop, and I’ve spent enough time optimizing my workflows to be mostly platform-agnostic. That’s not to say I wasn’t glad to get the office set up with my Mac — it’s a happy place. 🥰
Exploring our new town has been a ton of fun, and I’m getting to know the area quite well through driving for DoorDash. We’ve hiked, ice skated, and weathered the freezing temperatures and heavy snowfall. Starting this weekend will be an annual Ice Festival in town, which is sure to be a hoot. ❄️
📱 Apps I’m Trying
Endel - My subscription to Brain.fm expired, and I was never super happy with its lack of shortcuts or overall design. Endel is expensive, but so far, I’ve been enjoying their free, algorithmically generated music to help me focus and wind down. Matthew Cassinelli also put out a bunch of shortcuts for controlling Endel in his newsletter.
Last.fm - The Apple Music vs. Spotify debate often comes down to music discovery. I’m not switching to Spotify, so I’m trying out Last.fm, which tracks my music playback (with Marvis on iOS, Sleeve on macOS) and offers both recommendations and exciting insight based on my listening history.
Caset - This one just appeared on my radar, so I haven’t gotten to use it yet. But supposedly, it will let you make collaborative playlists. They have to be edited in the apps, and playback has to start there, too, but the shared playlists are another feature I wish Apple would copy from Spotify.
Soor - My last music-related pick. I’ve used Soor on my phone for years, but they finally released an iPad app. I don’t know if it’ll pull me away from Marvis, but Soor does make better use of the iPad screen real estate.
Matter - I’m experimenting with Matter again for Read Later items to see if the text parser has improved. I’ll have more to say about it soon, but I’m not yet convinced. Reeder is still on top for me across my devices.
Locket - This is my favorite new app so far. You might have heard about it. Locket lets you send photos to a partner or friends that appear in a widget on their home screen. It’s the kind of focused and well-executed app that is a joy to use.
Nanoleaf - For Christmas, I received a Nanoleaf bulb and light strip. Although I control them from the Home app most of the time, Nanoleaf’s app lets you do some pretty cool lighting effects. I’ve got to play around with it more.
Nextdoor - Being new to town, I wanted a way to ask questions and be connected with the folks around our community. I’m not going back to Facebook, so Nextdoor seemed the obvious choice. I was wary since I’ve heard that it could get pretty bad(read: racist) in the posts, but everything I’ve seen in the app so far has been very positive. And I was able to get a recommendation for a local thrift shop that didn’t show up in Apple Maps!
One Thing - Made for macOS, this app lets you type a short text string right in your menu bar. You can also automate it using Shortcuts or scripts, but I haven’t yet gone down that rabbit hole. Mostly I put little reminders up there.
📚 Stuff I’m Reading
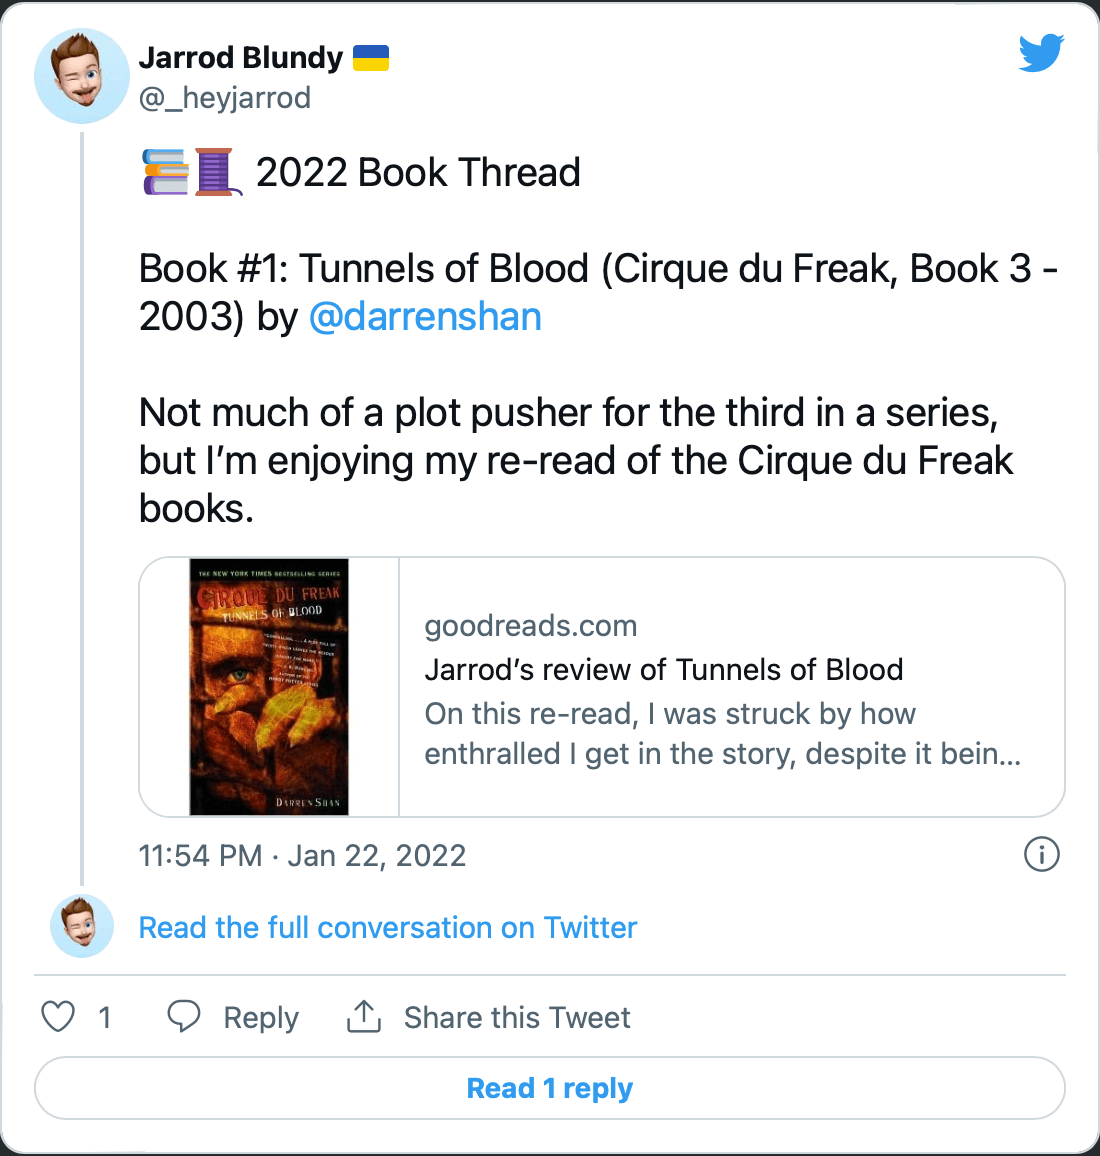
I’m still re-working my way through Darren Shan’s Cirque du Freak series. I’m on book #5 of 12, and this is where I remember that things get really interesting.
Dawn FM by The Weeknd - So listenable! I don’t have a favorite track yet, but I’ve listened through the whole album multiple times. It’s excellent in the background.
And the back catalogs of Lauv and Maisie Peters, which I recently discovered.
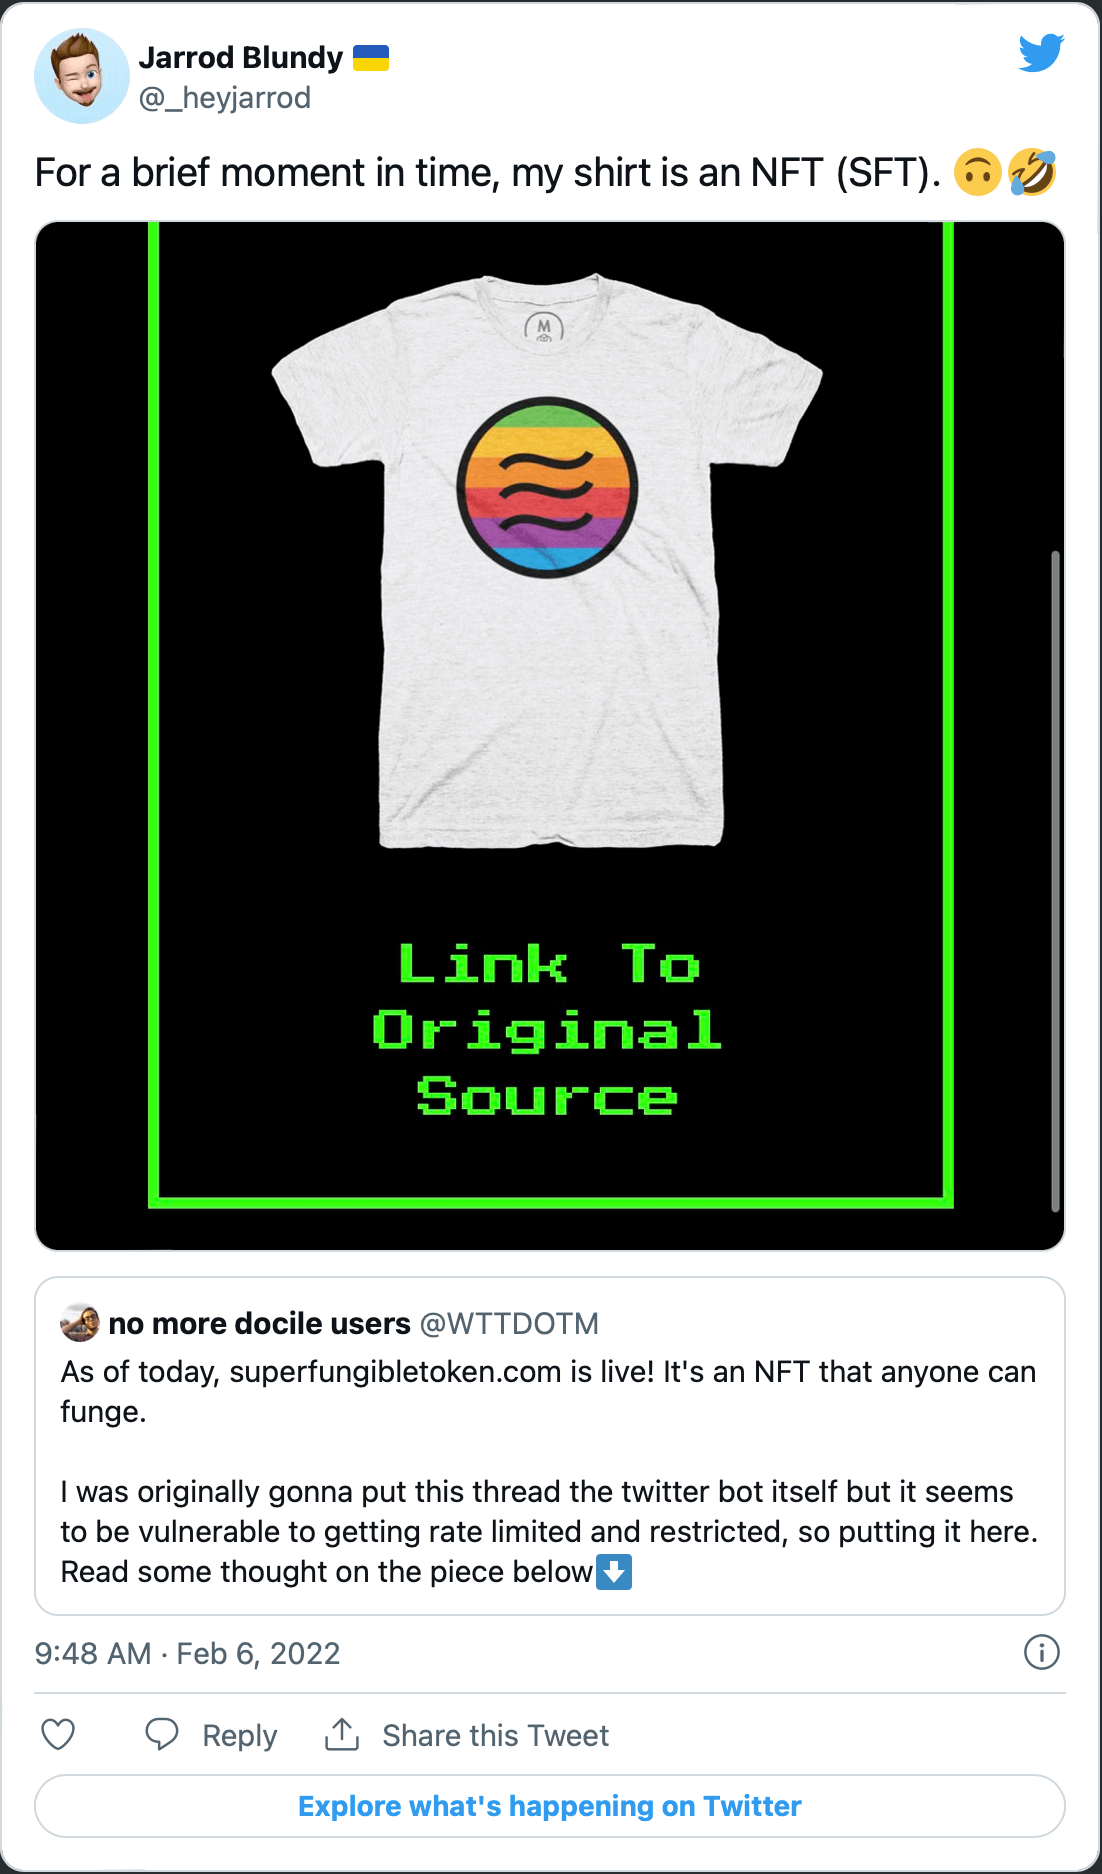
📺 Things I’m Watching
I’ve found a little more time for watching TV and movies lately. I’ve been trying something new this year. I’m reviewing shows and movies as I finish them and posting them to Twitter in a couple of threads:
When we moved, this house needed a little work in, so I’ve been mainly getting it up to snuff. There’s still a list of chores to do, things to clean out, and areas to set up (gotta get that workout area cleared), but it’s very homey now.
My other big hobby horse lately has been building shortcuts. I’ve had a massive backlog of ideas and no time to put them together. It’s my favorite kind of “programming,” and I can get lost for hours getting them just right. And then several more hours writing about them to post here for others to learn from.
For the last 30 days, at 12:00 am I dutifully put my headphones in and pressed play on a podcast. This podcast was a little different. Rather than piping animated conversation or thrilling stories into my ears, this one played silence. Yep, just silence. I kept the podcast going, episode after episode, for every hour of the day. I alternated my left and right earbuds into their charging case to keep the batteries going. I did not press pause until 11:59 pm.
At 12:00 am, I started again. For 30 days straight.
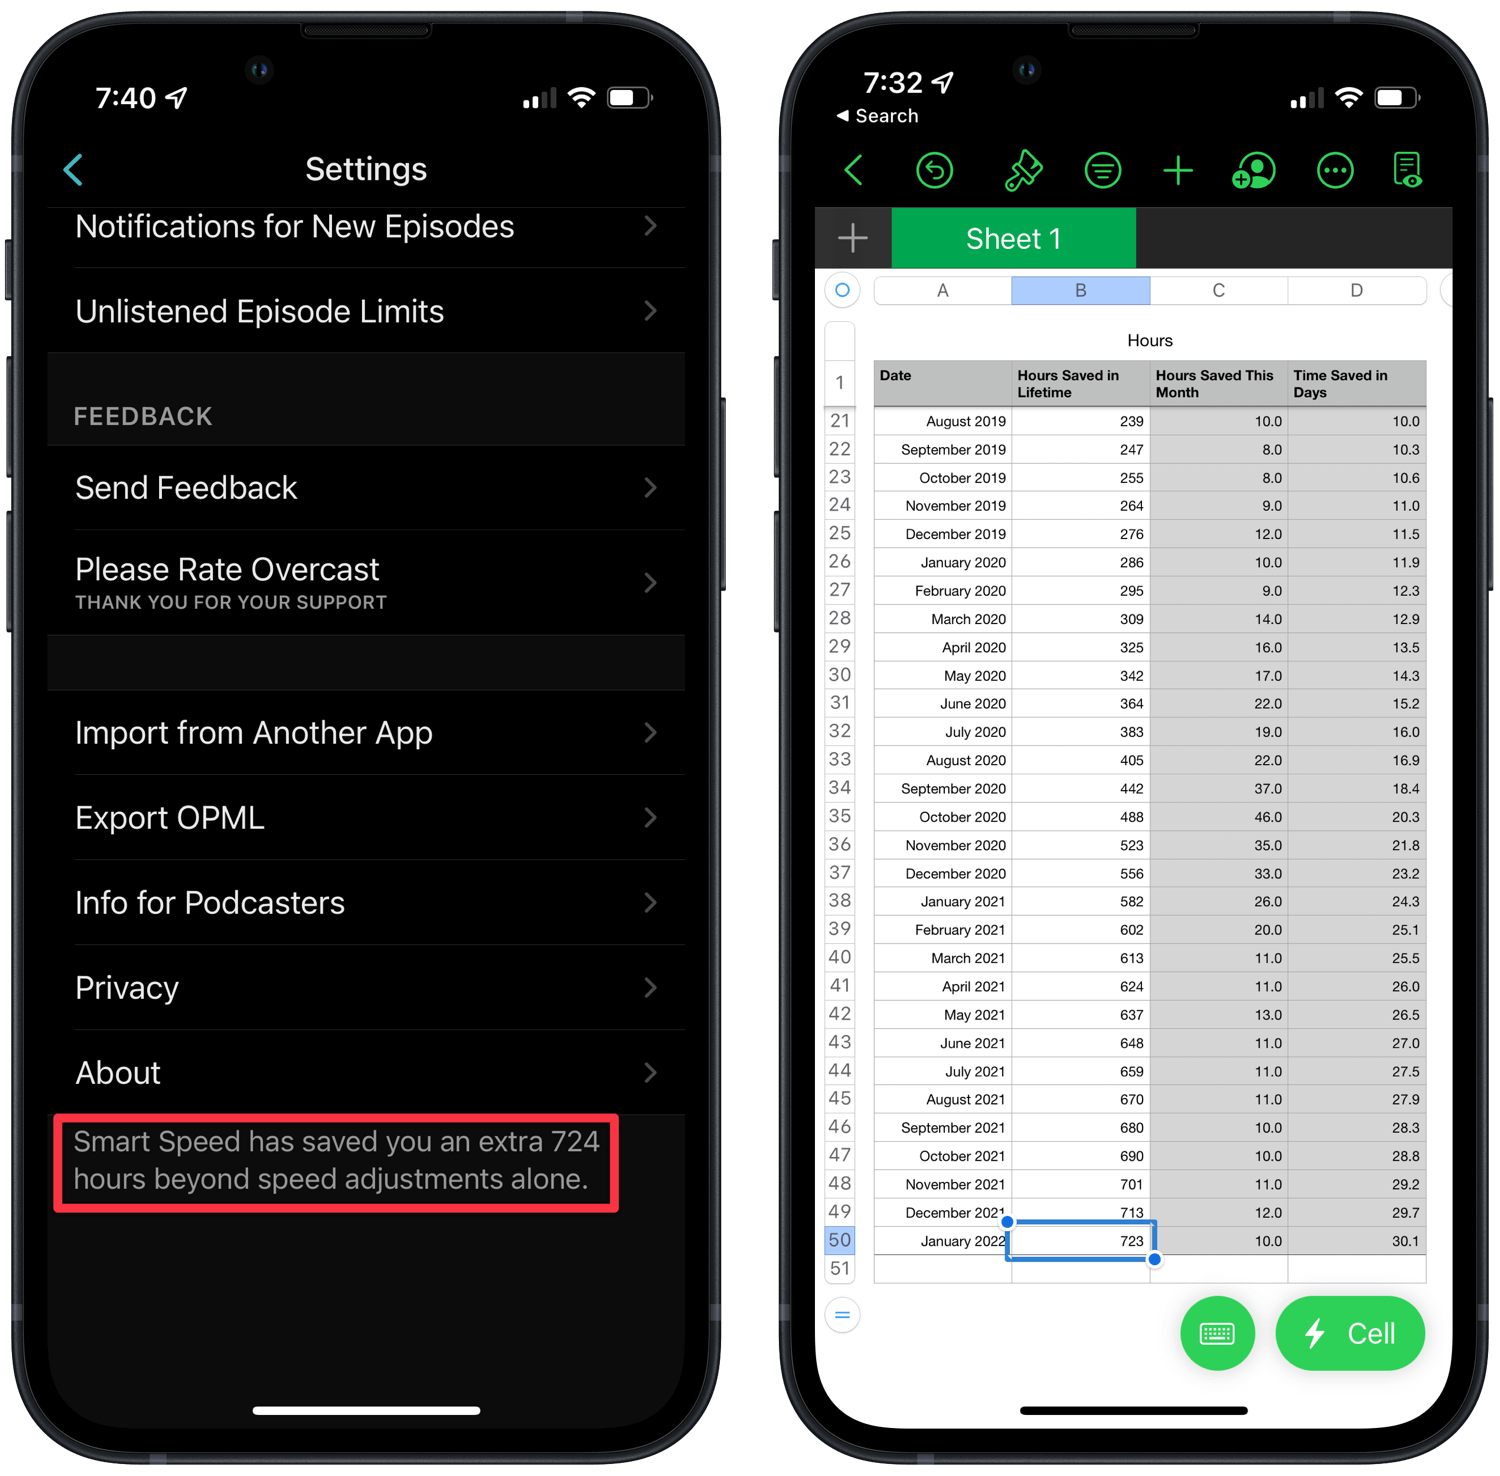
Okay, no, I didn’t actually do that. Because that would be bonkers, and because I use Overcast. It’s the podcast player that pioneered Smart Speed, a feature that has become standard for good podcast apps. Smart Speed strips out the pauses in speech, which extend between sentences and words as people gather their thoughts, to speed up the playback without actually speeding up anyone’s speech. And, critically, it’s done proportionally so that extended silences sound longer than shorter ones. It “just” compresses the silences relative to their length, leaving the flow of the conversation still sounding very natural.
So, instead of those 724 hours of silence, I’ve been able to listen to 724 more hours of my favorite podcasts, without adding any extra time over the last six years.
These little time savings that add up every day are perhaps the best unseen and under-appreciated benefits of technology. If you’re not using a podcast player that saves you time without resorting to bumping up the playback speed, give Overcast a try. (I hear Pocket Casts on Android does it pretty well, too.)
It’s not just a one-time principled stand, either. Neil Young is an artist with a lifetime of principled credibility. Cynicism runs so deep right now that many people overlook the obvious: that Young is putting his money where his mouth is by pulling his catalog from Spotify. There is no catch. Young’s goal was not to get Spotify to dump Rogan, as many seem to think. His goal was simply to force Spotify to go on the record, in public, with their explicit support for Rogan, and to raise awareness that their rules — right or wrong — accommodate his show’s commentary on COVID and vaccines. Genuine virtue, not mere virtue signaling.
I had started to collect similar tweets and stories about how Young’s stance has played out, but Gruber has done such a good job that I won’t duplicate his efforts.
I’m with him on this; I commend Young (and others) for acting on their principles but am not surprised in the slightest that Spotify didn’t blink. They knew what they were getting for the $100 million they paid for Rogan’s show.
I’m glad that Gruber called attention to the distinction between Spotify as the publisher of Rogan’s show and Apple as an indexer. It’s an important difference when considering where the responsibility resides for the content.
It’s not news that Sony is still struggling to get enough PS5s out the door to meet demand. I still see posts every week when units are in stock at this retailer or that, alerting customers to grab them fast. They’re always sold out by the time I click through.
But two articles I read this morning couldn’t have put a finer point on how differently Sony and Apple are shipping products of similar caliber.
Sony shipped just 3.9 million PlayStation 5 consoles in its all-important holiday quarter, a slight bump over the previous quarter’s figure of 3.3 million, demonstrating how the electronics giant is still struggling to meet demand during the ongoing global supply chain crunch. 17.3 million units in total have been shipped as of December 31st, nearly three million fewer than the PlayStation 4 had managed at the equivalent point after its release.
The report shows that Apple shipped 17.5M iPads in Q4 2021, against 19.1 in the same quarter of 2020, a decline of 8.6%.
Now, I know that iPads and PlayStations are very different products that appeal to different people, but I still think it’s a worthwhile comparison. They’re in a similar price range. Most people use them primarily for entertainment (I write, tapping away this very blog post on my iPad). Neither is a necessary device like a smartphone, so most households probably don’t have more than one of them. They’re secondary computers.
It’s not like Sony has been slouching. They need to get enough of these units into the hands of eager customers to start making a profit on them. And more PS5 consoles mean more PS5 games sold, which is where the real money is made. So I imagine they’re doing everything they can to make more.
But Apple’s legendary prowess in the supply chain, their massive war chest, and their insistence on custom parts for their products have afforded them the luxury of avoiding more of the chip shortage problems facing their peers. As a result, they shipped 17.5 million iPads while giving some prioritization to making iPhones.
Last week, John Voorhees at MacStories wrote up a terrific piece for their ‘Starter Pack’ series in which he detailed how he’s been streamlining his workflows using deep links. You should definitely go read John’s story, but the gist is that by using URLs that bring you directly to the place or content you need, you can avoid unnecessary distractions. For instance, if I have the deep link that gets me back into a specific email conversation, I can skip the inbox and save the time I’d inevitably lose when I feel compelled to scan and clear it out.
I’ve been relying on deep links on Apple’s platforms for a few years now and could not go back from this style of contextual computing. It’s ingrained in me primarily due to three world-class apps: Things, Drafts, and Shortcuts. Things and Drafts are available everywhere, and their URL schemes open to the right place no matter if you’re using an iPhone, iPad, or Mac. As I’ll detail below, Shortcuts augments the experience by gluing together other apps that don’t offer comprehensive linking.
Things as the Hub
Despite Things having a fully-featured URL scheme and a clever web tool to help users build them, I don’t end up linking to a task or project very often. But Things plays a central role in my contextual computing by housing most of the other deep links that I create from around the system. Here’s a typical example. I often write down story titles and pre-formatted linked posts in Drafts. It’s where all my HeyDingus ideas live. But if there’s a particular article that I want to write on a day, I’ll make a task for it in Things. Rather than checking Things then opening Drafts and searching for the title, I copy a linkdirectly to the Draft entry and paste it into the notes field of the task. That way, when I come to that item on my to-do list, I just click the link to go straight to the draft and start writing.
Left: Drafts has multiple ways of getting a link to its entries. Right: The Things task linked back to the draft, and the project linked to my writing Workspace. ⌘
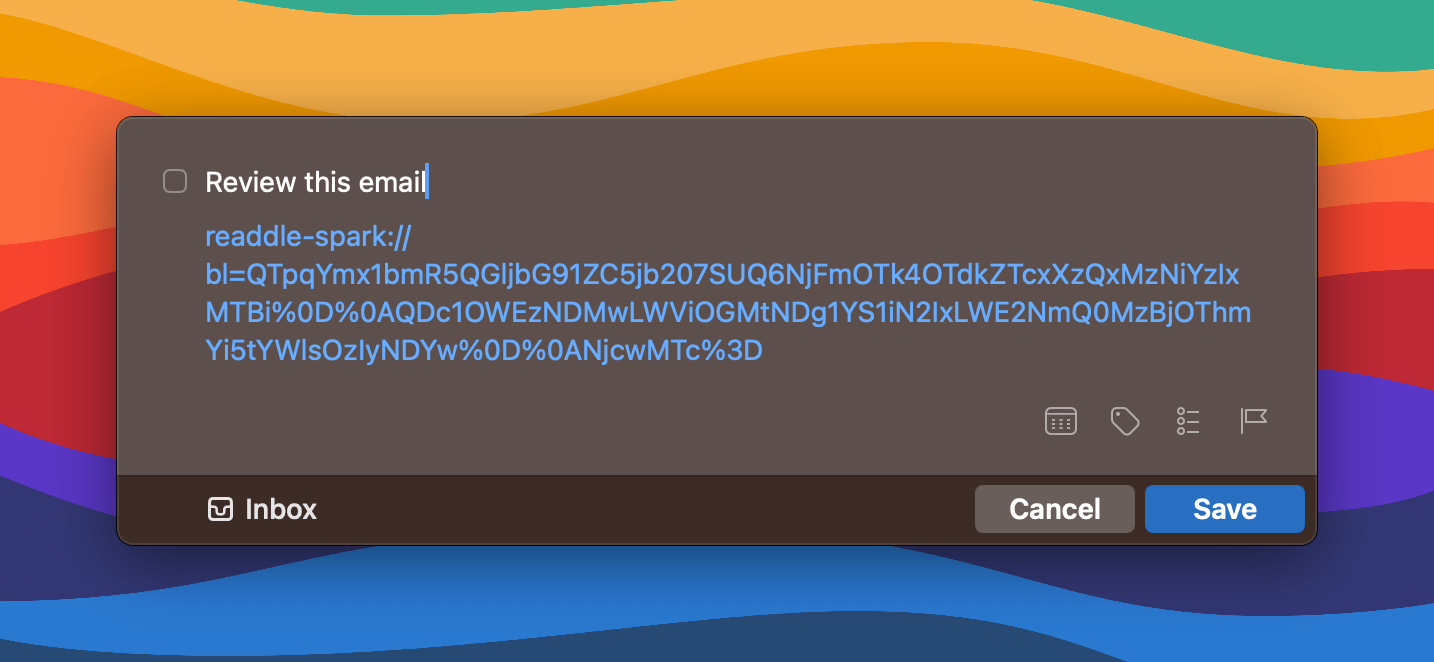
The same can be done with web pages or apps that I want to check out and emails to which I need to reference or return. In those cases, I can take advantage of the Things for Mac’s Quick Entry with Autofill feature to create a new Things task. With a global keyboard shortcut (Control-Option-Space) that works from anywhere, the system tries to get a URL back to whatever you were last doing. For me, most often, it’s a website or a message in Spark, my go-to email client.
These tasks with deep links let me clear out my inbox without losing a message that I need to come back to. ⌘
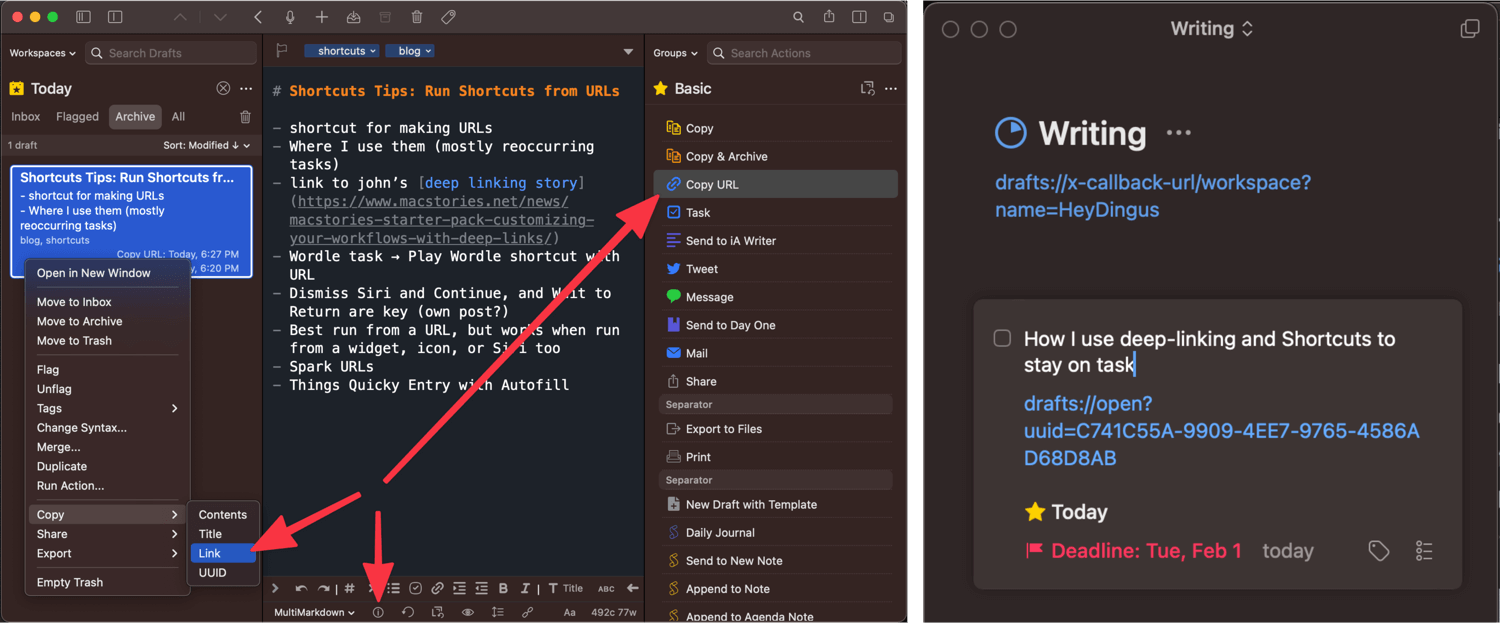
Running Shortcuts from URLs
My favorite way of quickly getting things done from deep links is by working Shortcuts into the mix. For many tasks in Things, the deep link is one that, when tapped, runs a specific shortcut. The scheme goes like this: shortcuts://run-shortcut?name=XXX where “XXX” is the URL encoded name of the shortcut. I find this type of deep link is most useful for reoccurring tasks. I’ll show you two examples and then how you can quickly build these Run Shortcut URLs yourself using, of course, Shortcuts.
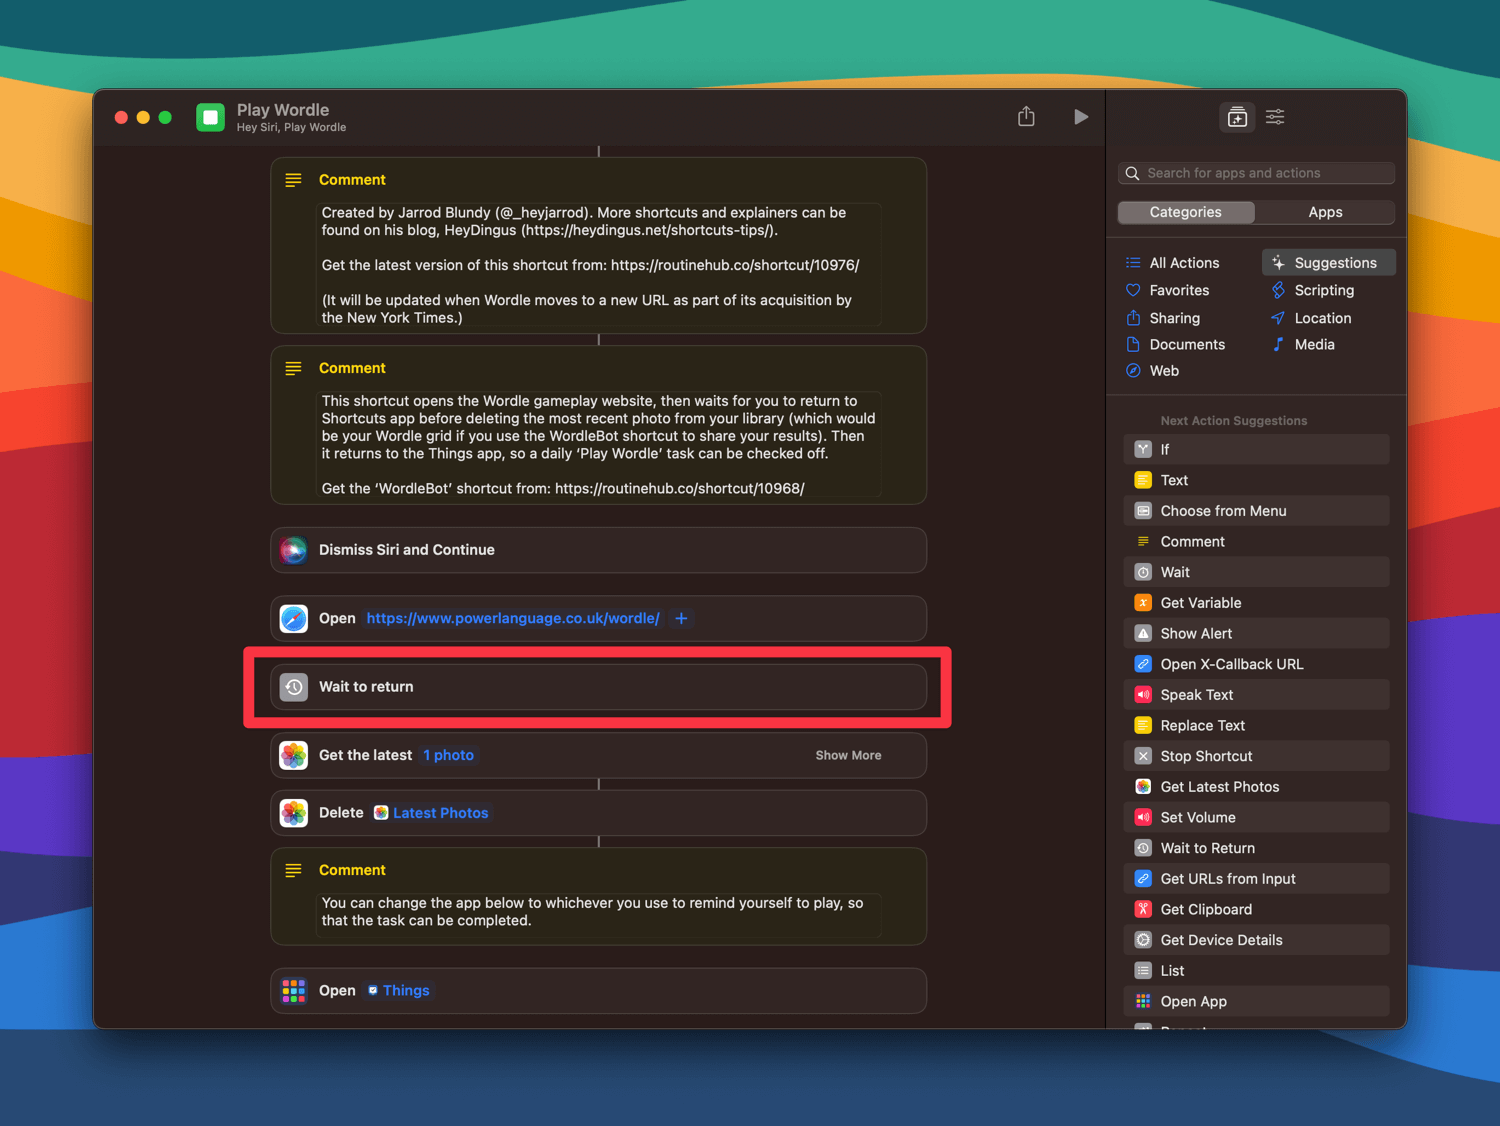
Play Wordle
Wordle is my daily morning obsession. It gets my mind moving after waking up and gives me one small success for the day before even taking a shower. In my Play Wordle task, I used to just link straight to the Wordle website. Then I realized I could string together all the parts of my Wordle habit — going to the website, creating and sharing accessible results, deleting the created photo, and getting back to the task so it can be checked off — all from Shortcuts.
The ‘Wait to Return’ action is critical. Even if other shortcuts are run from the Share Sheet in between, like WordleBot, it waits until you swipe back to the Shortcuts app to move on in the flow. So to play, I tap the Run Shortcut URL in Things, play the game, share my results, and then swipe on the Home Indicator to get back to Shortcuts. At that point, Shortcuts asks if I want to delete that most recent photo, I confirm, and then I’m brought straight back to the Things task to complete. No jumping around, and no task gets left unchecked.
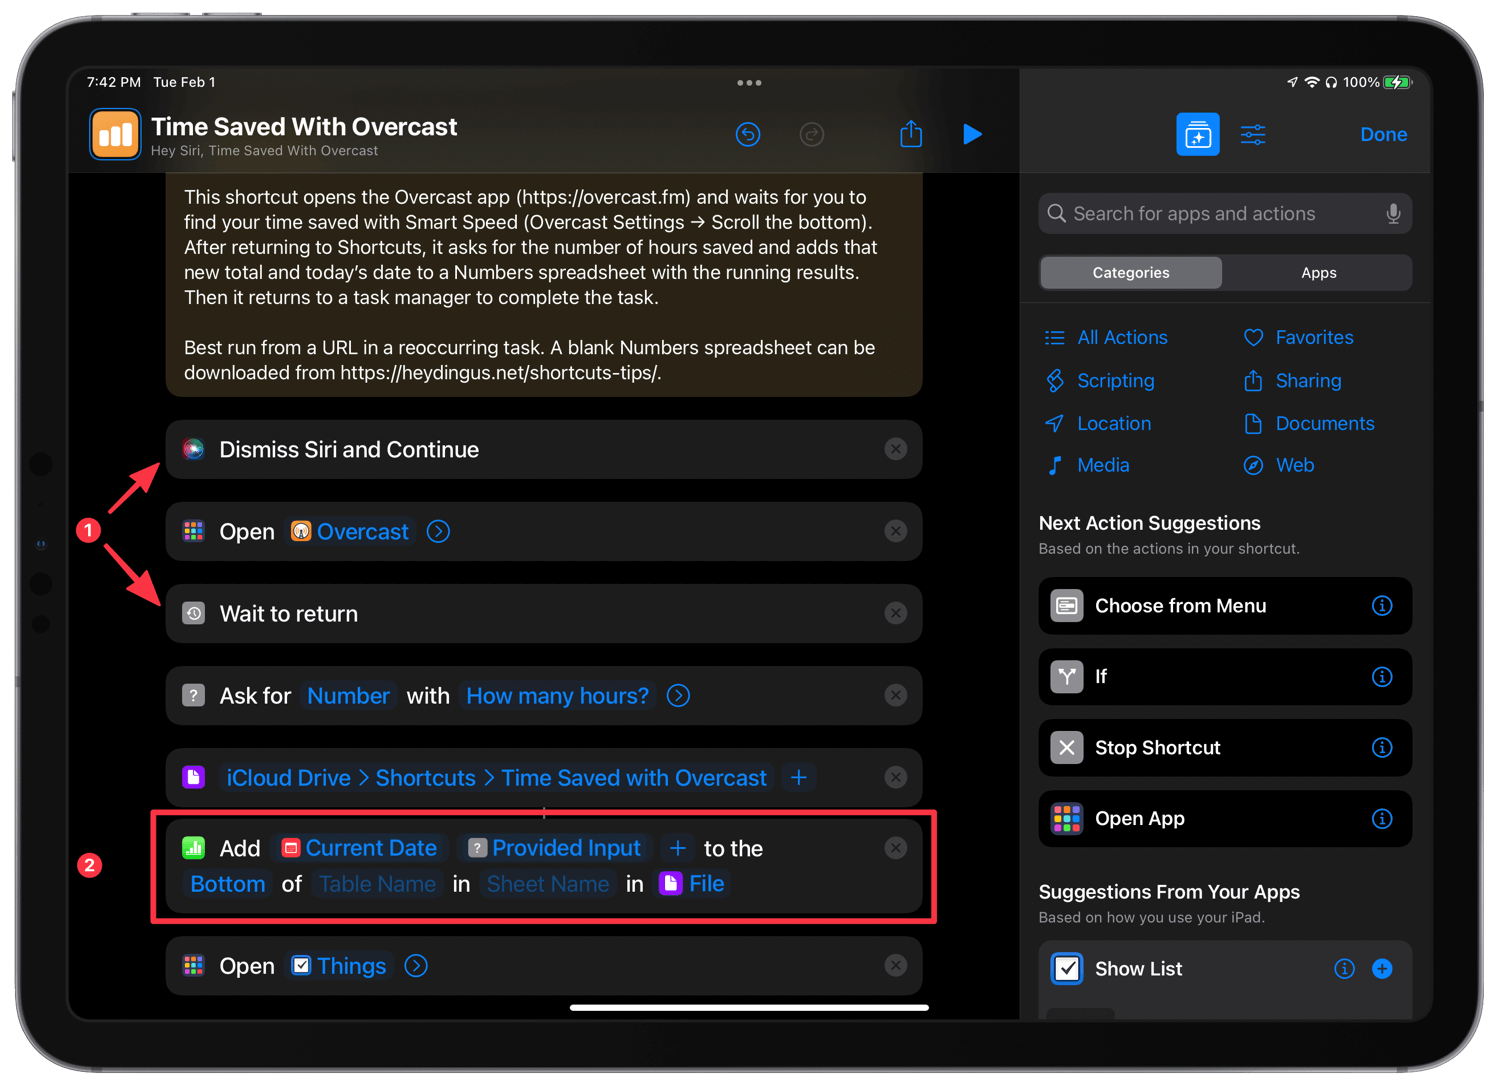
I listen to many podcasts, and because I use Smart Speed in Overcast, I save a ton of time that otherwise would have been spent listening to silences between speakers. I’ve been interested in tracking the number of hours saved over time and running a shortcut at the end of every month to keep track on a spreadsheet.
This shortcut guides me to the right number, adds it to the right spreadsheet, and then takes me back to my task manager. ⌘
A few things to note from this shortcut:
1️⃣‘Dismiss Siri and Continue’ and ‘Wait to return’ actions are used to ensure that no matter how the shortcut is run, it’ll keep the flow suspended until returning to the Shortcuts app and then asking for the number.
2️⃣ The ‘Add Row to Top or Bottom of Table’ action (not available on Mac) is integral to getting the data right where it needs to go. There is no need to track down the spreadsheet in the file system or add a row and manually paste in the data.
Left: You can find your Smart Speed hours saved at the bottom of Overcast’s settings screen. Right: My history of hours saved. I’ve saved over a month of listening to just silence in podcasts! (And yes, I gained an extra hour since logging it yesterday.) ⌘
This shortcut gets double points for deep linking because it fetches the Numbers spreadsheet for us. Again, staying in context is valuable when I know that I’d get off track if I had to go looking for it.
I’ve made a blank ‘Time Saved with Overcast’ Numbers spreadsheet available to download if you want to track your own saved time.
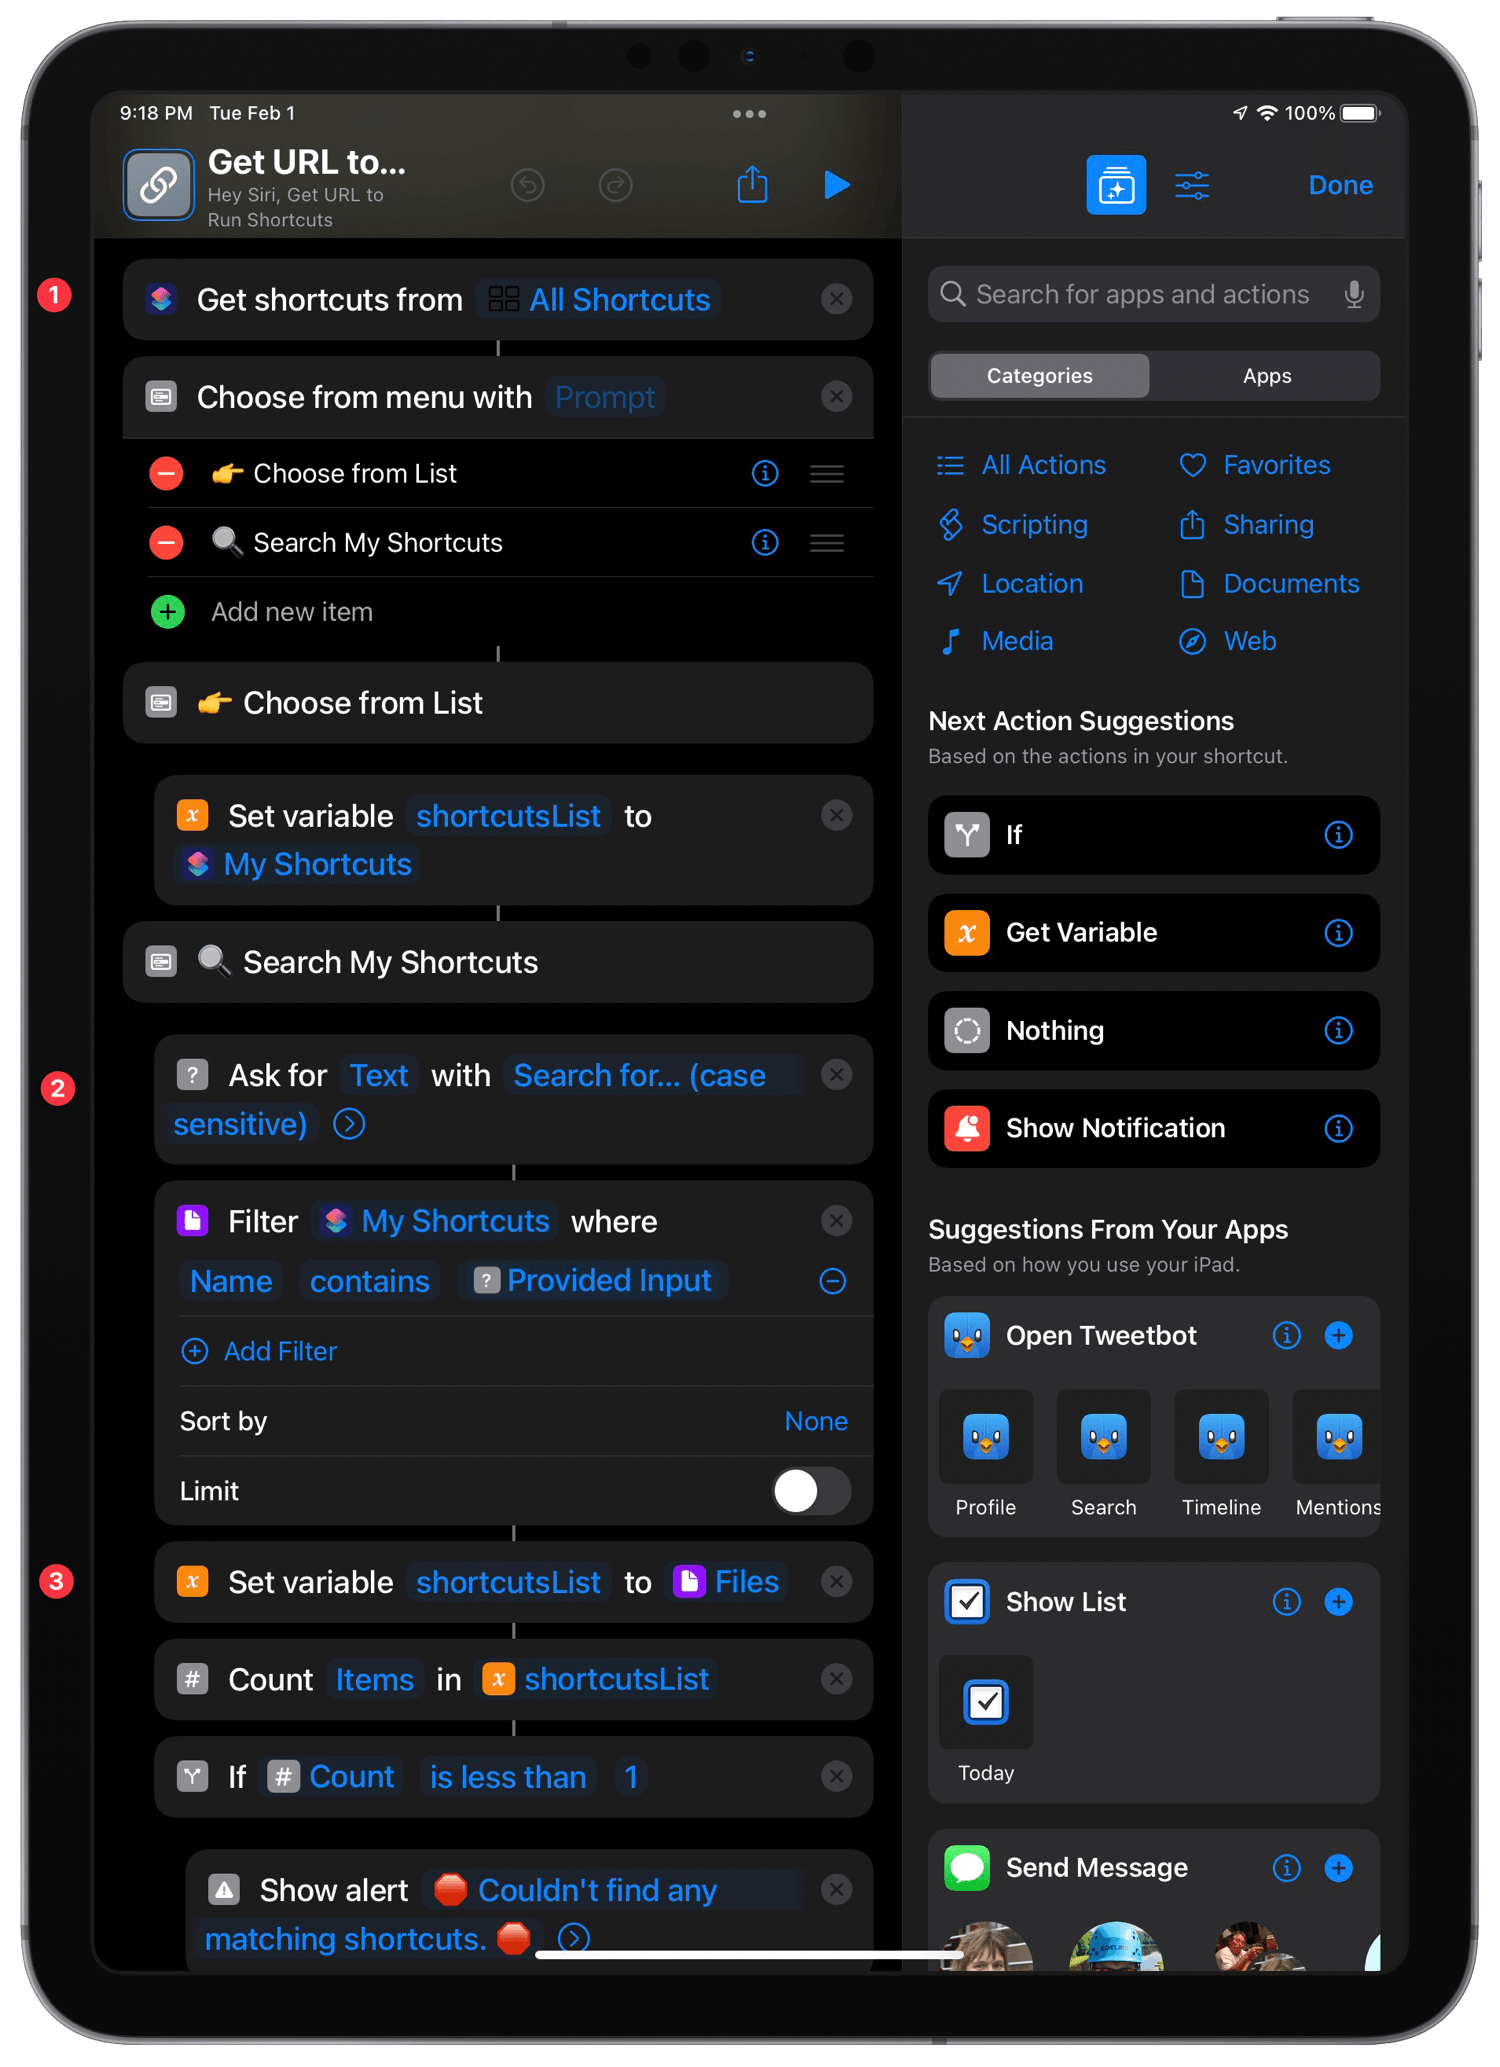
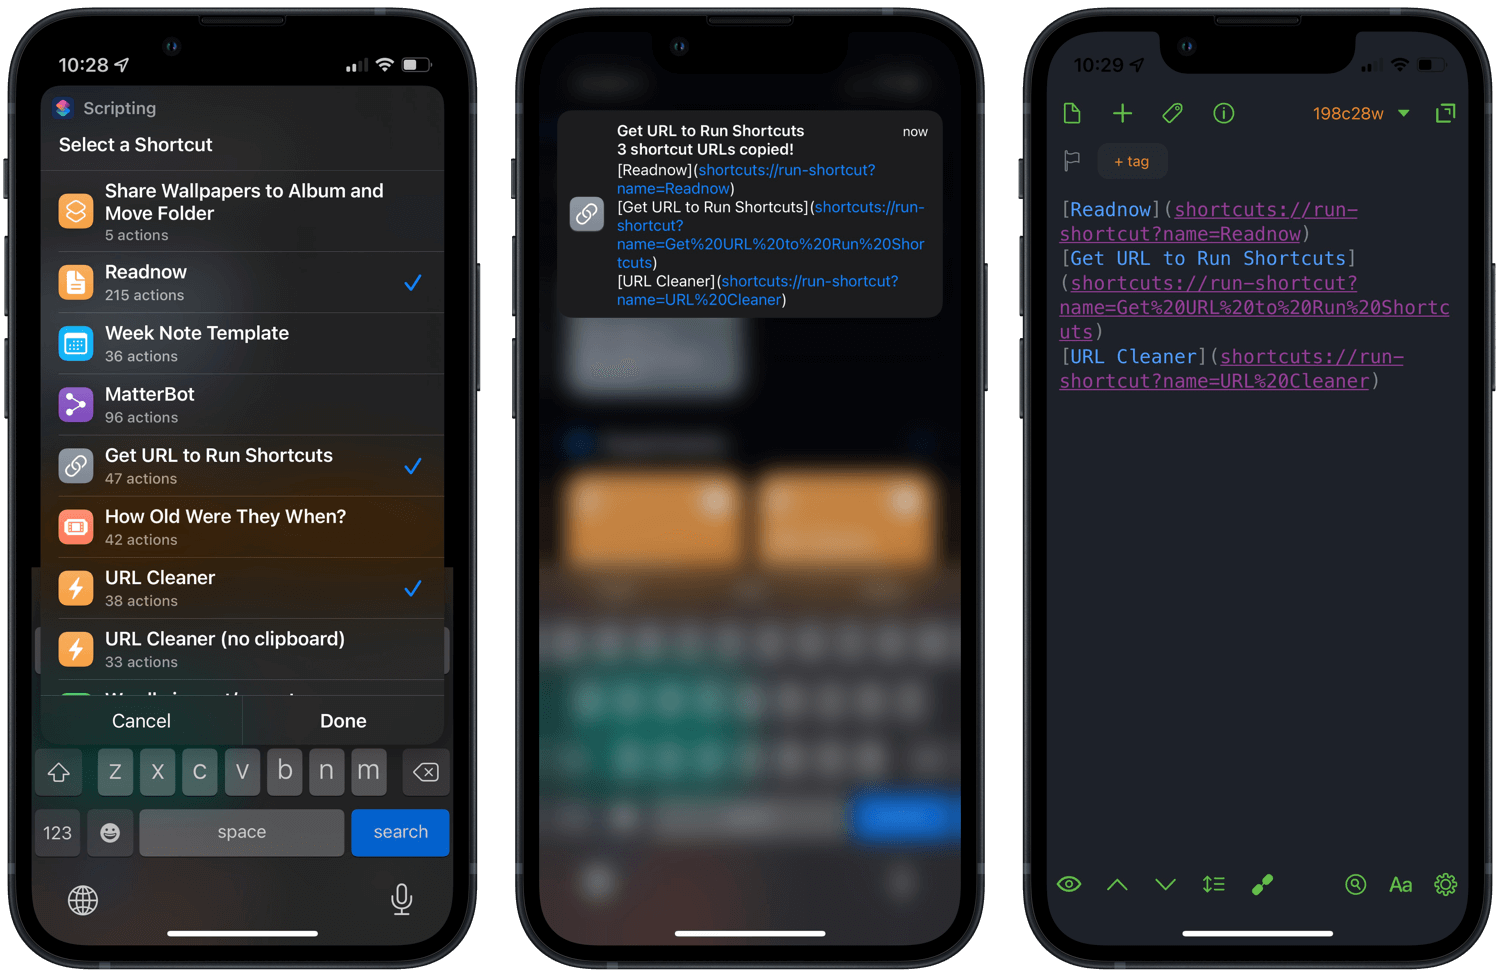
Now, we get into the nitty-gritty. How do you make these shortcut URLs that let you run them from anywhere you can paste text? Well, if you know percent-encoding, you could do it by hand. But why do by hand what you can automate? I’ve created a shortcut that lets you pick from all your shortcuts and makes its URL — in the style of your choosing — to put on your clipboard.
1️⃣ First, we get all the shortcuts installed and present a choice to either choose from a list of them all or search for a specific one.
2️⃣ The ‘Filter Files’ action lets us use the provided search text to filter out the list of shortcuts. It’s case-sensitive, though, so make sure you know what you’re looking for.
3️⃣ We haven’t actually selected any shortcut to make a URL from yet. The ‘shortcutsList’ variable contains the possible shortcuts to choose from — either all of them or only those that match the search term.
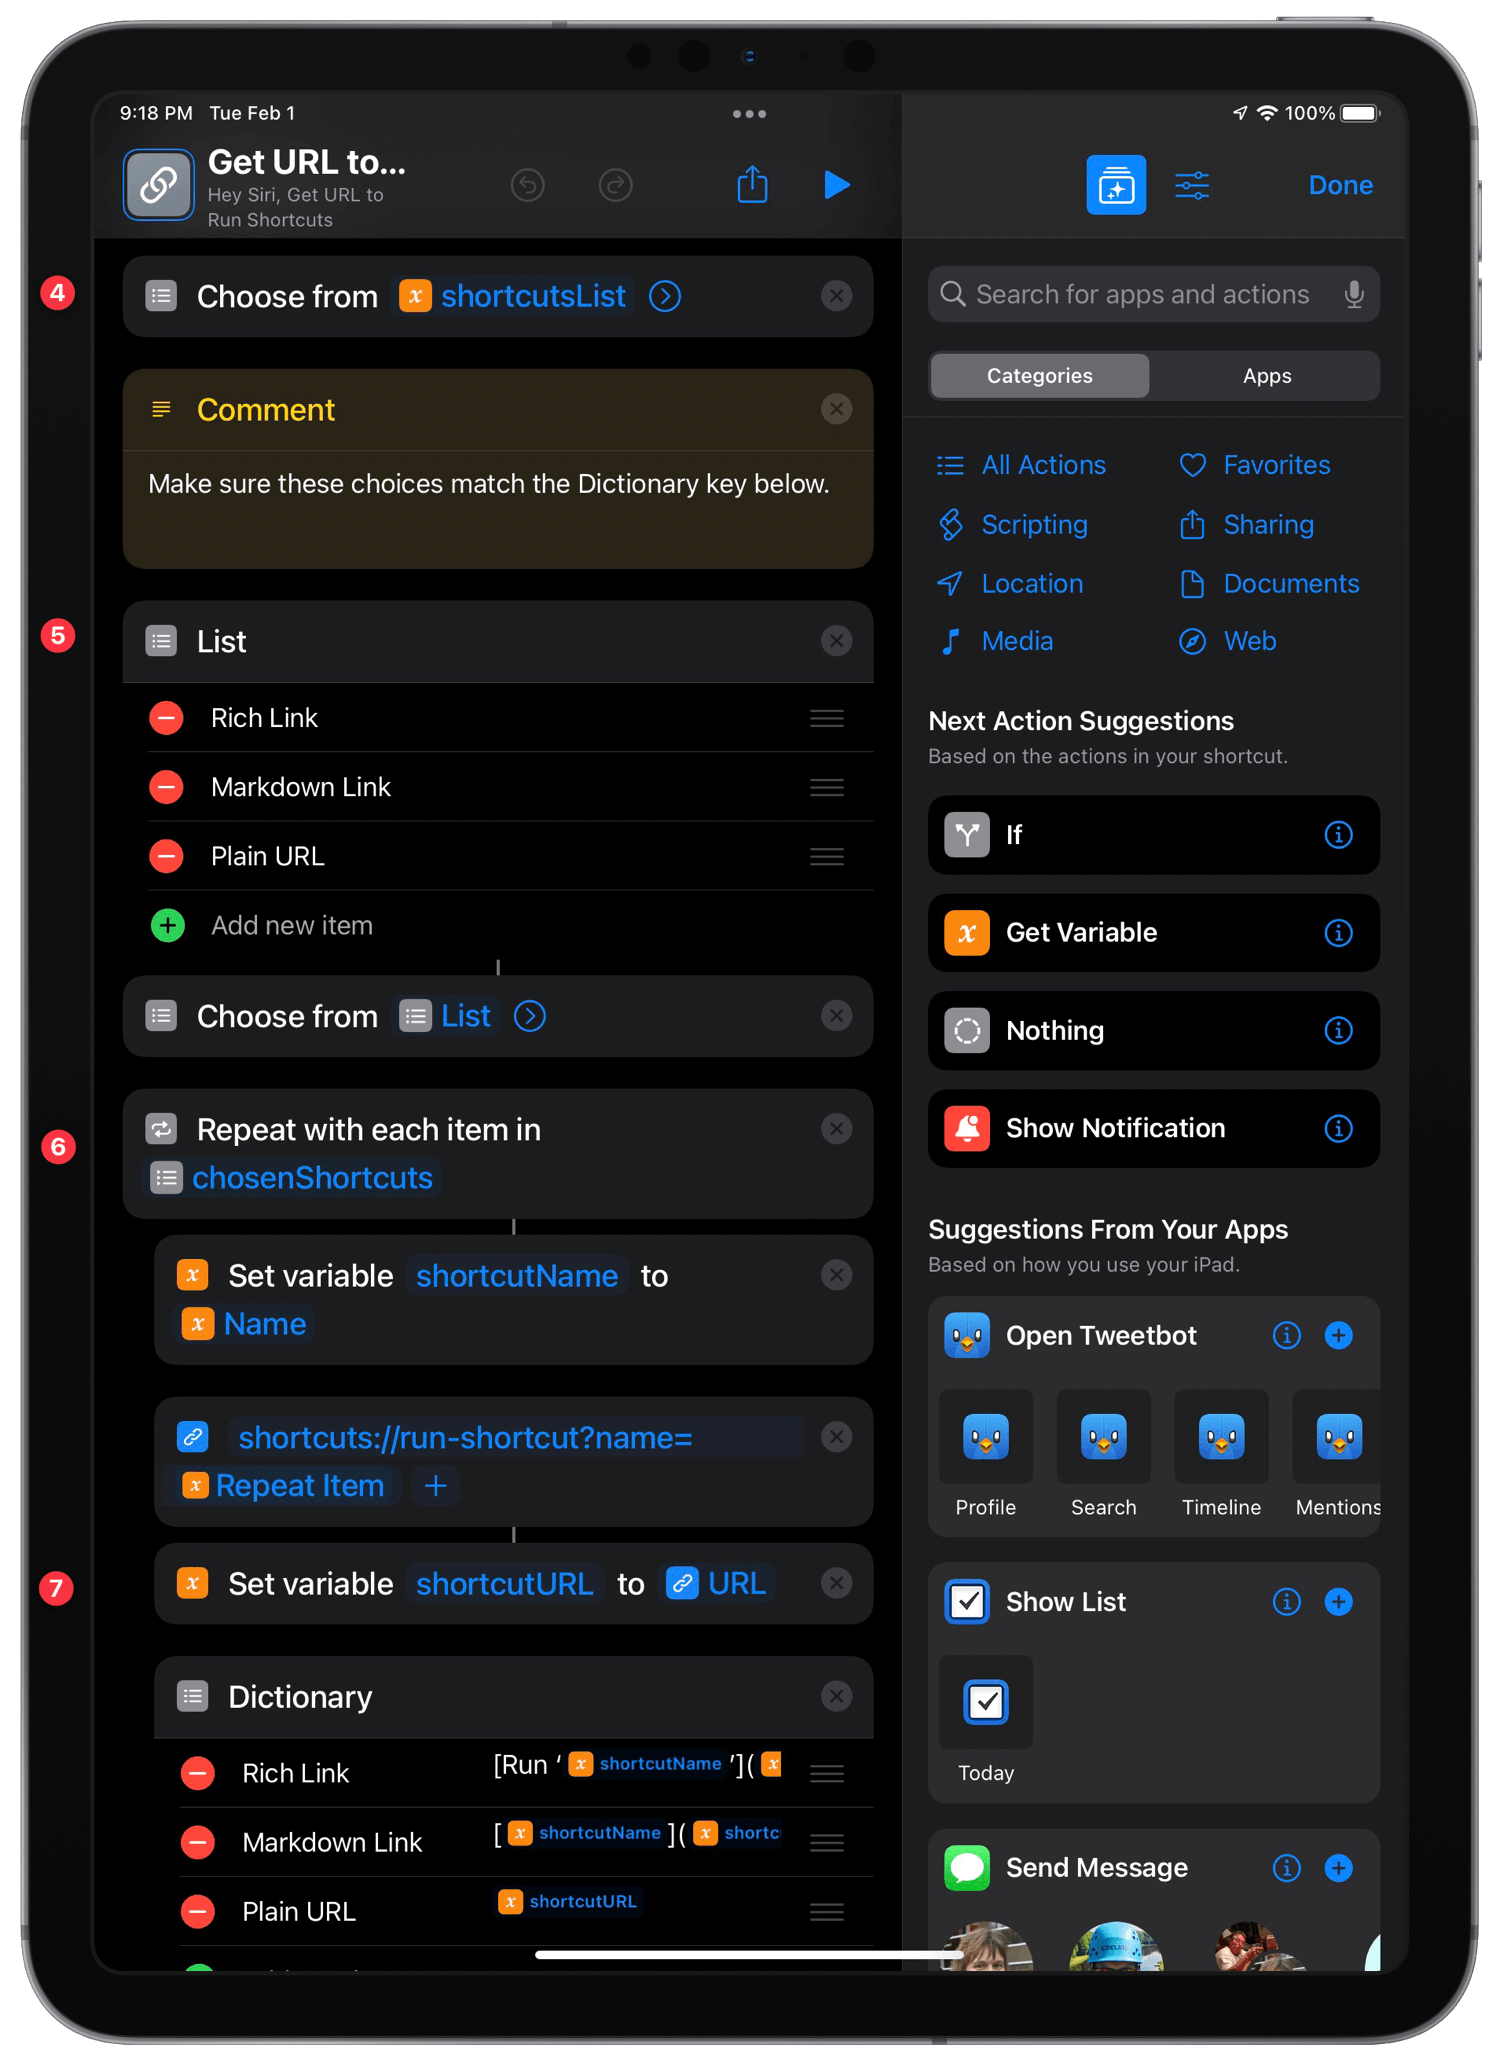
4️⃣ We take that variable containing the possible shortcuts and use another ‘Choose from List’ action to select one or more of them to continue with.
5️⃣ Here’s where things get interesting. I originally intended to do all the actions related to the text type using a dictionary. But since this shortcut supports working with multiple shortcuts at one, we need to know what the final text type will be before we start repeating through the selected shortcuts. Notice the comment that we must make sure this list matches the ‘Dictionary’ action below.
6️⃣ The ‘Repeat with Each’ action lets us transform each shortcut into its own run URL.
7️⃣ This variable is constructed by getting the shortcut’s name and tacking it onto the end of the standard URL for running a shortcut. Luckily, the ‘URL’ action takes care of percent-encoding the name portion without any additional action.
8️⃣ Here’s the ‘Dictionary’ action that lets us pair the text type we chose above to a format. The Rich Text key is paired with a Markdown-style link that will eventually show “Run ‘SHORTCUTNAME’” with the URL included as hypertext.
The Markdown and Plain URL keys are built from similar variables but won’t go through an additional transformation.
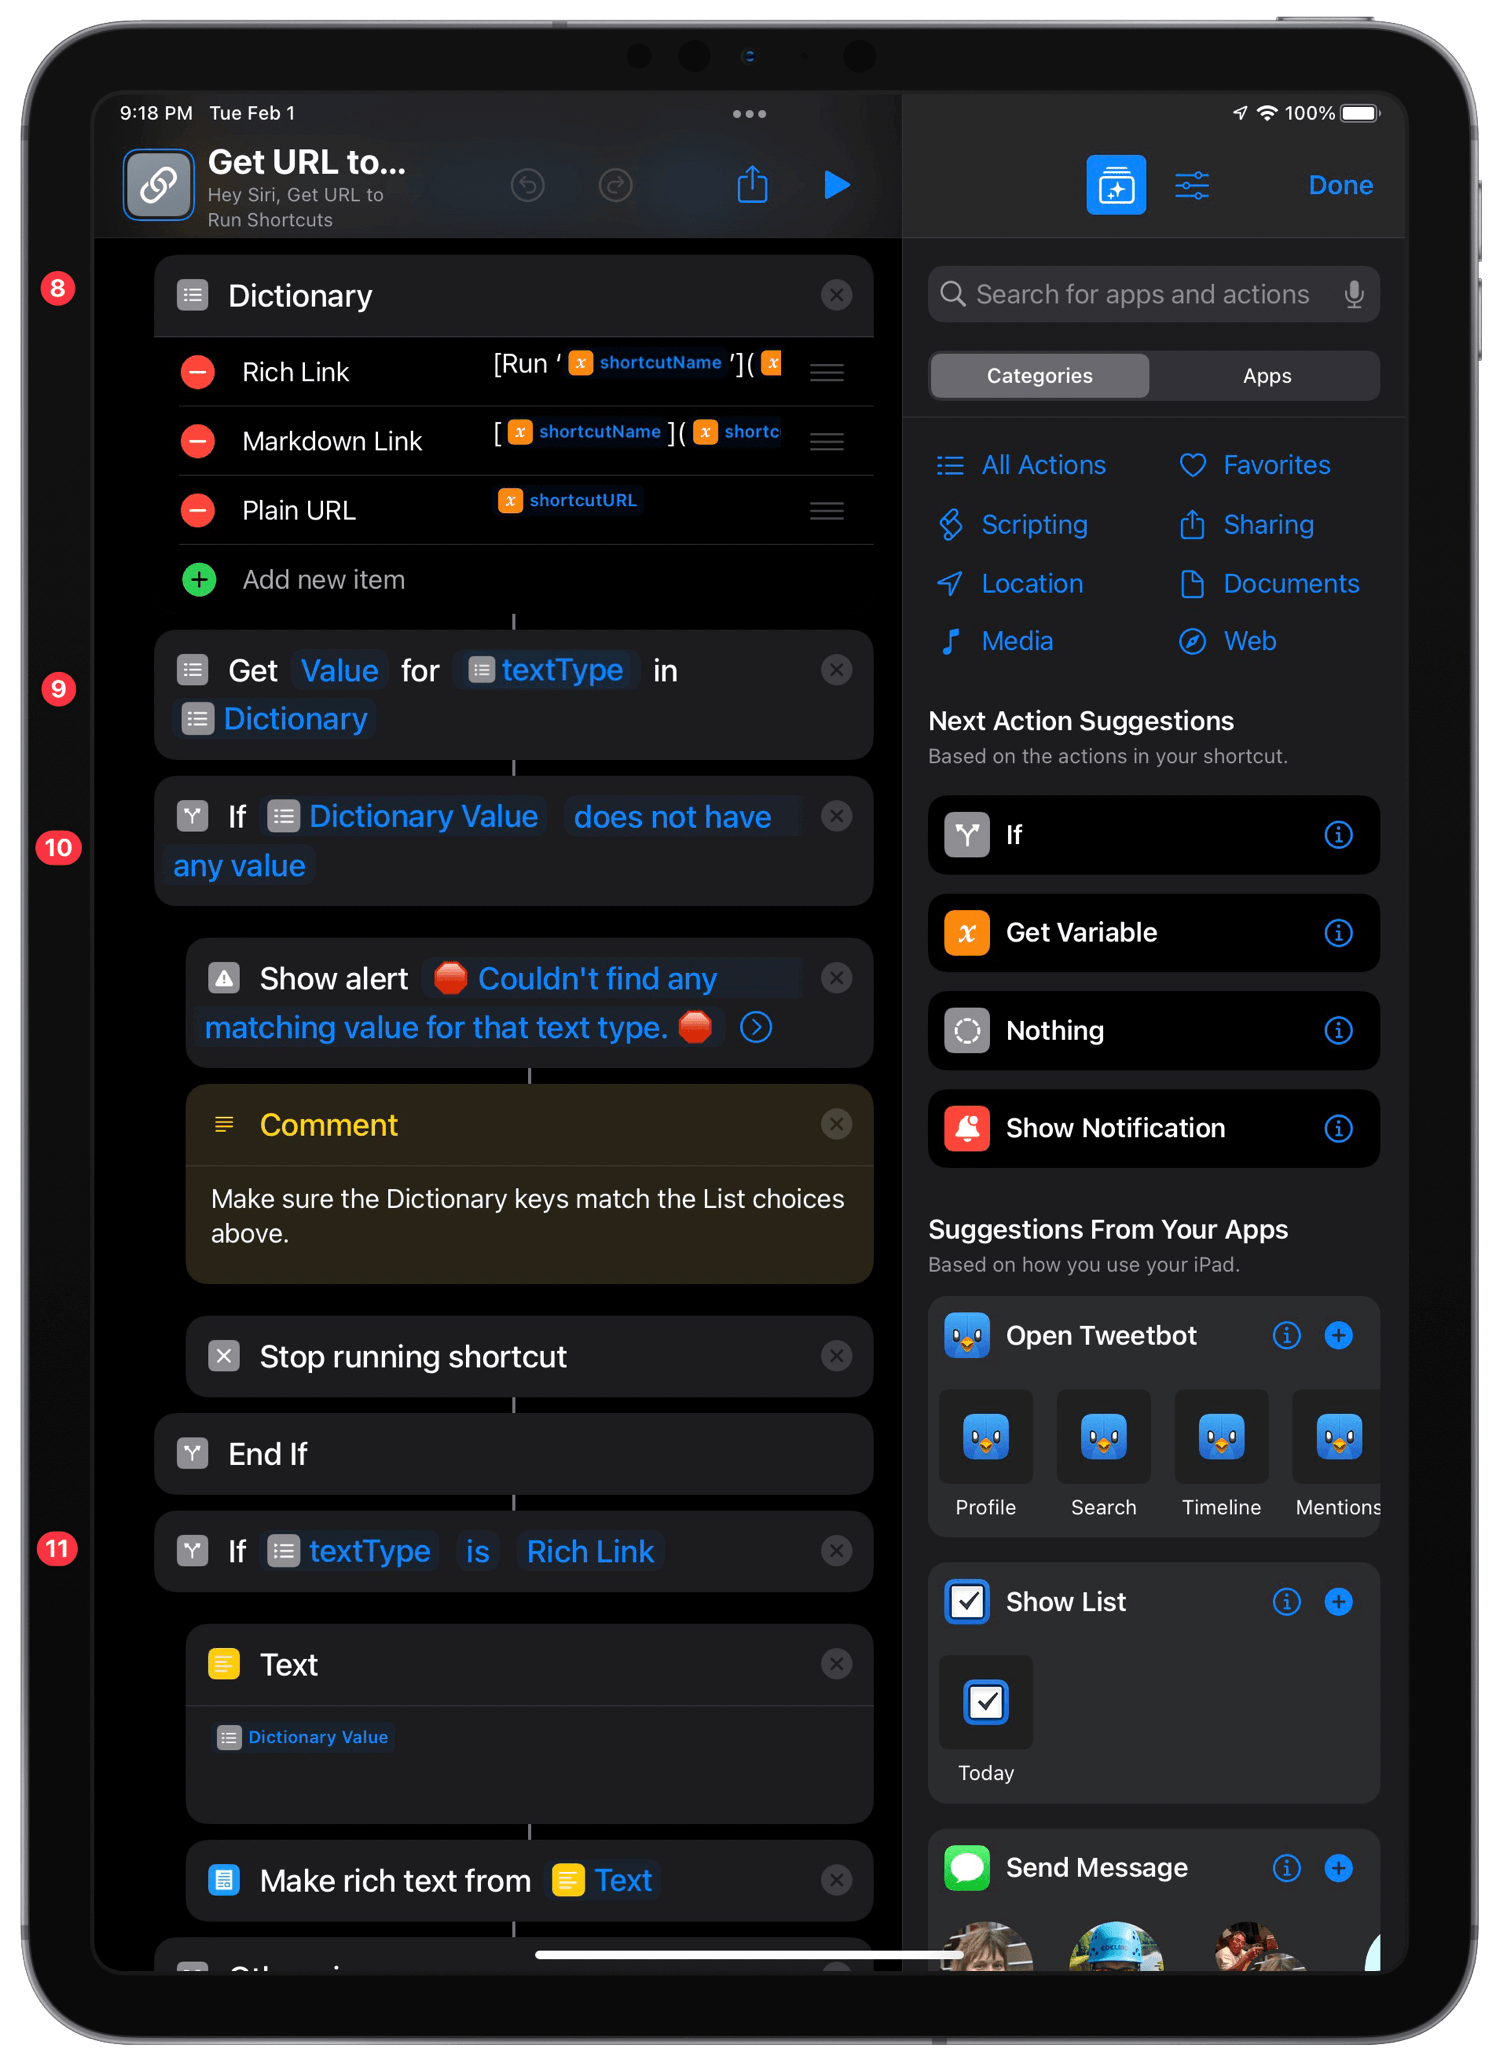
9️⃣ Now, we take the text type chosen back in the ‘Choose from List’ action and use it to get the value from the matching dictionary key. We’ll use this value later to build the final text.
🔟 A quick error check in case the ‘List’ and ‘Dictionary’ don’t match up.
1️⃣1️⃣ Since Rich Text needs a conversion, an ‘If’ action here lets us take the dictionary value, make sure the Markdown is plain text, and then convert it to rich text with a ‘Make Rich Text from Markdown’ action.
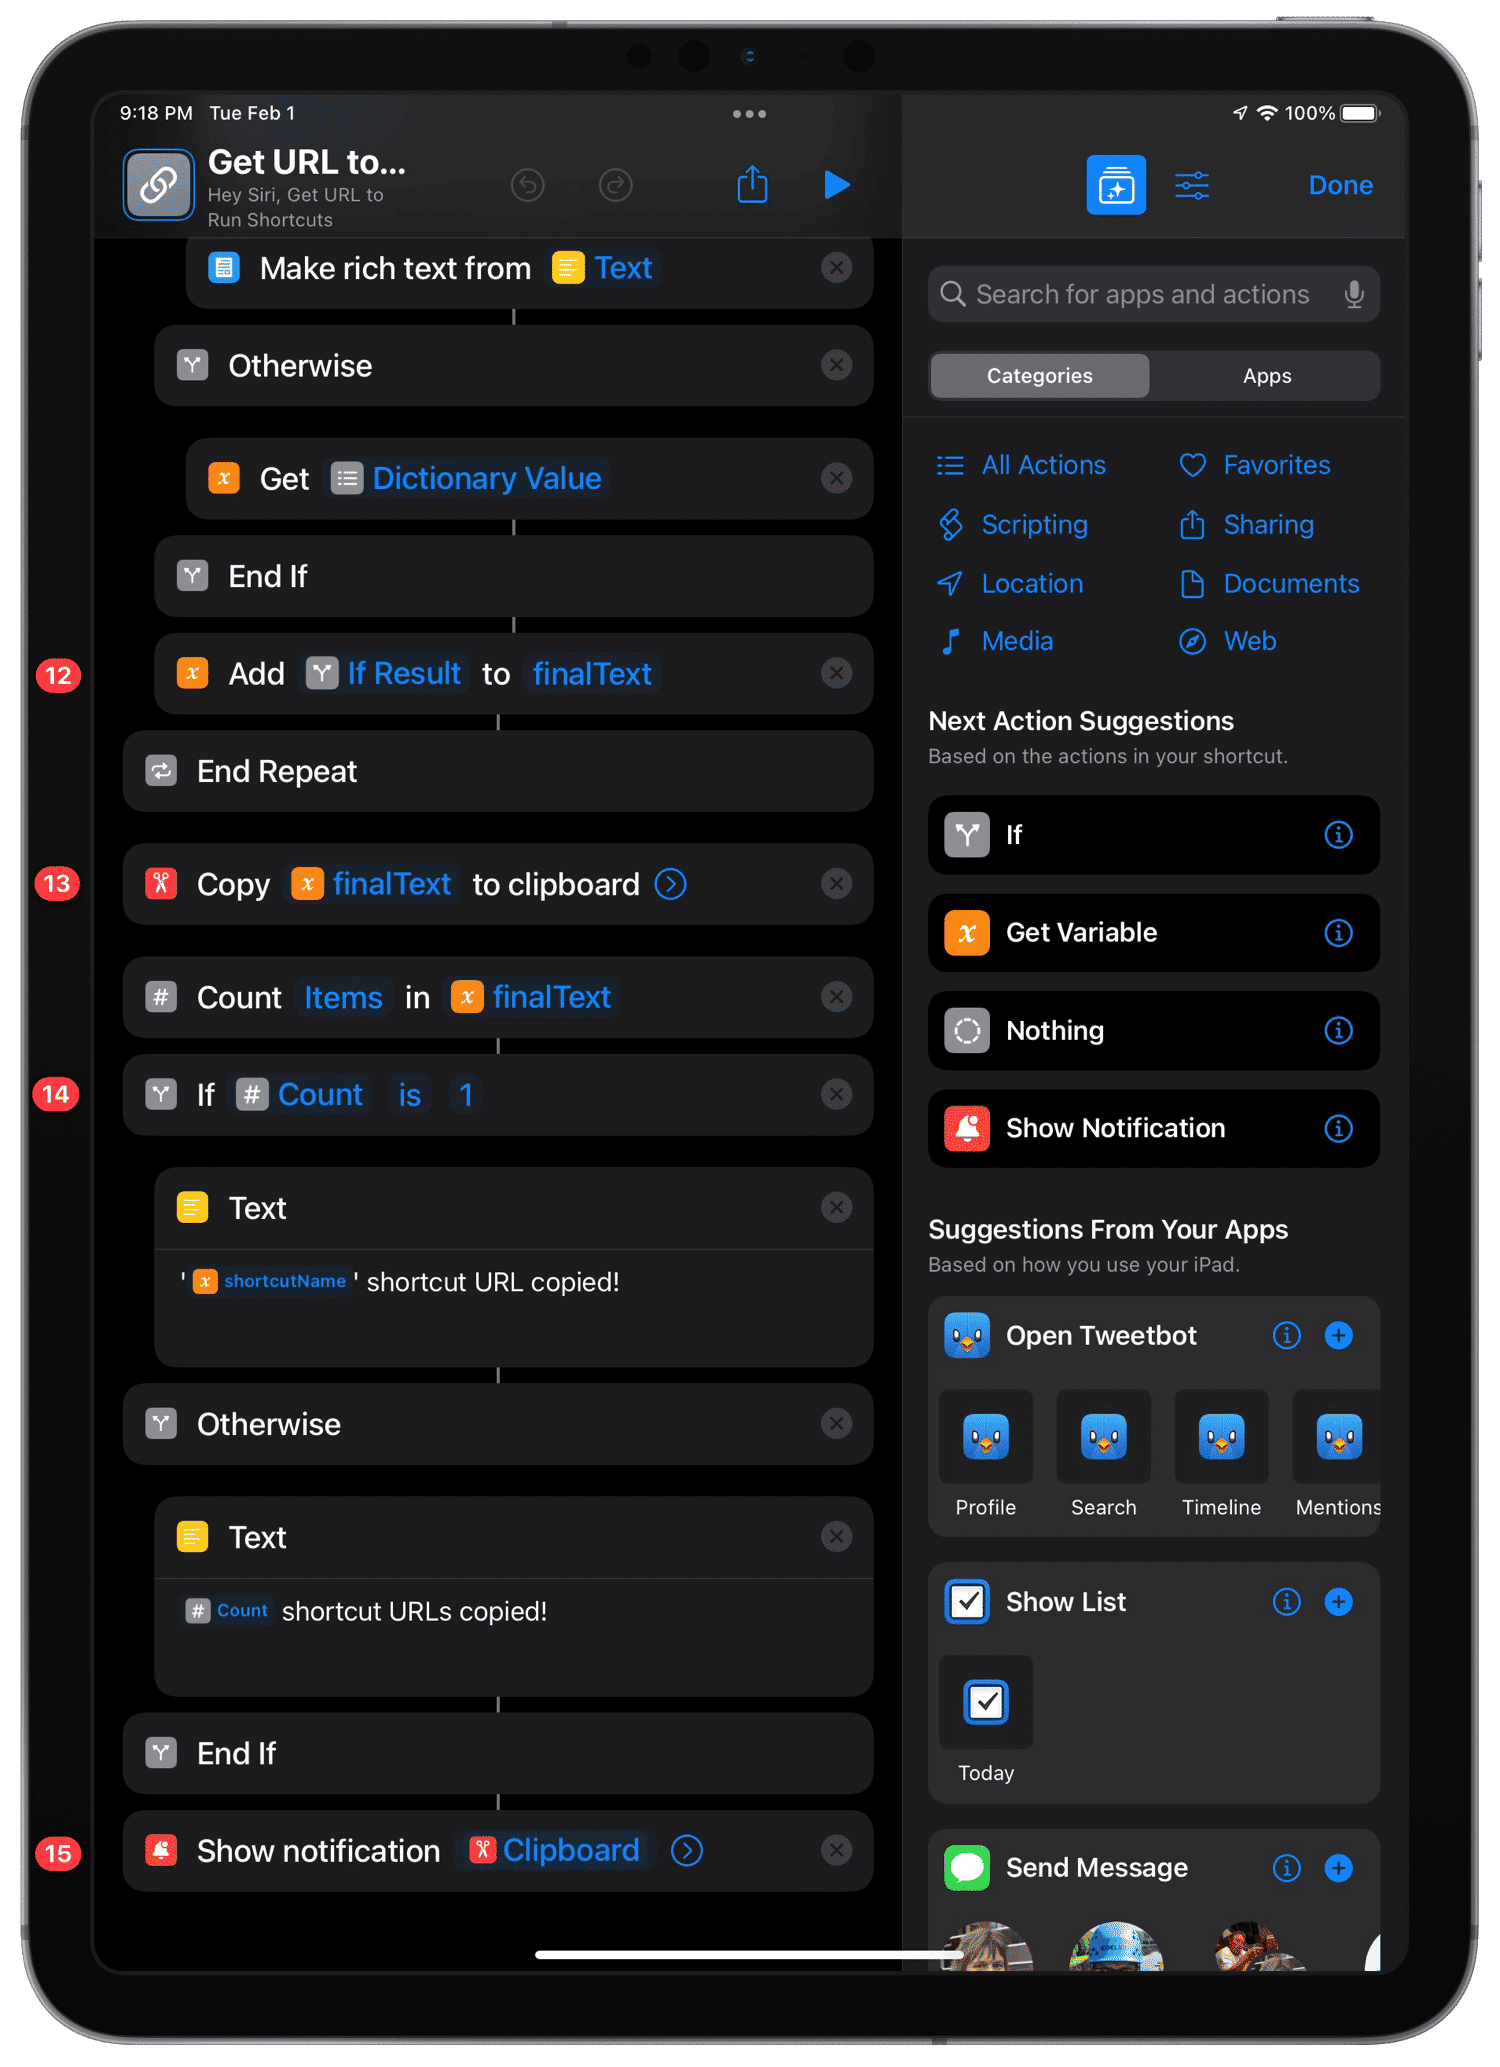
1️⃣2️⃣ Since the Markdown Link and Plain URL options need no conversion, we just get their value from the dictionary. Before repeating onto the following shortcut, we add the final text to a variable. Since it will add on each repeat, we’ll get a list with all the shortcut URLs in the end.
1️⃣3️⃣ The moment we’ve been waiting for! The complete list of shortcut URLs is copied to the clipboard, ready for pasting elsewhere to make our computing more contextual.
1️⃣4️⃣ This ‘If’ action lets us format the confirmation notification correctly based on the result for a ‘Count’ action, which determined the number of different links that were gotten.
1️⃣5️⃣ While I’d typically use a ‘Show Result’ action here to avoid spamming up the notification center, a ‘Show Notification’ action showing the clipboard means we can double-check the URL list after navigating to the pasting location.
I have dozens of shortcuts linked up and ready to run using this method. Using this URL scheme, I’m not limited to opening the Shortcuts app, taking a valuable Home Screen spot, or adding one to a widget. I can have the right shortcut — and therefore app, website, or workflow — at my fingertips precisely when I need it.
Platform compatibility note: Due to an unresolved bug in Shortcuts for Mac, the Rich Text option will not work correctly on macOS. However, you can still use the Markdown Link or Plain URL options there.
I thought it was just something that we lived with as Mac users. If you wanted to use the built-in photo picker to grab an image from your photo library, it was going to take a while. For as long as I can remember, the photo picker has taken a long time to load when choosing a file from the first-party interface.
Naively, I thought the introduction of the M1 chip might speed things up. Everything else was faster, so why not? But, no dice, it felt as sluggish as ever, even on my M1 Mac mini. Other files were instantly available to choose from, but something about Photos bogged things down. I put it out of mind.
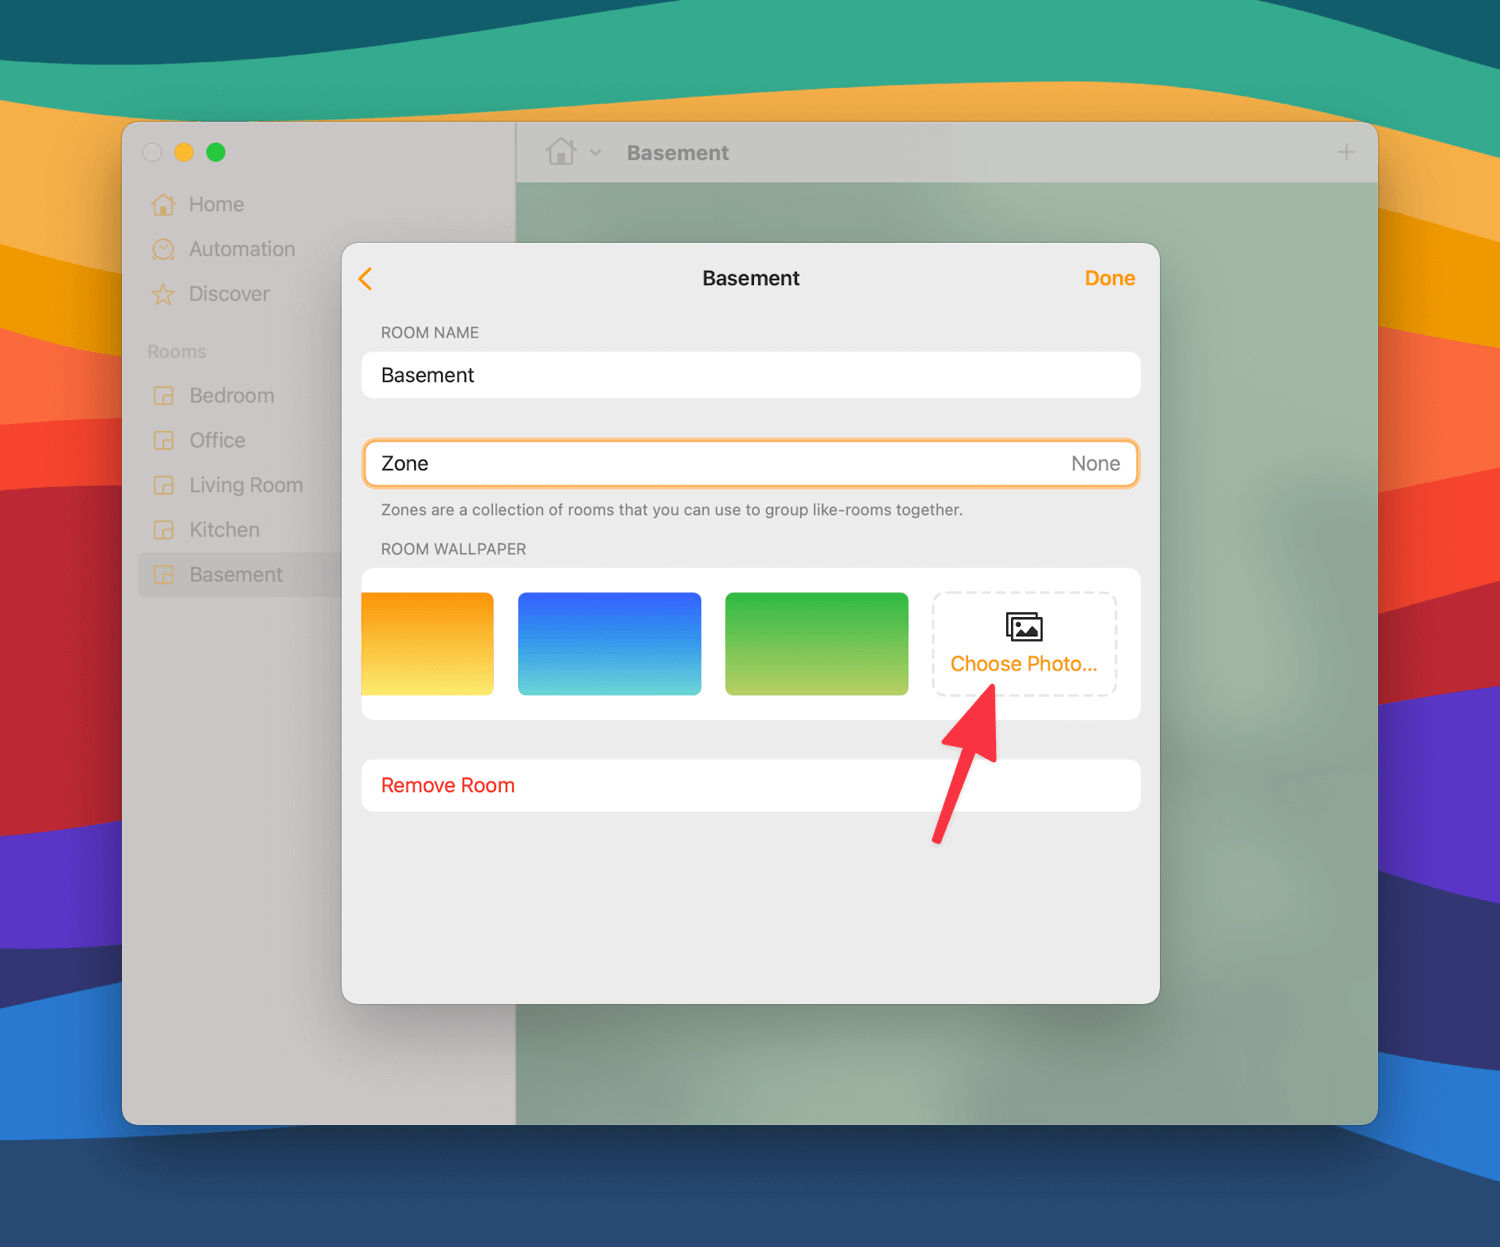
Enter the Home app. A little-known feature in that app is that you can customize the background image for specific rooms to your liking, either with a built-in color or one of your images. I was recently changing the backgrounds of my rooms to make them more recognizable, and since those images don’t sync between devices, I found myself in the Home app on the Mac to update them there. But when I went to the Home icon → Room Settings → Room Wallpaper → Choose Photo…, my jaw dropped. My photos were immediately available!
The reason is apparent; it’s using the iOS-style Photo Picker. My educated guess is that since the Home app is built using the Catalyst framework (basically an easy, but not the easiest, way to convert an iPad app to work on the Mac), it had shed the decades of cruft that slows down getting to those photos.
It’s possible that getting photos with this method has been lightning-quick since 2018 when macOS Mojave unveiled the ‘Sneak Peek’ which brought the News, Stocks, Voice Memos, and Home apps over from iOS using frameworks that later became known as Mac Catalyst. But I never had a reason to upload a photo to one of those apps before, so I wouldn’t know.
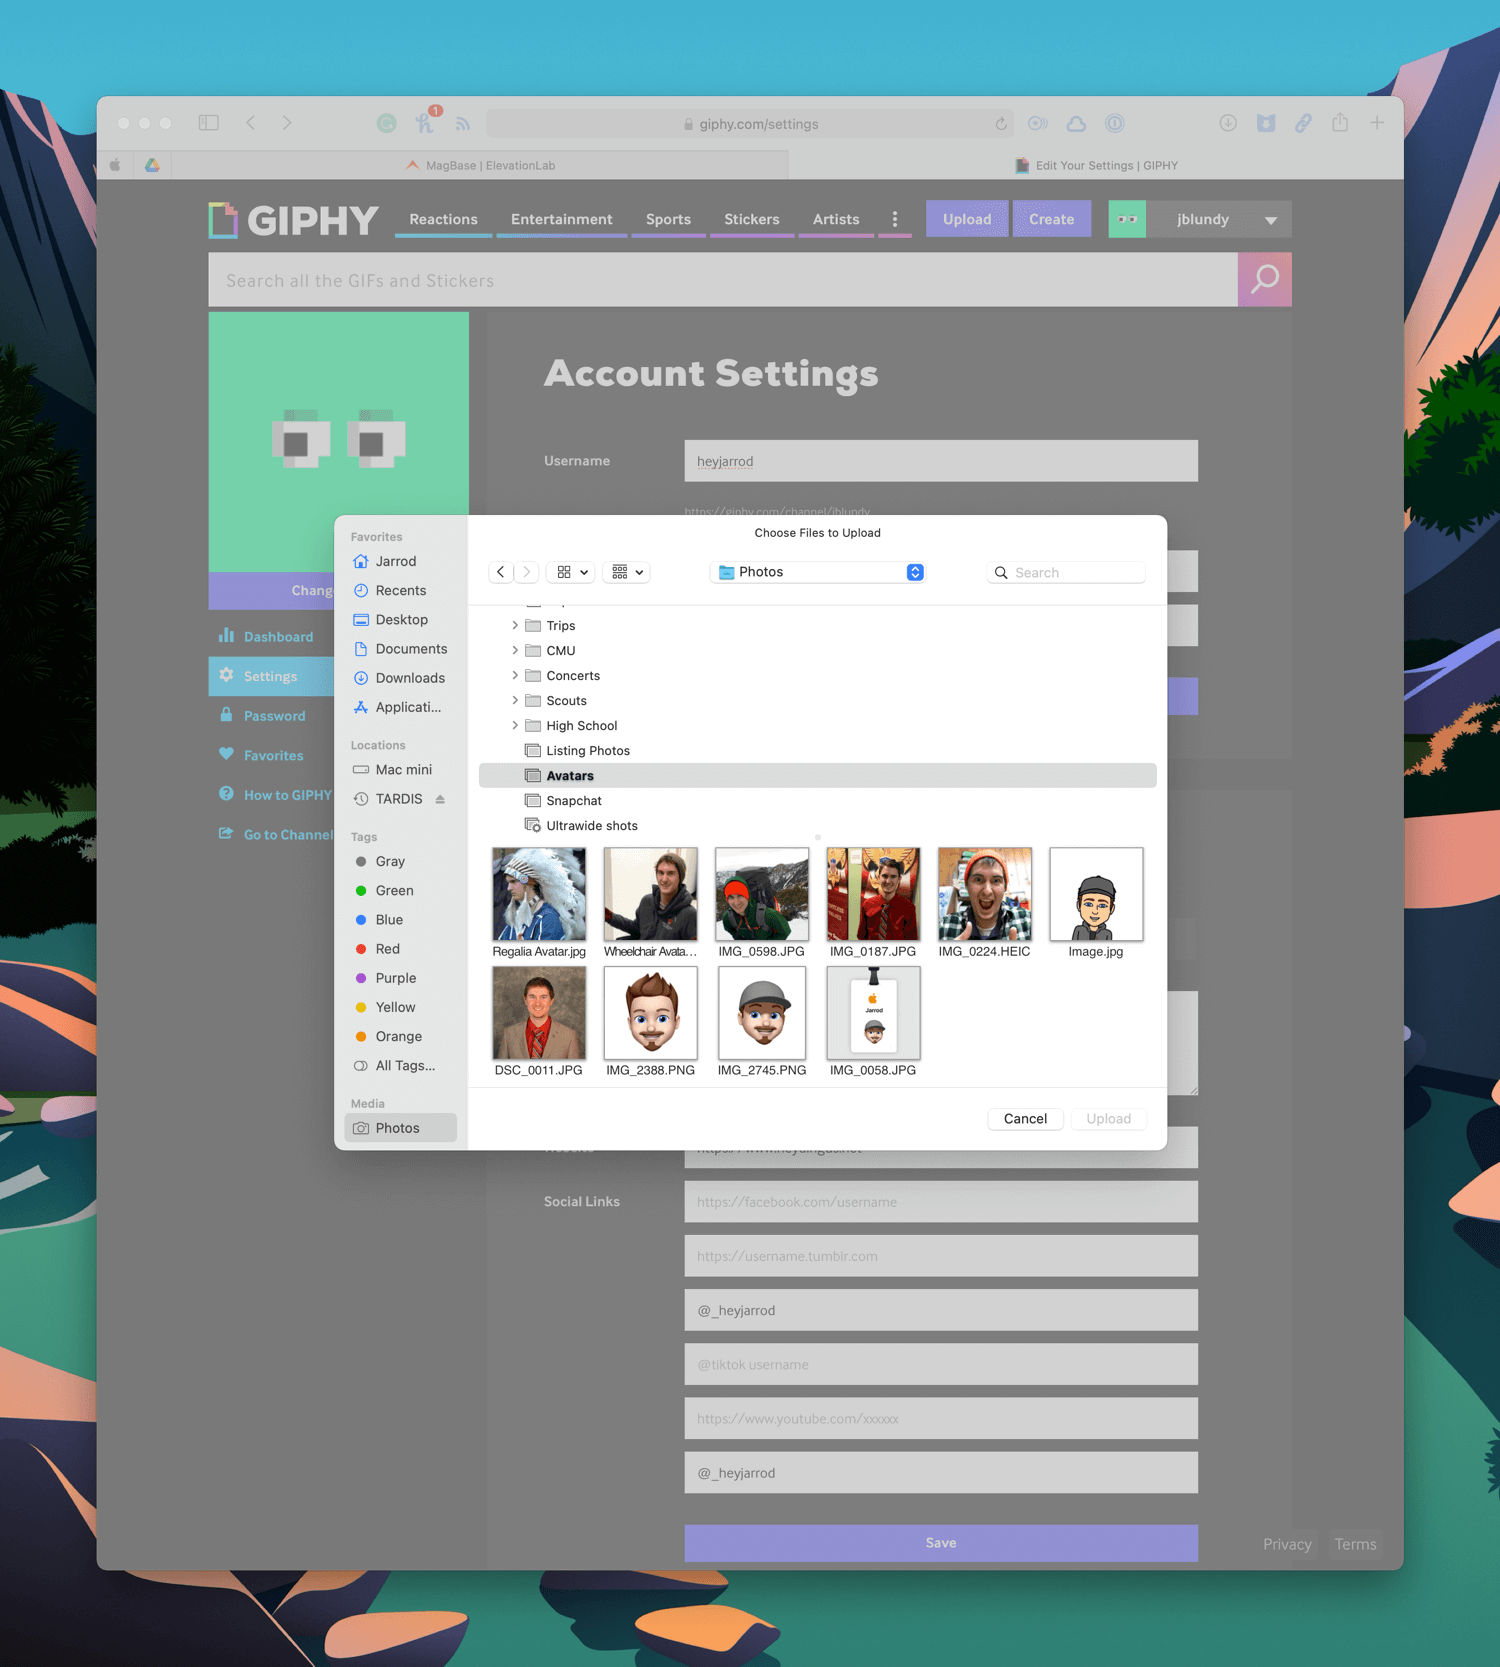
You can test it yourself. In Safari, try to upload a photo from a specific album by navigating through the ‘Choose File’ UI to the Photos location in the sidebar. Count how many seconds it takes before any photos appear. For me, with a 15,000+ item library, it takes about 7.5 seconds.
Almost 8 seconds from clicking to loaded images. ⌘
Next, go through the Home app. Less than 2 seconds for me, and often even quicker. That’s nearly 4x faster.
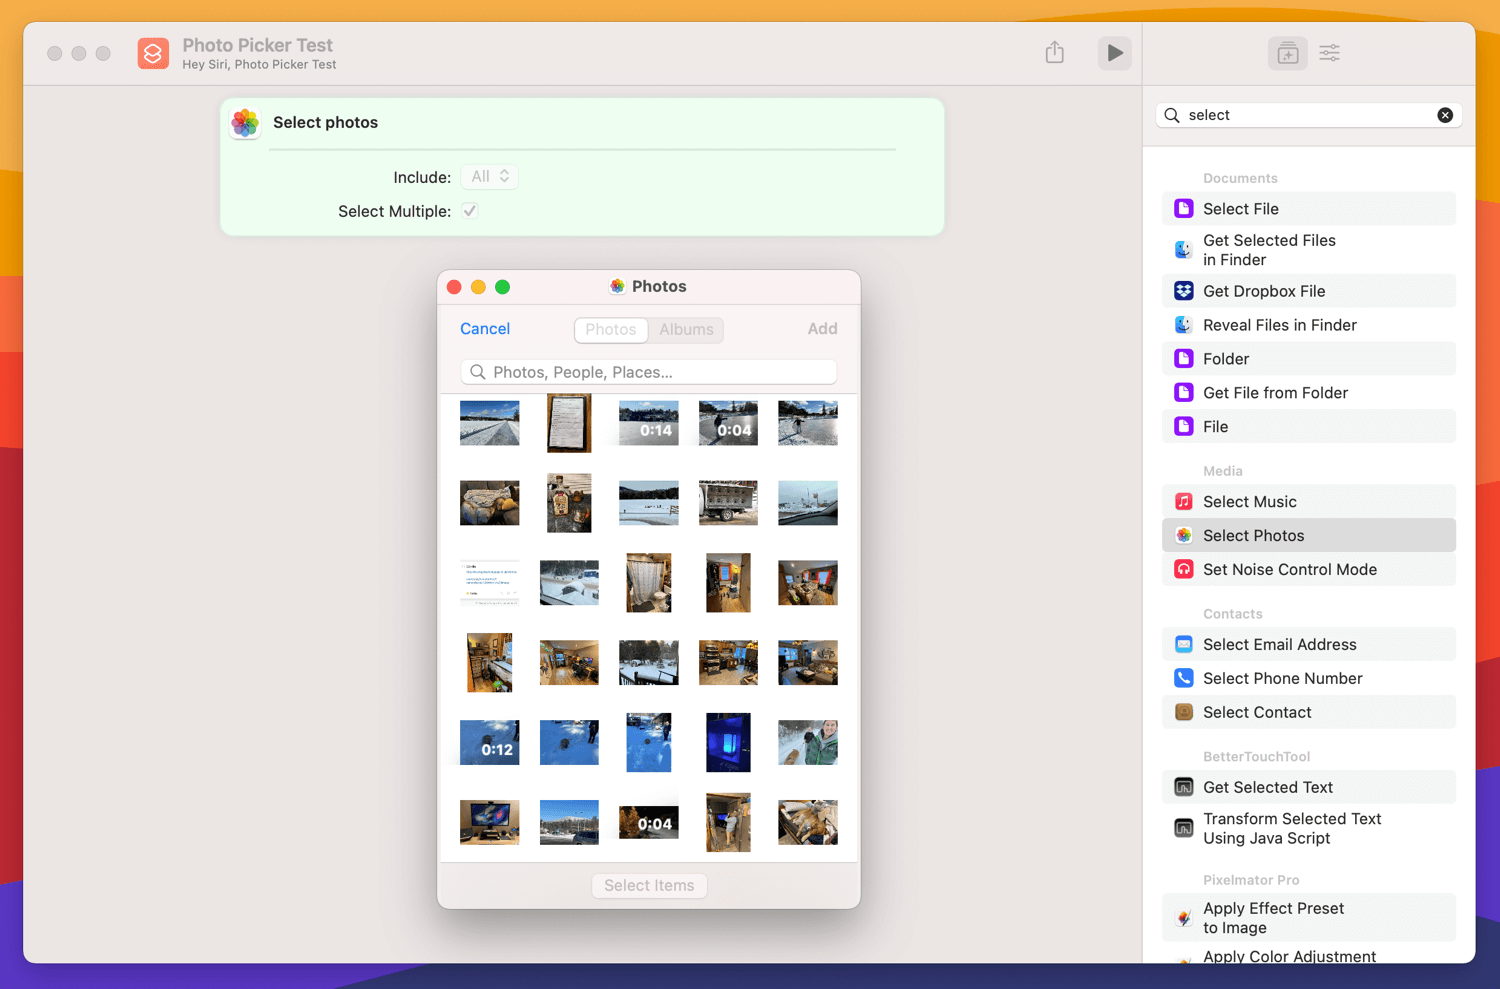
Let’s try one final test. Shortcuts is perhaps the most complicated app Apple has built with its newest cross-platform framework, SwiftUI. When pulling up the Photos Picker on macOS, my library loads, if anything, even faster than the Home app. It feels instant.
The fastest yet, Shortcuts loads photos almost instantly. ⌘
So, Apple, if you’re looking for some low-hanging fruit to pick to speed up what is supposed to be the “world’s fastest web browser”, I’d suggest digging down through that old file-choosing code and sprucing it up with something more modern.